This is an 800 Watt Solar Panel Wiring Diagram with a complete list of DIY parts needed and kits available.
Use this as a guide to fitting your RV, campervan, motorhome or caravan solar set up.
We’ve designed the diagram so it’s simple to understand for newbies to campervan electrics.
Campervan electrics can be dangerous so if you’re not sure what you’re doing or don’t feel confident to complete a solar set up yourself, seek the help of an electrician.
This post is one part in our DIY campervan solar system series which includes 12v solar panel wiring diagrams for other sizes too.
Need help & advice with your electrical setup?
Join Our Facebook Support Group
When you click on links to various merchants on this site and make a purchase, this can result in this site earning a commission. As Amazon Associates, we earn from qualifying purchases. For more info, please check our disclosure page.
What Can A 800 Watt Solar Panel Power?
How much a 800 watt solar panel can power depends on a number of variables including the time of year, the weather, your location and the type of charge controller you install.
But here’s an idea of what you might expect to get on an average day of 4 peak hours of sun with an MPPT controller.
800 watt of solar panels will provide about 240 – 256 amp hours per day.
That’s about enough to run:
- an inverter for a TV, charging laptops and a coffee maker,
- a large, energy efficient fridge,
- recharge a plenty of small devices on a USB like phones, tablets and kindles,
- run your roof vent during day and night to stop condensation,
- keep a composting toilet’s fan running 24/7,
- run a diesel heater during winter and
- switch on LED lights inside the campervan.
Bear in mind this is based on an average sun light day.
An 800w systems gives you a good few days in reserve, depending on your usage and without other sources of recharging.
If you intend living in a camper in the winter months, 800w is complete luxury!
You may not be able to replenish the batteries everyday so consider what level of contingency you need to avoid cycling the batteries more than necessary.
Who Will Suit A 800 Watt Solar Panel System?
An 800 watt solar panel set up is a good size for 4 people with a large RV or camper with roof space for the panels.
An 800w system will comfortably support an entire campervan electrical system 100% off solar, year round. No need for shore power or driving.
Though you’ll always need to monitor usage and battery levels, with a solar system this size, you’ll comfortably have enough power to meet the needs of 4 people.
If your ideal solar system is even larger than 800w, you going to need a support vehicle just to carry your panels around!
You could consider extra juice from a portable solar panel system but that’s for another post.
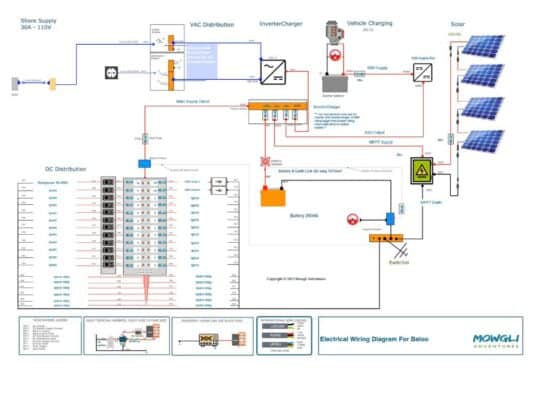
800 Watt Solar Panel Wiring Diagrams
There’s a few points worth clarifying about these wiring diagrams before you get into the detail:
- The wiring diagrams shows only the supply side installation of a 800 watt solar panel system. They goes as far as charging the battery. For the load side detail, check out our post on campervan wiring.
- They exclude charging the battery from shore power or the alternator.
- This set up needs a minimum of 300 – 360ah of battery so the diagrams have 2 x 12v batteries wired in parallel.
- For more information on how to fit the batteries, see our post on campervan batteries.
- The diagrams also excludes wiring an inverter – it sits on the load side of the battery.
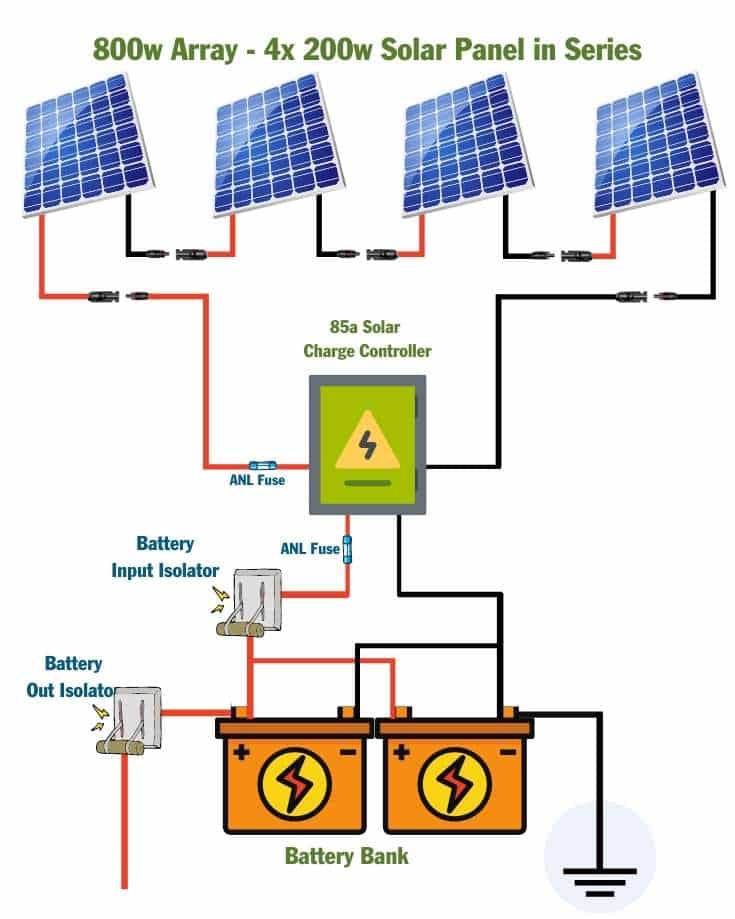
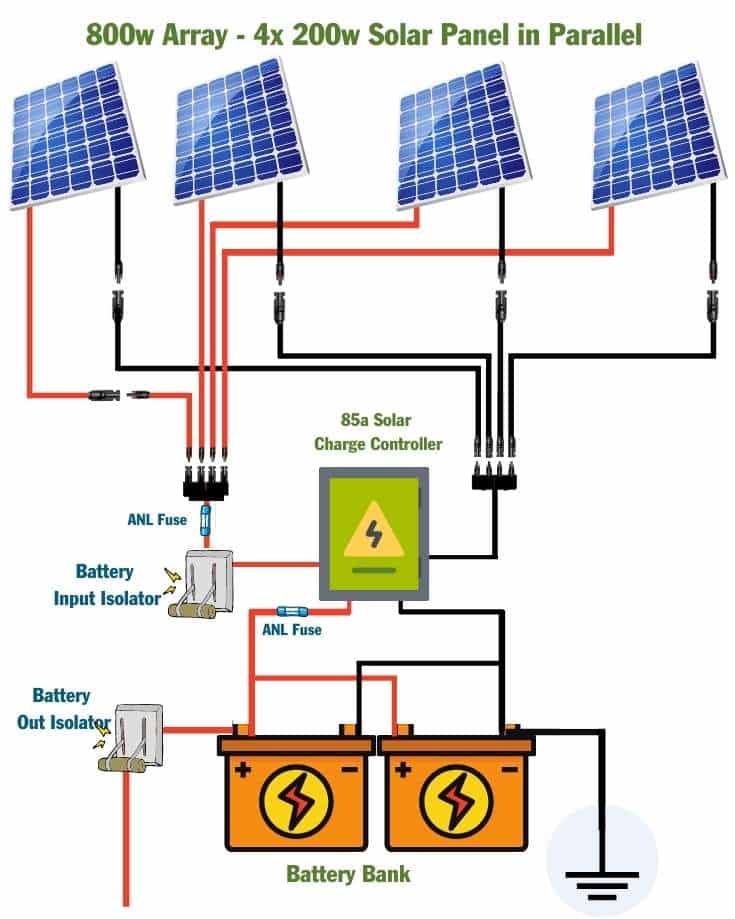
- The first 2 diagrams below show an 800 watt solar panel wiring diagram wired in parallel and series with 4 x 200w panel configurations.
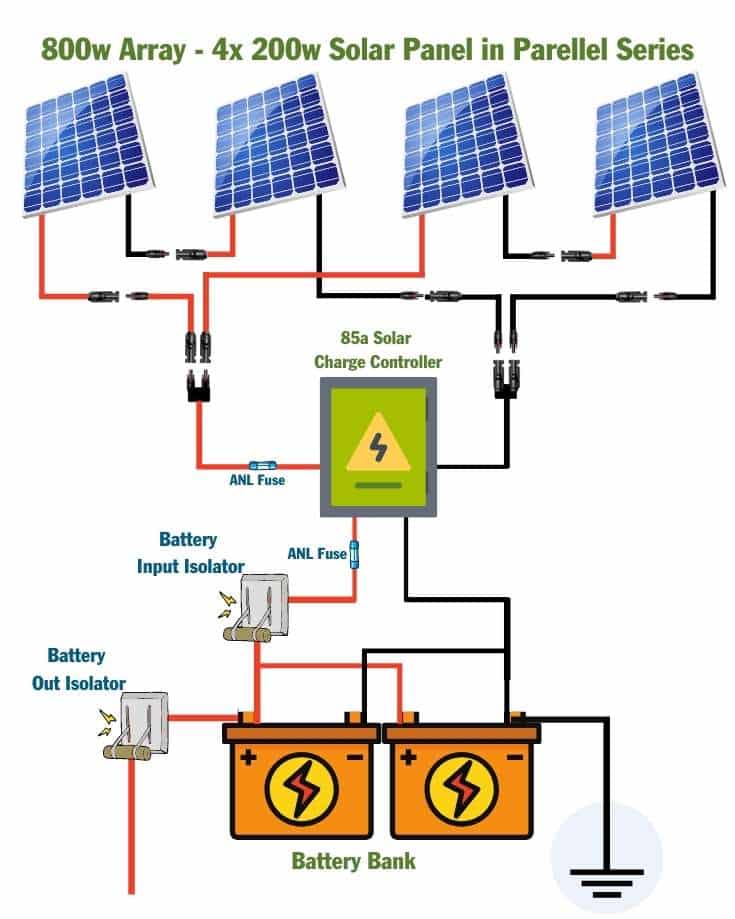
- The 3rd diagram shows an 800 watt setup wired in a combination of parallel and series with 8 x 100w panel configurations.
- For a full breakdown of the detail, comparisons and even an interactive calculator for mixed panels, check out our complete guide to wiring your solar panels in series or parallel.
800 Watt Solar Panel Wiring Diagram in Series with 4 x 200w panels
800 Watt Solar Panel Wiring Diagram in Parallel with 4 x 200w panels
800 Watt Solar Panel Wiring Diagram in Series & Parallel with 4 x 200w panels
Automatically Create Your Bespoke RV Wiring Diagram
Includes 110v & 240v, solar, B2B, batteries, inverters, 12v, 24v & 48v systems, wire gauges in AWG & mm² & much more!
DIY 800 Watt Solar Panel Parts List
This is a list of every component you need for a 400 watt solar panel set up on your RV or campervan.
Solar Panels
Solar panels harvest sunlight, converting it to electricity.
There are different types of solar panels but we recommend using monocrystalline as they’re the most efficient.
8 x 100w Rigid Monocrystalline

Enter coupon code MowgliAdventures for 10% off at Renogy.com
4 x 200w Rigid Monocrystalline
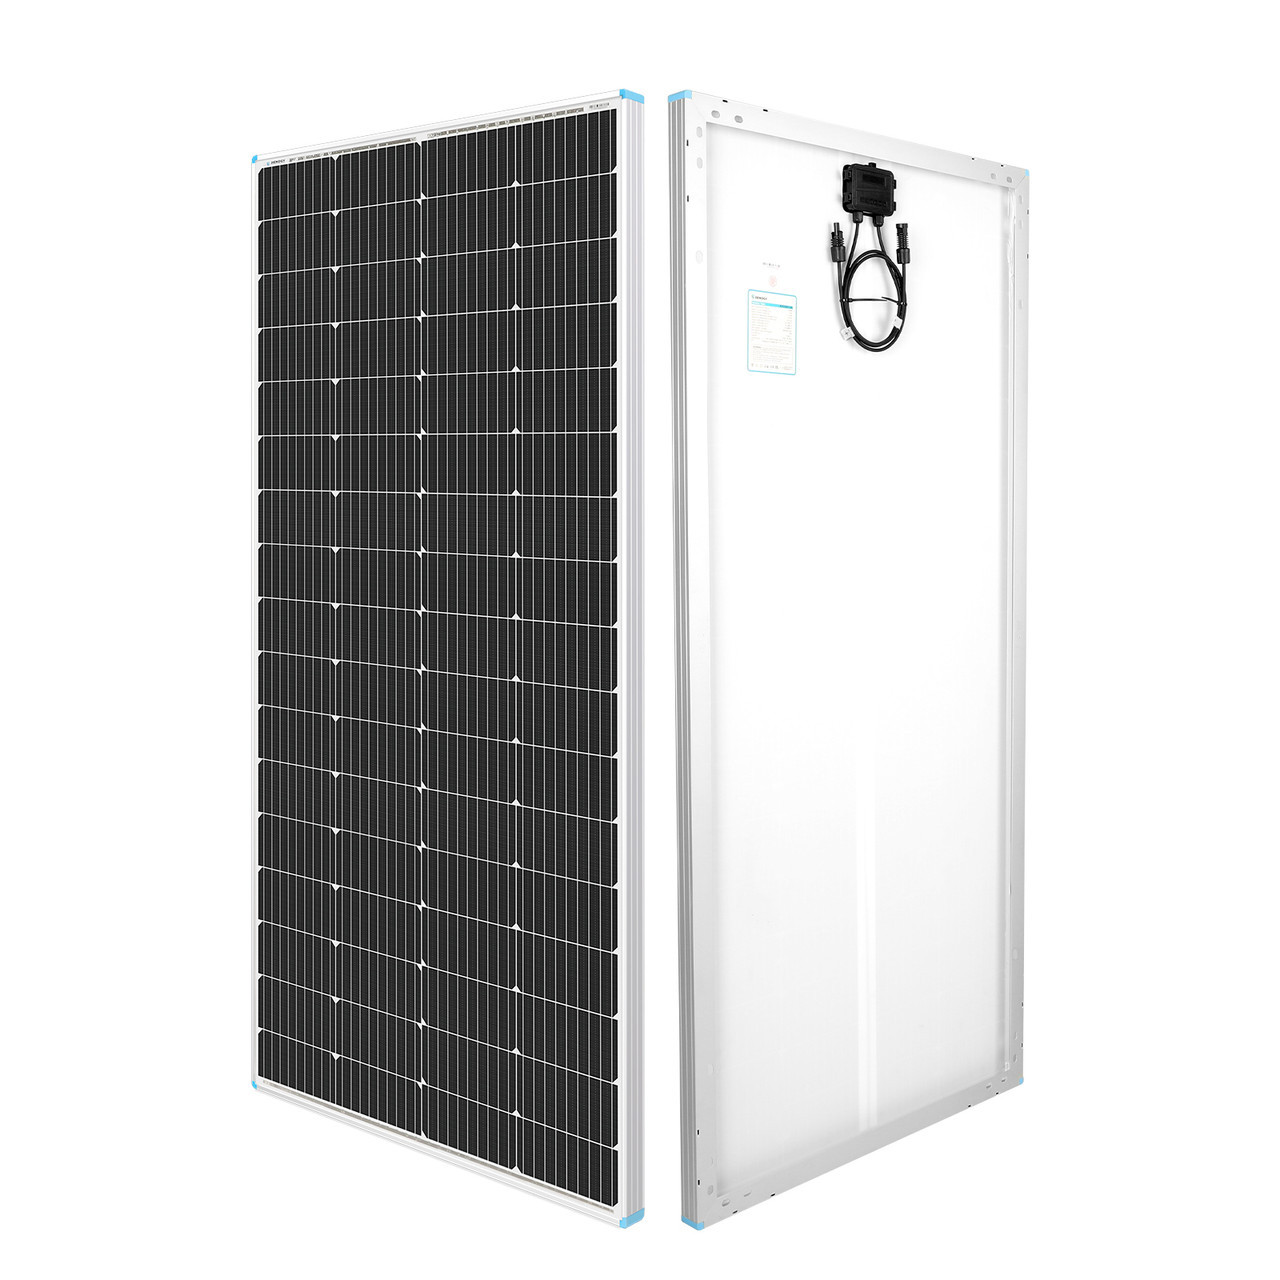
Enter coupon code MowgliAdventures for 10% off at Renogy.com
Solar Charge Controller
Solar charge controllers regulate the current from the panels to a safe level so it can charge the batteries.
A 60-100A controller is needed for an 800 watt solar panel set up, depending on the number of panels and how they’re wired.
Use our solar charge controller calculator to double check the correct size for your set up.
At this size and investment, we recommend installing the MPPT controller.
A PWM controller is a fraction of the cost of a MPPT but the considerable loss of harvested energy would offset the cost of the larger system.

Enter coupon code MowgliAdventures for 10% off at Renogy.com
Check out our complete guide on how to select the right solar charge controller for your setup.
And if you need to know what size to get, use our interactive solar charge controller calculator.
How Many Batteries Do I Need For A 800w Solar Panel?
How large a battery bank you need depends largely on how much power you use and even when you use it. Use our solar battery bank calculator to work out how much energy you use each day, and what size battery bank you need to meet that level.
That said, a battery bank stores the power generated from your solar panels. If you don’t have a large enough battery bank, you could potentially waste the energy you’ve worked so hard to harvest.
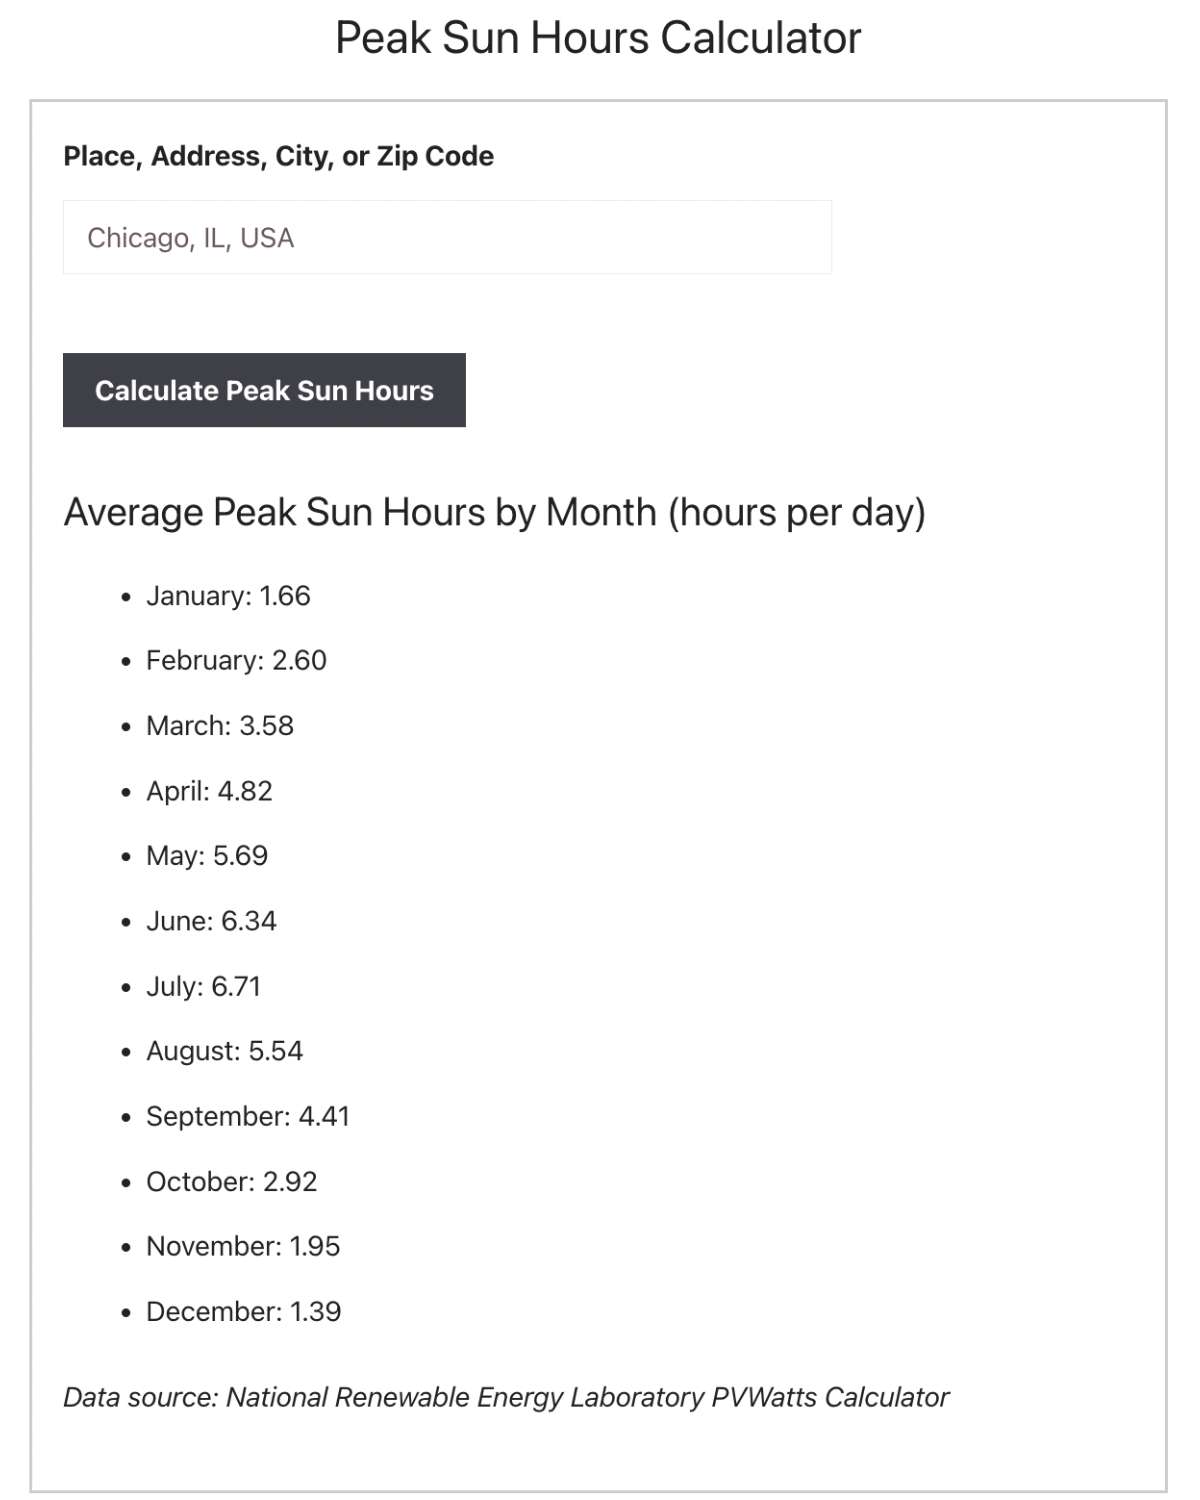
A 800W solar panel setup could generate as much as 37ah of power per peak hour. However, how many peak hours of sun you can reasonably expect to receive differs by location, time of year and the weather.
In the US, you’re unlikely to get much more than 5 or 6 hours of peak sun conditions in mid summer. Therefore, an 800w solar panel system will generate a maximum of 330-400ah per day.
Although you may use some of that energy as you generate it, it’s more simple and prudent to err on the side of caution. So the minimum size battery bank you need for a 800w set up is 400ah – more if you don’t install Lithiums.
You may have more than one charging source or want some contingency so you can of course increase that size as much as you like.
There are 3 types of campervan batteries. We recommend choosing Gel or Lithium-ion, though AGM batteries are also popular.
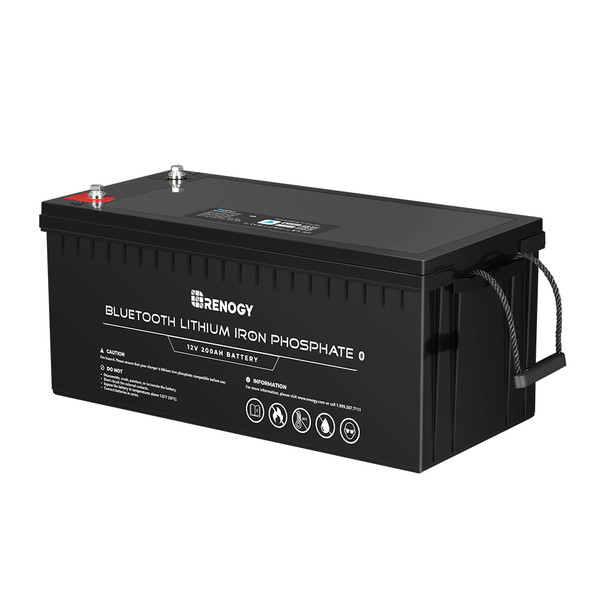
Enter coupon code MowgliAdventures for 10% off at Renogy.com
If space isn’t a major issue, you’ll never be unhappy of a bigger battery so always go up a size rather than down.
Fittings

These allow you to mount the solar panel to your van without needing to drill holes in the roof. You need one pack for every panel.
Always resist any urge to breach your roof.
MC4 Connectors

Solar panels come with about a metre of cable so not normally long enough to reach your battery bank.
MC4 connectors are rated to cope with the current and are weather proof so you can extend the cable.
For wiring 2 panels in parallel, you need 1 single pair of MC4 cable connectors and a pair of T branch MC4 connectors.
For wiring 2 or 4 panels in series, you need 1 single pair of MC4 cable connectors.
For wiring 4 panels in parallel, you need 1 pair of 4 to 1 solar branch connectors and 1 single pair of MC4 cable connectors.
Solar Panel Cable
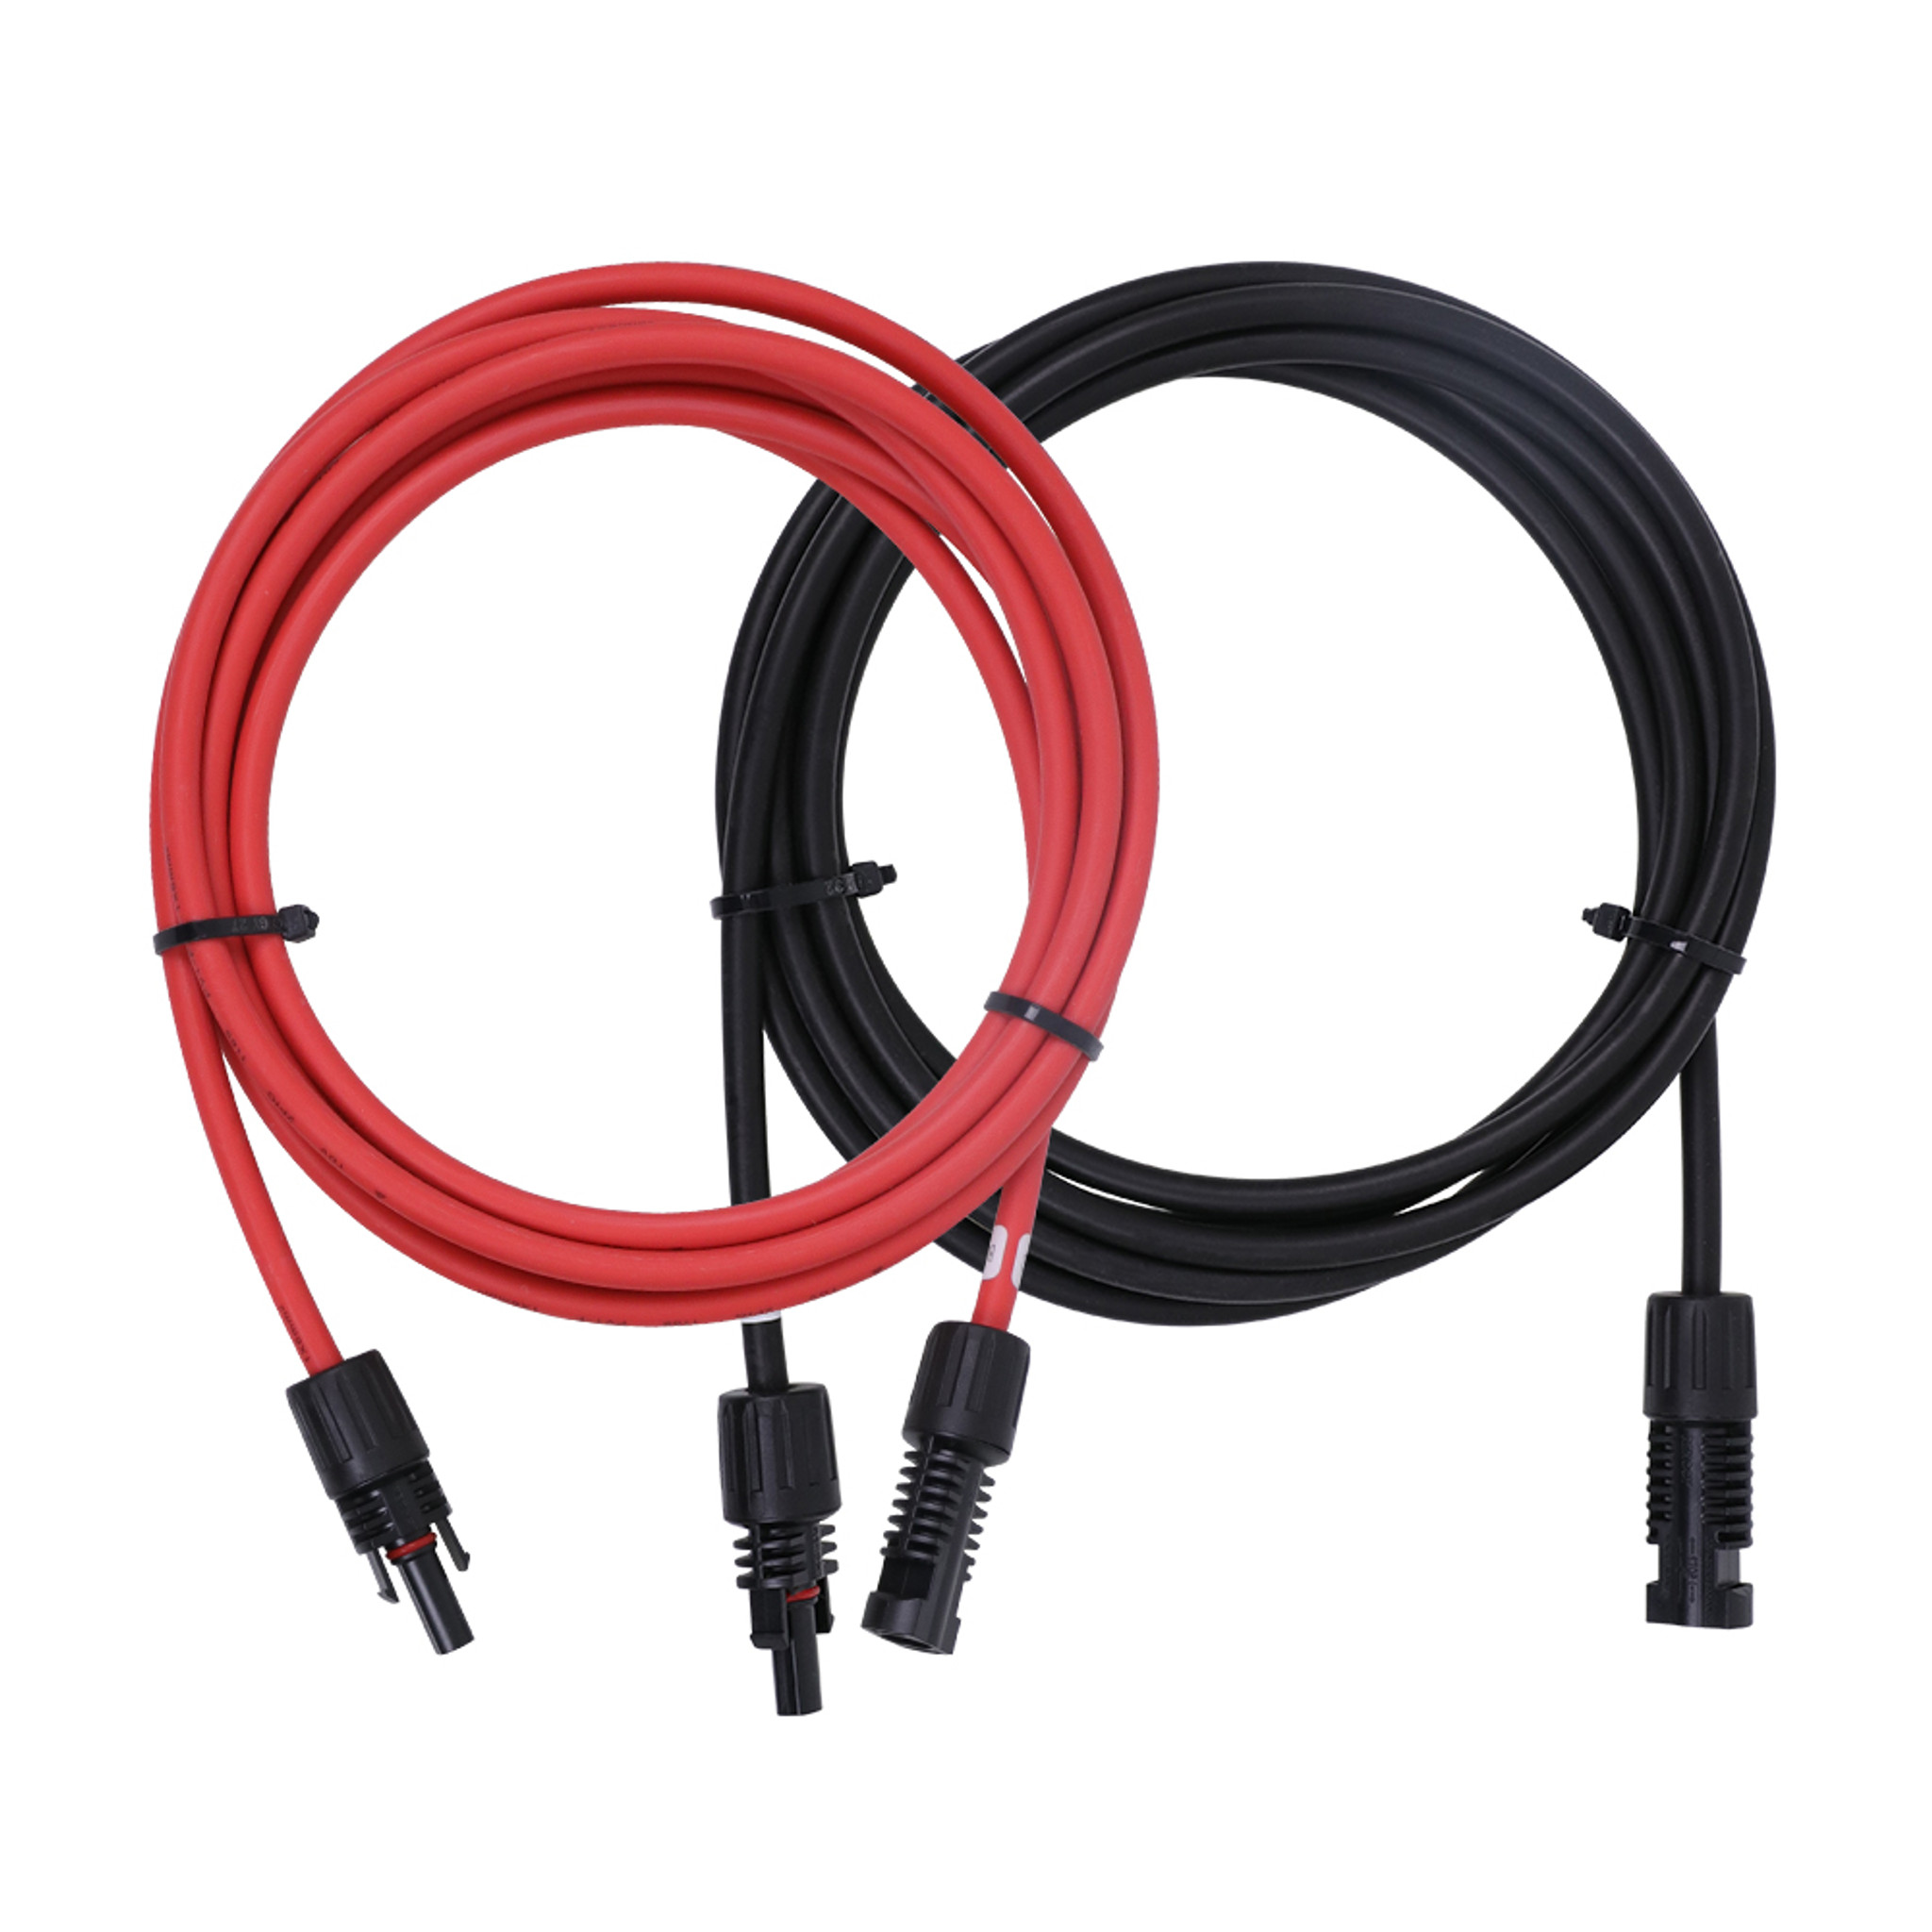
The point of using different colours is to easily identify the negative and positive wires.
If you can’t get red, use the black cable and mark it with red electrical tape or heat shrink.
Measure how much extension cable you need before you buy.
For both the positive and negative sides, you need enough to run from the end of the existing solar panel cables to the battery, via the solar charge controller and kill switch.
Solar Panel Gland Seal

Sadly, the only way to run the solar cable into the van is by drilling a hole. Plug it up and make it water tight with a gland seal.
Fuse Holder
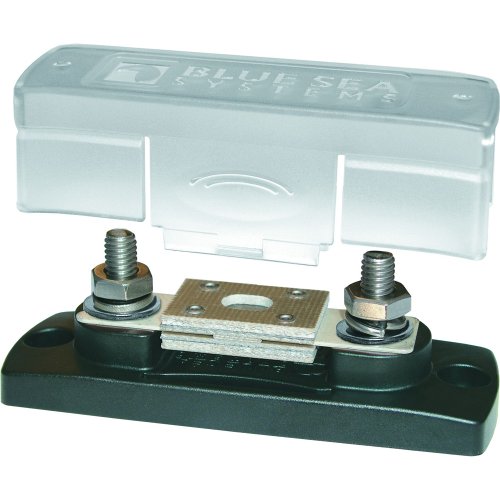
This sits between the solar charge controller and the battery cut off switch.
ANL fuse holders are easier to mount than in-line holders. However, the fuses needed for these are more difficult to find than the standard blade fuses.
Bear this in mind if you’re travelling to areas where online shopping may not be an option.
When wiring in series, the fuse between the solar panel and the solar charge controller should be 1.3 times the size of the lowest Optimum Operating Current of the panels in the array (see the back of the panel for their specification).
When wiring in parallel, the fuse between the solar panel and the solar charge controller should be 1.3 times the total of the Optimum Operating Currents of all the panels in the array (see the back of the panel for their specification).
2 x 1250 Amp Battery Cut Off Switches

Cut off switches on the battery supply line and the circuit supply lines allow the battery to be isolated.
The battery cut off switch must be greater than the total capacity of the battery bank.
If you want to upscale in the future, it’s worth fitting a larger one now to save changing it later.
Battery Terminal Eyes / Wire Lugs

These allow you to connect the cable to the battery.
Choose a lug size rated greater than your wire gauge and with an eye large enough to fit on the battery terminal.
1/4” Red & 1/4” Black Heat Shrink
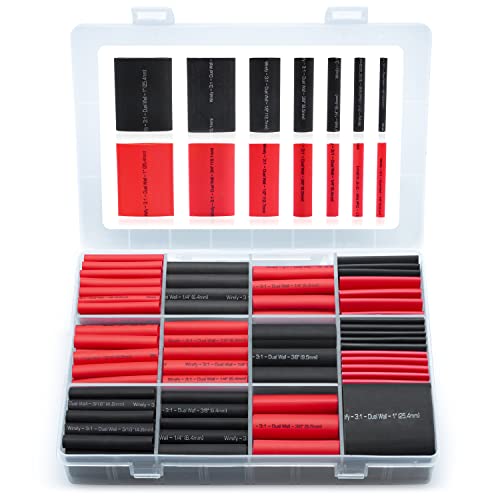
Heat shrink seal electrical joints to cover the bare wires.
On this solar install, you’ll need it to connect the inline or ANL fuse and the battery terminal connectors.
Sikaflex 221 (Panel Adhesive)
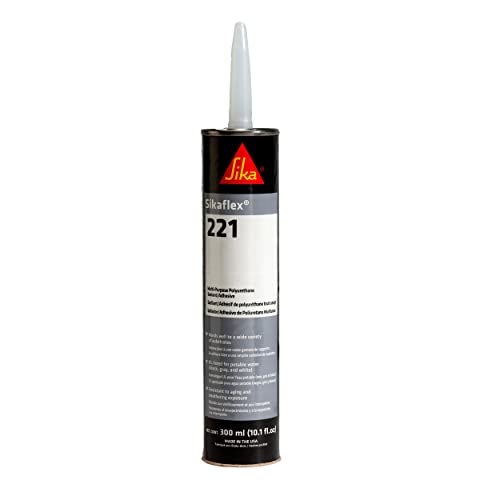
Use this adhesive to secure the solar panel mounts to the van roof.
It’s a bit messy, so wear latex gloves when applying it.
You need about 4 or 5mm of sealant between the bracket and the panel for a robust bond. It takes about 24 hours on a dry day to cure.
Fuses and wires must be rated for the system’s load and cable run length. We’ve covered everything you need to know in our campervan wiring post.
800 Watt Solar Panel Kit
If you’d prefer to avoid shopping around, you can buy pre-configured solar panel kits.
They usually include the solar panel, solar charge controller and mounting brackets. Some include extension wires.
If you opt to buy a solar kit, check what’s included and what additional things you’ll need to buy.
And make sure it makes economical sense.

This is an 800 Watt Solar Panel Kit complete with:
- 8 x 100W 12V Monocrystalline Solar Panel
- 60A MPPT Charge Controller (for a series & parallel combined configuration)
- all cables and connectors
- mounting brackets
- fuse holders & fuses.
You need to buy the cable entry housing and battery separately.
How To Install 800 Watt Solar Panel System
Our guide details everything you need to install a campervan solar panel system.
It’s written to suit any size of system so it makes reference to how to install multiple panels.
It may come in useful when considering upscaling your set up though.
There’s also a section about the tools you need to install your campervan solar panels.
Some of these tools can be quite expensive so unless you expect to get a lot of use out of them in the future, try to borrow them where possible.
We do encourage you to invest in a multimeter though and keep it in your RV toolkit while travelling and living in your van.
Check out our complete guide for how to use a digital multimeter in your camper.
It’s on our van life essentials list for good reason!
Graham Bogie

Graham is a seasoned marine electrical engineer with two decades of experience designing customized electrical systems for plant machinery and converting campers and overland vehicles. His expertise has led him to author the reputable Campervan Electrics Handbook and become the chief designer of the RV Wiring Design Tool. As a knowledgeable figure in the field, his YouTube channel, blog, Facebook group, and newsletter, offering electrical advice and product reviews, reach more than a million users each year.
This is a comprehensive lesson.