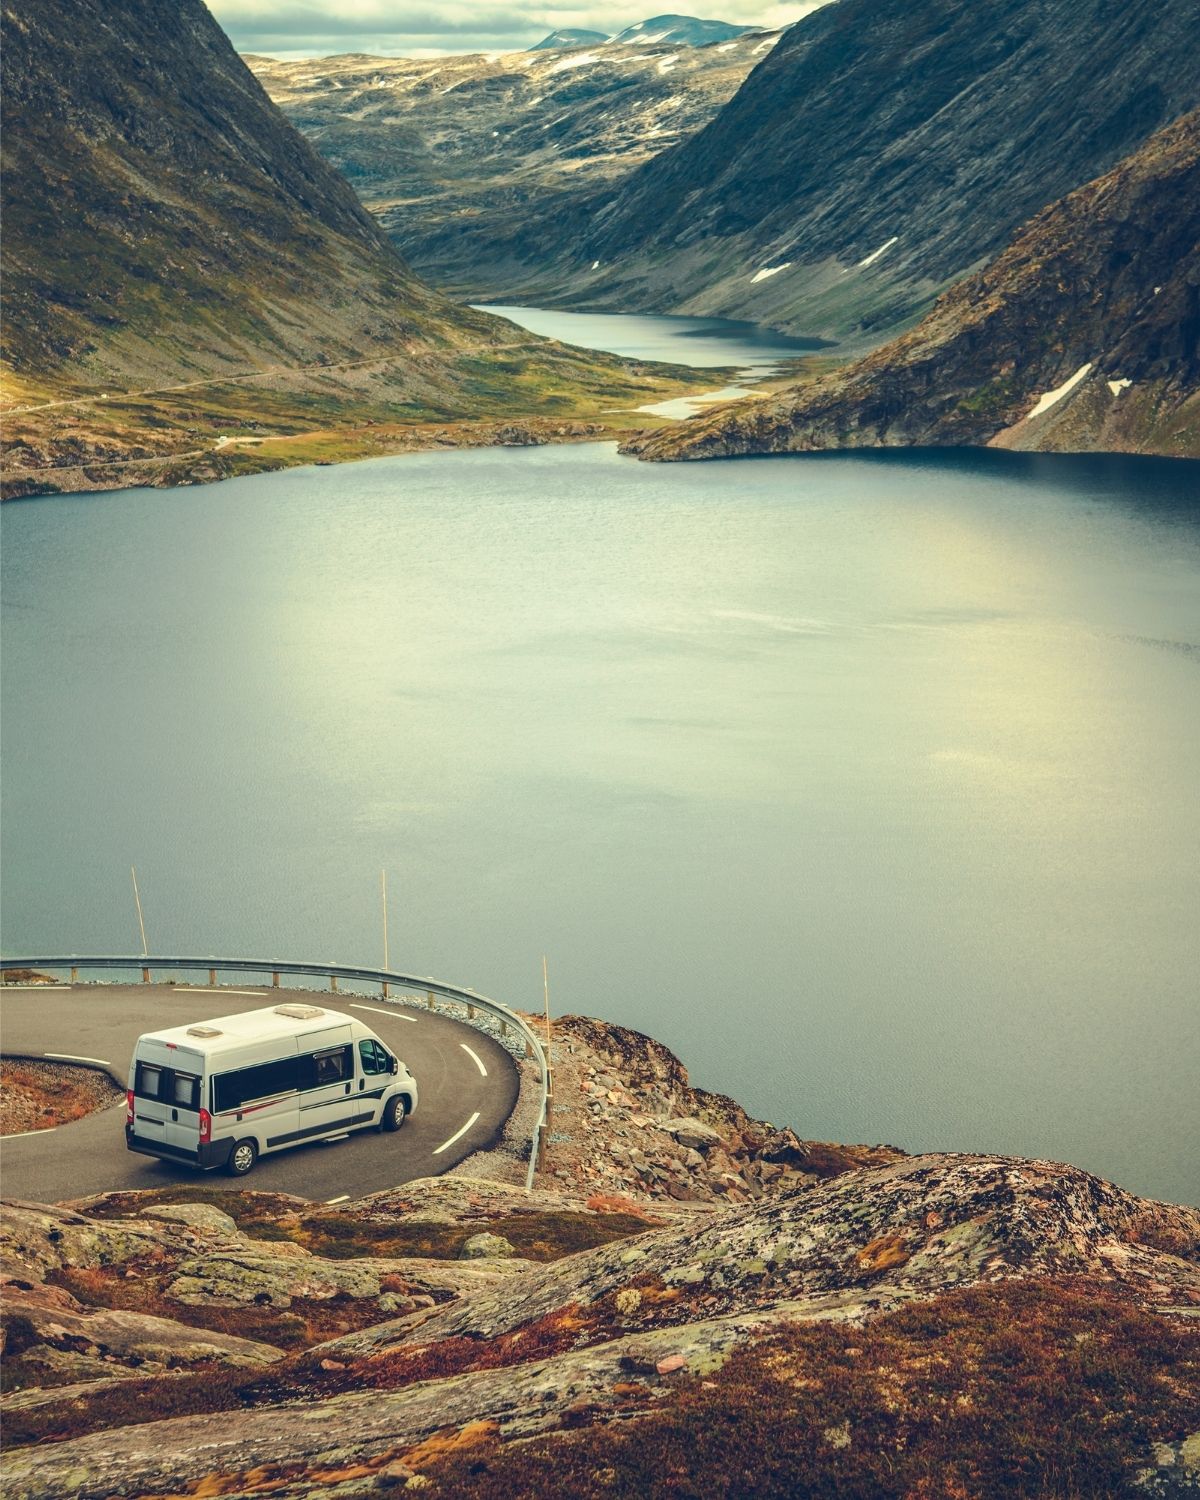
Most of us don’t worry about water at home. We get a mains supply with enough pressure, so when we turn a tap, fresh drinking water flows.
It’s all different in a campervan.
Having a supply of freshwater is key, so we need to be sure that we’re storing it and carrying a fresh supply at all times. That way, we can refill when we’re running low on water.
We need to dispose of dirty water and might even want to heat it a little for an occasional shower.
When making a DIY camper build, make a plan on how you’re going to have an abundance of water to be used for hydrating and cleaning.
In this post, we’ll cover everything to do with a campervan water system.
We begin with the basics, consider how much water you need to carry, and how to store and heat water.
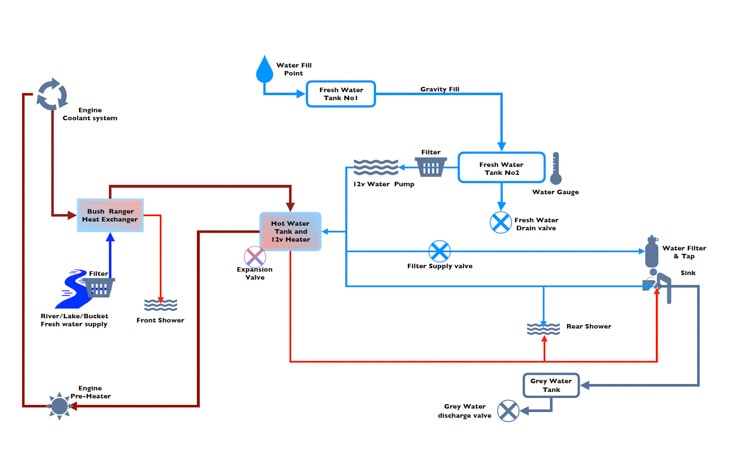
We’ve provided a detailed campervan water system design diagram, walking you through each component and how to install it.
So spanners and plumbers tape at the ready, let’s go!
How much water do you need in a campervan?
As with most decisions in a campervan conversion, the design of the water system is full of compromises. Consider these fundamental points:
- Cost | Water tanks don’t come cheap, so the more water you carry, the more it’ll cost to fit.
- Space | Water takes up a fair amount of space. Every 100 liters of water needs 0.1 cubic meters of storage, so you’ll need to get creative with where to fit the tanks.
- Weight | Water is pretty heavy at 1 kg per liter. Vans have a gross vehicle weight, and it’s not legal to exceed it. And anyway, the more weight we carry, the worse our fuel consumption.
- Van life | Do you expect to live off-grid much, or will you use campsites more often than not? The amount of water you need to carry will vary on your lifestyle and access to showers and fresh drinking water.
Daily water consumption of van lifers
We need to drink at least 2 liters of water a day in temperate climates to avoid dehydration.
In hot climates and high humidity, we need a lot more. For example, we spent 3 months traveling in Brazil in our van and drank over 3 liters of water every day.
Then you might like an occasional shower. An average shower uses 45 liters of water.
Even if you adopt the military approach (tap on – get wet, tap off – soap up, tap on – quick rinse – tap off), you’ll still use around 12 liters.
Include water for cooking, cleaning the house, and laundry, and you could consume 50 liters a day.
There are plenty of creative ways to conserve and reduce water consumption, though.
Based on our own experiences, we reckon frugal users will average around 25 liters per day, per couple.
How often will you fill-up?
Now consider how often you can replenish your water supply. This depends on what sort of van life you’ll live and where you’re going.
Most camper stops around Europe have free water, so it’s easy to store enough that should last up to 3 days of use.
In contrast, access to drinking water is more challenging in Africa.
Even so, with a few compromises and an effort to conserve water, you can still avoid fitting huge tanks.
We’ve seen some overland trucks fitted with 1000 liter water tanks. Finding that much drinking water is a challenge in some parts of the world.
There aren’t many garden taps once out of Europe. Even if you find a hand-pumped well in a remote African village, a responsible traveler won’t take much.
Besides, 1000 liters of water weighs 1 tonne and needs a cubic meter of load space. To us, these points alone far outweigh any benefit.
Calculating how much water to carry
In our Unimog camper Mowgli, we carried 230 liters of freshwater. We bought Mowgli pre-built so this wasn’t our design decision.
Even so, we had plenty of water.
We’ve personally lasted nine days on one tank of water, but we did limit how we used it to make it stretch that far.
When we calculated how much water to carry in the Sprinter van conversion, we assumed we’d use an average of 25 liters per day and carry enough water to only need to refill once every 5 days.
We decided on 125 liters but by the time we’d sourced the water tanks (more on that below), we ended up with 170 liters, including 20 liters of hot water.
Water system layout in your campervan
There are a few things to consider before finalizing the layout of the water system:
- Where will you install the sink?
- Will you put it close to any bathroom you plan to install? The plumbing is easier to install if they’re close together.
- How will you fill the freshwater tanks and empty the grey & black water tanks?
- If your layout demands pipes are fed through the floor of the van, make sure the chassis and cross members don’t get in the way. They can’t be moved!
- Will you store your water tanks inside or outside the van?
- Outside storage of water in winter conditions may lead to freezing so you’ll need to think about this if you plan to live in the campervan in the winter or travel to colder climates.
- Does the layout allow easy access for future maintenance? You won’t want to dismantle the entire camper because you need to replace a water pump.
- And don’t forget to consider the weight distribution of full water tanks and how this might affect the handling of the vehicle. You can get more advice on this in our post on modifying your van build.
Campervan water system | The basics
In summary, a basic campervan water system is made up of a handful of components:
- Campervan water tanks to store freshwater
- Water pump to shift the water from the tanks to the taps
- Taps and/or shower
- Greywater tank to collect used water
Additional components like accumulators and water filters aren’t essential but serve a purpose for an enhanced set up.
You can add water heaters too so you have hot water for showering and washing dishes.
We’ll go through each of these components here.
Campervan Water Tanks
There are potentially 3 types of campervan water tanks you might need:
- Freshwater tank
- Greywater tank
- Blackwater tank
Fresh Water Tank
The most simple and budget-friendly option for carrying fresh water in your campervan is to use a jerry can.
But water is heavy and a full 20-liter jerry can weigh in at 20 kilograms. Lugging that around isn’t ideal for everyone.
A portable water tank is an option for those who don’t plan on stealth camping.
The ultimate solution though is to fit permanent freshwater tanks.
If you plan to spend the winter months in your campervan, will you experience temperatures below freezing point?
If so, consider fitting at least some of your water tanks inside the van because any outside may freeze.
We haven’t winterized our Sprinter van and all our water tanks are stored underneath the van outside.
There are all sizes of freshwater tanks that are available, so this makes it super easy to find one that fits well in your campervan. Many fit just over the wheel arches and don’t take up a ton of room.
You can have more than one water tank too. We have 3 tanks under our van.
Once you’ve calculated how much water you need, decide where to store it. Then shop for the water tanks and check the measurements closely before you buy them.
This was our biggest challenge in designing our campervan water system.
You need a way of filling the freshwater tanks.
Most camper vans and motorhomes have a filler fitting on the outside of the van leading to the water tanks.
Some have a filler fitting just inside one of the doors, nearest the location of the water tanks.
Some water tanks have tank vents pre-fitted. They allow air to fill the tanks as the water is emptied. Without a vent, the air can’t escape and you’ll end up with airlocks.
If your water tank doesn’t have one pre-fitted, you’ll need to fit one.
Grey Water Tank
Any campervan water system needs some form of container for collecting wastewater from the sink or indoor shower.
The simplest approach is to feed it directly into a jerry that can be securely stored beneath the sink.
Make it a different color to your freshwater can so you never get them mixed up!
Some portable grey water tanks have wheels and live outside the van when parked.
They’re great if you plan to spend most of your van life on campsites.
You’ll need to connect a hose from your sink through the campervan floor then connect the portable tank each time you set up camp.
This isn’t ideal for stealth camping or off-grid living though and you’d need to store the tank inside the van when traveling.
Alternatively, fit a permanent grey water tank to the underside of your campervan.
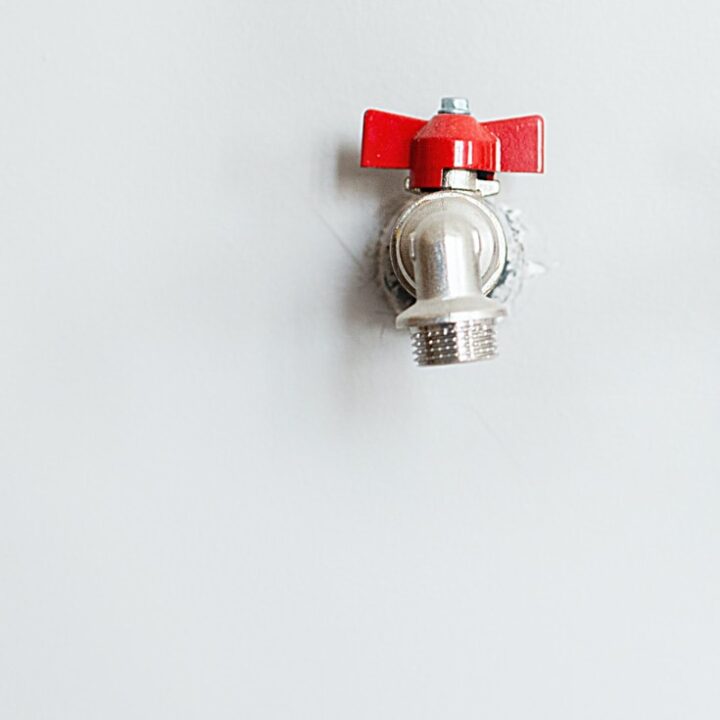
We have fitted a 50-litre grey water tank to our camper. It has a tap so we can empty it and keep it closed the rest of the time.
Black Tank
There are several campervan toilet options you can go for in you.
Some are self-contained units where the waste is collected in a compartment attached to the toilet.
Some campervan toilets flush waste into a black tank.
You can either fit a permanent black tank to the underside of your camper or use a portable waste tank.
You’ll need to find space underneath the van for a permanent tank. If you’d prefer the portable tank, you’ll need to find somewhere to store it when you’re traveling.
We don’t have a black tank because we have a composting toilet in our van.
The section above provides just a short insight into water tanks. There are a variety of solutions for the different types of water storage. For loads, of more detail, check out our post on campervan water tanks.
Water Pumps
To get water flowing from the freshwater tanks to the taps, you’ll need a pump.
Manual pumps provide a budget-friendly and easy installation option for cold water setup.
These hand pumps work by pumping the handle back and forth. They look pretty cool too.
This foot pump is a bit more robust and provides a half-decent flow. Again, this is designed for small galley use.
You’ll never get a shower from this kind of installation though.
If you’re serious about having a long-term water system in your campervan, you need to install an electric pump.
An electric pump keeps the entire water system pressurized all the time.
When you turn the taps on, assuming the tanks aren’t empty, water will flow. How civilized!
Pressure at the tap or showerhead is affected by the size of the borehole, the length of the hose from the pump to the shower as well as the size of the pump.
If the pump is too powerful, you’ll use way too much of your precious onboard drinking water.
A 30 psi pump is a pretty standard size for campervans and motorhomes.
Try to go for a pump that doesn’t deliver too much water per minute though. It may sound great but a shower can quickly deplete your water tanks.
Our pump flows a little less than 11 liters per minute and is ideal.
Fit electric pumps in an operating position that is easy to access. Pumps are known to break down after many years of use so you may need to change them at some point in the future.
Keep shower head, hose, and taps clean and limescale free. The limescale build-up is one of the culprits for low water pressure issues.
Debris can sometimes find its way into your water tanks. Pumps don’t respond well to this so to help prolong their life of them, make sure to fit a filter.
Our pump had a filter included but you can buy them separately too.
Accumulator
12v water pumps switch on when they sense a drop in pressure, like when the taps are turned on.
An accumulator reduces how soon the pump switches on by acting as a pressure store.
Arguably, they save energy. Our view is that while the accumulator may stop the pump from kicking in so soon, the energy still needs to be generated to re-prime the accumulator.
Regardless of your school of thought, accumulators are optional.
We don’t have one installed in our water systems and suffer no hardship.
Sink & taps
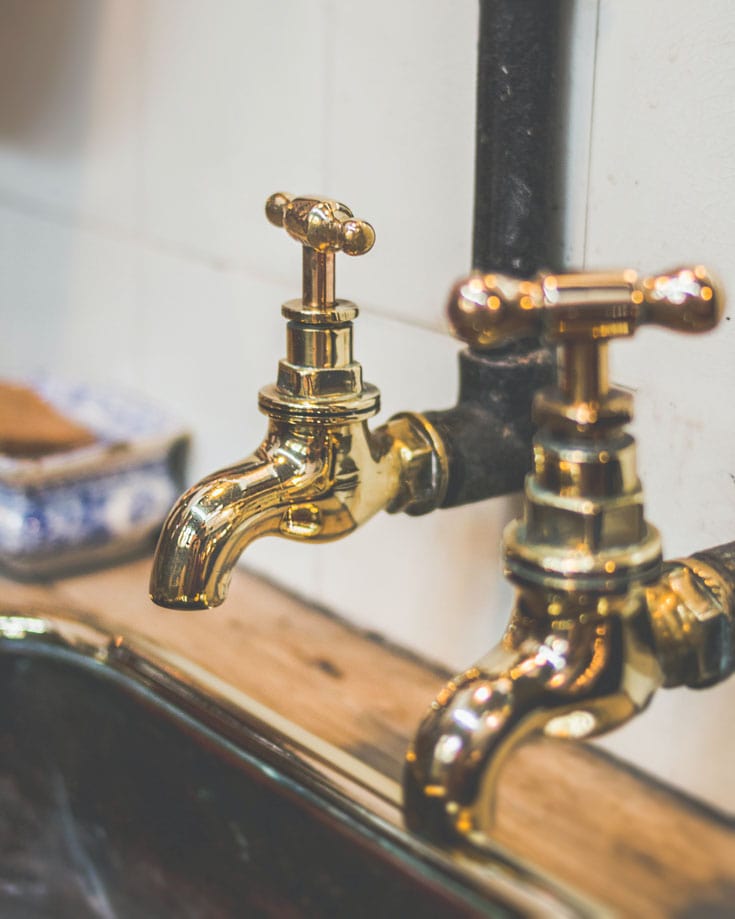
There’s a huge range of campervan sinks on the market.
You can buy sinks integrated with a cooker for the ultimate in space-saving kitchen design.
Hinged lids make for a useful extra workspace when not in use and folded down.
You can buy taps that fold flat, taking up little space.
While the sink and taps you choose are as much about personal taste and design, there are a few things to consider before buying:
- Do you need an integrated draining board? Wet dishes on a wooden countertop won’t do your wood any favors.
- How deep do you need the sink to be? The key is to have a sink large enough to comfortably wash your biggest pot but not so big you’ll use too much water or so deep it uses too much under counter space.
- There are some beautiful tall taps on the market. In a moving vehicle, especially if you plan to drive off-road as we do, the taller the tap, the more likely it is to work itself loose.
- If you plan to install a hot water system, consider a mixer tap instead of a single tap to save space.
- We recommend a swivel tap too so you can move it out of the way – helpful when washing up the big pot!
- Check if your sink includes the drainer and plug – often they don’t and you’ll need to buy them separately.
Water filter
In some parts of the world or when living in a van off-grid, access to clean drinking water can be challenging.
Our delicate stomachs might become upset by nutrient levels we’re not accustomed to.
Water can have an unpleasant taste if treated with chlorine.
At worst, it could harbor dangerous diseases.
While this water may be ok for washing dishes and even cooking if boiled, it might not be sensible to drink it straight from the tap.
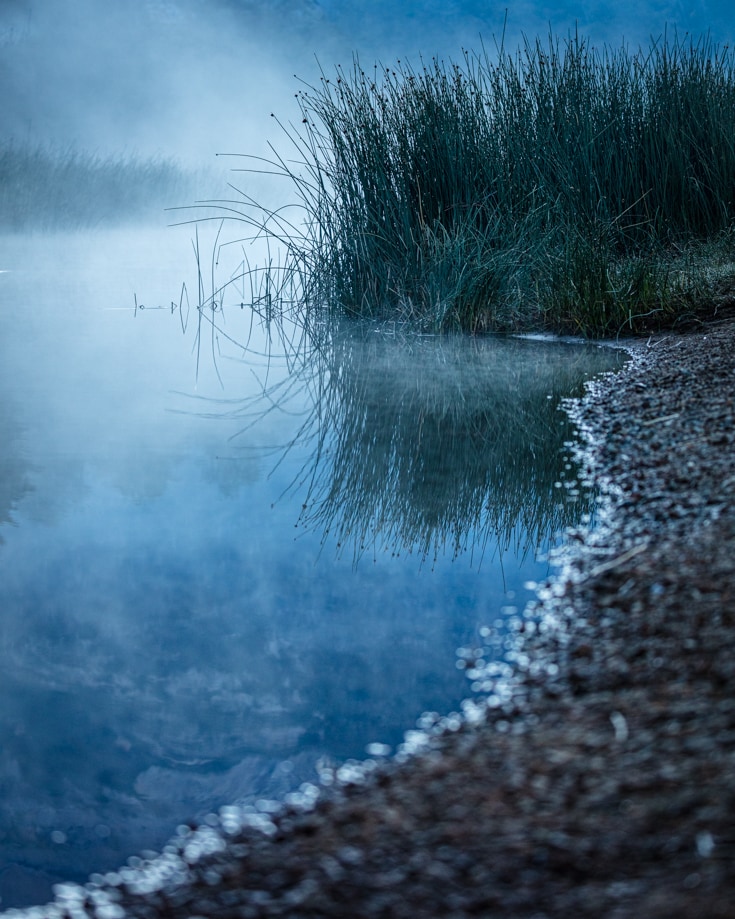
A micropore filter is a simple solution, allowing you to filter water from any lake, well, or stream to use as safe drinking water.
It cleans water using a combination of ceramic and carbon filters.
The ceramic element removes most bacteria while the carbon elements eliminate most chemical traces.
Whilst not 100% effective, they do improve water quality significantly.
The relatively low cost of the filter units makes installation a bit of a no-brainer.
If in doubt, boil your drinking water and add an occasional cap of bleach to your freshwater tanks to keep harmful bacteria at bay.
Hot Water Heater for Campers and RVs
Hot water in a campervan is a luxury and one we’re not happy to live without.
We don’t have a huge capacity but it’s enough for washing dishes and an occasional shower.
When designing your campervan water system you need to decide how you’re going to heat it.
Your options to heat water in a camper are:
- Solar heated
- Coalescer
- 240v electric water heater
- 12v immersion heater
- Electric propane water heaters
Solar heated water
The sun provides the simplest solution for getting hot water in your campervan.
Even on a cloudy day, a portable solar shower can be quite effective.
This involves a rather basic approach of placing a dark container on the roof of your van and letting the sun heat it.
There’s no need for any plumbing indoors. If you only use your campervan for short trips and don’t need hot water inside the van, this could be an ideal low-cost option for you.
Coalescer
This is an efficient way of heating cold water through the engine’s cooling system.
As you drive, water is circulated around the engine block, passed through the radiator, and returned to the hot water tank.
When you park up at the end of a long drive, you have a tank full of hot water. Nice!
Installing a coalescer involves breaking into the engine coolant system so you need some confidence in your skills to fit one.
240v electric water heater
Less efficient than the coalescer, a 240v or110v hook-up is needed.
Much like the old water tanks so many of us used to have in the attic in houses, a heater coil is submerged in the tank to heat the water.
The main advantage of this is realized when parked up on a campsite for a few days.
With the available hook-up and an electric water heater, you won’t run out of hot water for washing up if you keep your tanks topped up.
12v immersion heater
A 12v immersion heater works in the same way as the 240v system, only no hook up is needed.
Really you’d want to run your engine to heat your water though as otherwise, it’ll drain your deep cycle campervan batteries quickly.
The downside of this method is that you must remember to turn the heater off when you’re not driving so it doesn’t drain your batteries.
It’s perhaps the cheapest and most simple method of getting hot water in your van though.
Our hot water tank is designed to heat water by the engine coolant system and by 12v too.
We only use the 12v capability when we’re hooked up to mains electricity.
Electric propane water heaters
If you already use gas for cooking, you could go for an electric propane water heater.
It removes the dependency on your batteries but puts a greater demand on the gas. A commodity not readily available everywhere you might travel.
Even so, electric propane heaters are perhaps the most common way to get hot water into campervans.
Showers for campervans
There’s a large range of showers for campervans, from basic solar heated shower bags to complete indoor setups.
In our campervan, we have 2 shower facilities.
One is a Bullfinch shower point. It can be installed inside or outside the van. The hose gets locked into the shower point when in use and it acts as a mixer tap.
The water supply is provided by the water pump.
We’ve installed ours at the back of the van beside the doors and use it outdoors only.
We can hang a shower curtain at the back door and shower even in less remote areas.
The 2nd shower is a Bushranger shower.
We discovered this clever device in Morocco while camping next to a camel’s watering hole with fellow overlanders we met along the way.
As we pulled up for the night in the Sahara Desert, one of the other overlanders pops the bonnet on his Defender, throws a hose into the well, and have a long hot shower!
What a brilliant gadget! So we had to get one for a Baloo.
The Bushranger shower heats water by pumping water around a heat exchanger via the engine coolant system.
It’s easy to install and completely separate from the main campervan water system.
Instead of using our onboard water, another 30 psi water pump is fitted in the engine bay to draw water through a fine filter from a river, well, lake, or bucket of cold water and pump it through the heat exchanger.
Now we can shower without depleting our drinking water or for as long as the river is full!
Monitoring and system controls
We fitted a water gauge to our water tank so we don’t have to guess how full or empty they are.
With the gauge located at the base of the driver’s seat, it’s easy to check daily.
It’s not a completely accurate reading but it gives a good approximation of available water.
Campervan water system electrics
Our camper water design needs a few 12v power supplies for the water pump, gauge, and 12v heater.
Mixing water and electrics can be dangerous, so if you’re not sure what you are doing, you might want to outsource this part of your build.
You might want to take a look at our campervan electrics post to get you started or our electrical design for more detail.
Campervan water system | The design
We based our campervan water system design on our specific needs.
Planning to live in the campervan long term, we didn’t want to scrimp on the setup.
We wanted enough fresh water to last at least 5 days off-grid, shower facilities, and the ability to cope with dubious water sources.
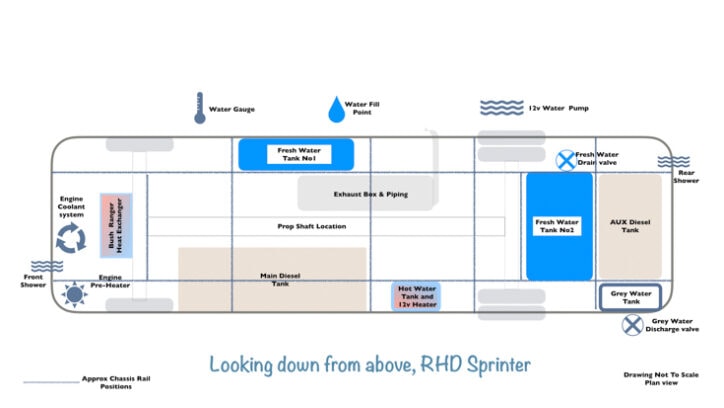
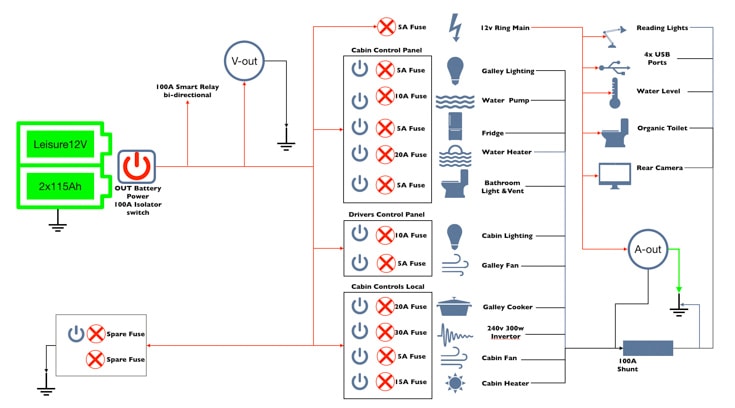
This is our campervan water system design.
It’s pretty generic and, aside from sizing and component specifics, is what most motorhomes, RVs, and camper vans have installed.
The Bush Ranger shower is a little different though.
If you’re looking for a design for your own van build, this is a great base to start from.
Use the link below the image to download a full-size image and tweak the design to suit your exact needs.
A summary of our design
- We carry 170 liters of fresh water in 3 tanks, 1 of which is a 10 liter hot water tank
- All the tanks are fitted to the underside of the van outside and not winterized
- We have a 50 liter grey water tank
- No black tank is needed or fitted
- We use a coalescer to heat the water by the engine coolant system. We can also heat the water by the coalescers’s 12v system
- A Doulton ceramic water filter provides clean drinking water
- We decided to install the shower at the back doors for outdoor use
- A Shurflo electric water pump supplies the sink taps, water filter, and rear outdoor shower
- To monitor the water level, we fitted a water gauge at the side of the driver’s seat.
- We added a Bushranger shower too. The water is heated by the engine.
- We added extra connectors on each water tank so if we ever need to drain the tanks or bypass one, we can do so with ease
Are we happy with it?
We’ve been living in the van full time now for a little over 2 years.
We’ve never run out of water so feel we got our capacity just about right for our lifestyle.
We use the water filter a lot. While we’ve not had to fill our tanks with water we felt was unsafe, we have had water that has a slightly chlorinated taste. The filter does a great job of getting rid of most of that.
When we fitted the shower at the back door, we knew we could re-plumb it to move it indoors easily if we felt the need.
Needless to say, 2 years and we’re quite happy with it where it is. It wouldn’t be ideal if you spend most of your time in urban areas, though.
The Bushranger shower is one of the best things we have on the van. We’ve used so much water from Patagonian lakes and rivers for almost endless hot showers.

We really only use the 12v water heater if we’re on hook up as it’s quite heavy on the batteries.
We got rid of our flat hose because, after much use, it sprung a few leaks.
Our replacement is a more robust garden hose. It takes up more storage space, but we keep it inside the engine bay, so it makes no difference to us.
Campervan water system | Step by the step installation guide
This is our step-by-step guide on how to install a campervan water system.
It is based on our own water design as shown above.
We’ve not included how to install the Bushranger shower here. It comes with instructions and is completely separate from the main campervan water system.
We’ve estimated a total of 5 days to complete the job. Some of this is preparation, including design and shopping for products.
If you’re familiar with plumbing, it may not take you as long as it took us.
Whilst your own design may vary in specific components, and even layout, the main principles behind installation are fairly generic.
We’re happy to answer any questions you may have. Just leave a comment at the end of this post, and we’ll get back to you.
You May Also Be Interested In:
- DIY Campervan Water Tanks for Van Conversions
- Living in a Van for Beginners | A Van Life Manual
- Overland Build | The Ultimate Guide to Overland Vehicle Mods
How to install a campervan water system
A step by step guide to installing a campervan water system on a DIY camper conversion.
Materials
- Your design including where your fill pipes, hoses and tanks will be fitted.
- Fresh water tank(s)
- Pump
- Sink and sink drain
- Taps
- Filter
- Shower mixer
- Shower hose
- Shower head
- Water inlet fill cap
- Grommets
- Pipes
- Connectors for water tanks
- 2 x standard hose T-piece joints
- 1 x reducer hose T-piece joint (included with filter kit)
- Jubilee clips
- P-clips
- Drain soil pipe
- Water level sensor
- Water level gauge
- Grey water tank
- Hot water tank
- Tank brackets - we made our own from flat bar iron
- Electric cable
- Fuses
- 2 switches (one for water pump, one for the 12v hot water heater)
Tools
- Plumbers tape
- Stanley knife & blades
- Drill
- Screwdrivers
- Screws
- Spanners
- Bucket
- Mop or old rags
- Torch
Instructions
- Print your campervan water system design so you have it as a handy reference
- Fit connectors to water tanks
- Install the water level sensor to tank 2 as per the manufacturer’s instructions
- Partially attach tank holding brackets to the securing points you’ve chosen on the van
- Fit all the fresh, hot water and grey water tanks in position, tightening the holding brackets
- Fit the water pump securely to its operating location
- Drill a hole in the floor for the hose from the cold water tank to the pump
- Drill a hole in the floor for the hose from the pump to the hot water tank
- Drill a hole in the floor for the hose from the hot water tank to the hot tap
- Fit the sink, taps, filter tap and shower mixer to their operating positions as per the manufacturer’s instructions
- Fit the sink drain hose to the sink and lay it to the grey water tank
- Fit the water inlet fill cap to the hole in the side of the van where you’ll fill the fresh water tanks
- Fit the hose from the fill line from the water inlet fill cap to the first water tank and secure it at both ends with a jubilee clip
- Connect the balance line between tank 1 and tank 2
- Lay the hose from tank 2 to the water pump inlet, connecting each end with jubilee clips. Don’t forget to attached the grommet to the hole in the van floor.
- Fit the pump outlet hose, attaching the first standard hose T-piece joint
- Lay the hose from the T-piece joint to the hot water tank inlet. Don’t forget to attached the grommet to the hole in the van floor.
- Lay hose from the T-piece joint to the 2nd standard hose T-piece joint. This one splits off to the shower and the taps
- Lay hose from the T-piece joint to the Bullfinch shower mixer and attach it securely
- Lay hose from the 2nd standard hose T-piece joint to a position near the sink
- Fit the reducer hose T-piece joint for the filter tap spur
- Lay hose from the standard piece of the T-piece joint to the tap
- Lay hose from the reduced piece of the T-piece joint to the filter tap
- Connect the water sensor wiring to the water gauge as per the manufacturers instructions, securing the gauge to it operating position
- Fill water tanks, checking for leaks
- When any leaks have been fixed, check the water gauge reading is full to confirm this is working correctly
- Connect the campervan electrics to the water pump
- Insert the water pump fuse
- Switch the water pump on
- The pump should operate until the system pressure reaches 30psi before shutting down. This could take a few seconds while the pump primes
- Test the tap, shower and water filter are all operating with cold water (at this stage, no hot water is connected)
- Fix any leaks or operating issues
- Connect the hot water tank as per manufacturer’s instructions
- Test the hot water system works as expected
- Make your self a cup of tea and wash up to congratulate yourself!
Notes
- If you need to drill holes in the van’s side wall for your fill line, do this first. Make sure you avoid any strengthening webs, structural and mechanical components.
- If your water tanks are inside the van, you do not need to drill holes in the floor.
- Consider running a vent hose to a higher position to prevent spillage when driving with full water tanks.
- The connectors on the fresh water tanks may already be fitted. If not, fit them before fitting the tanks in position.
- We had to fit our hot water tank on the opposite side of the van to the fresh water tanks because of available space. Because of this, we had to install the inlet and outlet hoses for the hot water underneath the van.
- We drilled 4 holes (3 for the fresh water and 1 for the grey water) because we didn’t want one large hole in the floor. This way we could use grommets to seal the holes and prevent chaffing of the hoses on the hole and ingress of dust & dirt.
- The balance line between the 2 fresh water tanks acts as the fill line for tank 2. The connectors should be at the bottom of tank 1 and the top of tank 2.
- All T-piece joints should be secured with jubilee clips
- Keep hoses tidy and secure with P clips at intervals along their length
- Our water pump included a water filter. If your pump doesn’t, you’ll need to buy a water filter separately.
- Mixing water and electrics can be dangerous so if you’re not sure what you’re doing, you might want to outsource this part of your build.
- If hoses are too tight a fit for the connectors, try to soften the ends in boiling water for a few minutes.
- Use plumber’s tape to help seal any threaded joints.
- If your hot water system is like ours and heats by 12v and by the engine coolant system, connect the 12v system first to make sure it works correctly before you breach the engine coolant system.
- Once the entire campervan water system is installed, sterilise your water system.
Graham Bogie

Graham is a seasoned marine electrical engineer with two decades of experience designing customized electrical systems for plant machinery and converting campers and overland vehicles. His expertise has led him to author the reputable Campervan Electrics Handbook and become the chief designer of the RV Wiring Design Tool. As a knowledgeable figure in the field, his YouTube channel, blog, Facebook group, and newsletter, offering electrical advice and product reviews, reach more than a million users each year.

Sorry I’m late to the party. We are just starting our build and I have reservations about where to install hot and cold water line that needs to cross the van. Do I bury it in the floor encased in 1.5 inch xps foam or do I run it above in the ceiling? Our water lines will be heated with a 12v thermostatically control heating element. The dilemma/ question is ability to drain the system if needed. Will the system drain if water lines are low?
Hi Scott
You don’t need to worry too much about insulating the pipes unless you intend to be in sub-zero temperatures for prolonged periods. We run our pipes underneath the camper i.e. outside with no insulation – no probs so far and we’ve spent 2 winters a little below zero. We wouldn’t advocate running the hoses over the ceiling – if you have a leak the damage would be more extensive. The drain plug should be at the lowest point of the system – probably on your water tank if it’s underslung.Hope that helps, Graham
How can your water tanks be balanced, when one end of the hose is connected to the bottom of tank 1, and the other end to the top of the other tank?.They should be at the same level to be balanced correctly.??
Hi Roy, We recommend placing the balance line at the bottom of each tank, as in the diagram on this post. The diagram on this page is solely a circuit diagram as opposed to a water flow diagram. Hope that removes any confusion.
BLEACH?, it’s a poison, NO way this should be added to your fresh water tanks, it should be MILTON, it’s a better steriliser, wont kill you.
We’re not suggesting you drink the bleach straight from the bottle. Adding a small amount of bleach to a large water tank is not going to kill you. Recommended volumes are about 1/4 teaspoon for every 4 gallons. Or use Milton if you prefer. Or better still, the filters.
@Angela and Graham, In the UK this is classed as a Poison and even a small amount can cause problems, it contains Sodium Hypochlorite and Sodium Hydroxide and in some cases also has added Perfume. And I would not follow Mr Trumps advice. By the way there is no recommended information on any of our bleach products that it can be used in the way you describe. Warnings on our bleach containers state, “Do not Injest”.
@Roy,
Sodium Hypochlorite outgasses readily from ventillated containers (such as water tanks) and Sodium Hydroxide will likely turn to salt in the plumbing so both will rapidly disappear out of the water system.
A ‘best practice’ solution would be to add a tiny amount to a near empty tank, fill it (mixes bleach into water) and leave the caps off for ~2 hours. The bleach will kill the pathogens and then dissapear over this period.
Put the caps on the tanks and use the cleaned water.
bye.
Have you seen our considered a gravity based pressure system rather than a pump? IE it the water tanks in an elevated position (maybe on the roof?)
Hi Peter, It’s a great idea but not in a moving vehicle. The centre of gravity needs to be as low as possible to keep it stable, especially on adverse inclines. 1 litre of water weighs in at 1 kg so having that much weight on top isn’t a good idea. That’s why we undersling the water tanks and pump the water up. Hope this helps answer your question.
Hi, thanks for your very helpful information. Can you explain the benefit of a tap with a 12v switch please. Do I need one if I have an underbody mounted tank and a pump like your? Thanks
Hi Sinead.
If your water pump has a pressure sensor, you don’t need a tap with a 12v switch because when you open the tap, the water pump sense the pressure drop and kicks in.
The switched tap just puts power to a pump without a pressure sensor so you don’t need both. I hope that helps.
Angela