If you are parking your trailer permanently or for a few months, you need to level it properly. Leveling is important to keep your appliances safe, avoid accidents in the RV kitchen, and free your body from diseases like sleep apnea and sinus.
Leveling your trailer is a complex process, but we will make it simple by giving you a 9-step guide on how to level a travel trailer on a permanent site. We will also discuss why leveling is important, whether it is possible to find an already level campsite, and how to level a camper without moving it.
When you click on links to various merchants on this site and make a purchase, this can result in this site earning a commission. As Amazon Associates, we earn from qualifying purchases. For more info, please check our disclosure page.
Why Do I Need To Level My Travel Trailer On A Permanent Site?
How It Impacts Your Refrigerator’s Ability To Cool
You might have already heard that a poorly leveled RV impacts how well your refrigerators work. But did you know why?
Absorption refrigerators are very common in RVs. These can work on both AC electricity and propane gas. So if you park near a power source, you can plug into the grid, but when you are on the road, you can run the fridge on propane.
This refrigerator uses a simple trick to move its cooling ammonia liquid: gravity. Gravity moves ammonia from the condenser at the top of the fridge to the evaporator at the bottom. Normal refrigerators use a compressor for this job.
If your RV is not level, the ammonia will not travel down properly. The refrigerator will not cool things as you want it to. This means you lose your perishables quicker, and the fridge gets damaged over time.
Problems With Running Water Supplies in The RV
The same gravity principle applies to your RV running water systems. If it is not perfectly level, water will not drain properly, and toilets will not flush properly.
The more the incline, the worse these problems will become. With time, standing water will cause your drainage pipes to start clogging, and if they are metallic, it can also cause corrosion and rust.
Problems With Your Water And Waste Storage Tanks
Your RV water tank indicator works by checking the water level at a particular point in the tank. If the tank is inclined, your indicator will overestimate or underestimate the water supply (depending on which side is higher).
Secondly, as the water level falls to the bottom of the tank, your pump may not be able to push it up if the tank is inclined away from the pump.
Your waste storage tanks will also face the same problems. You will have to make more runs to the dumpsite because the waste indicator will tell you it’s full before it actually is.
How It Can Impact Your Health
When you lie down on a tilted bed, blood flow from your heart goes haywire because gravity pulls it more in one direction than the other.
You can suffer from heartburn, blood-pressure-related issues, sinus, backaches, muscle pain, and other problems just by sleeping on a slightly tilted bed. You might also have trouble getting out of bed. You can even roll down off it if you sleep in a tilted bed.
Kitchen Disasters
If you keep heavy items in overhead cupboards, there is a risk that they will fall and injure you. Things like knives and other sharp objects on your kitchen countertop can fall on your legs and hurt you.
Doors
Another impacted area is the doors of the cupboards or the RV itself. They will either shut too tightly or open on their own if they are on a tilted surface.
What You’ll Need
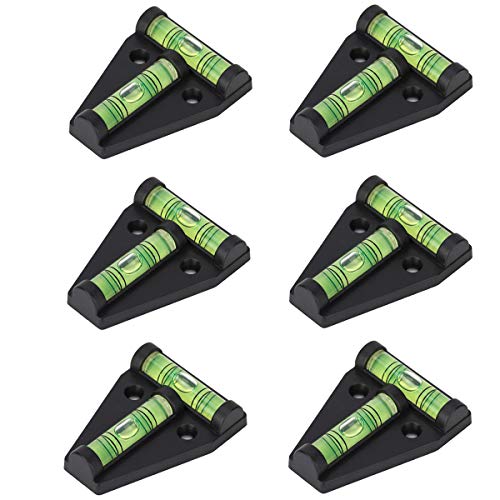
1. RV Levels

There are two types of levels that you can use: the bubble type and the Bluetooth type.
Bubble levels are simple, easy to use, and inexpensive. You can put them on the bumper or anywhere on the floor inside the RV to get an accurate reading.
Bluetooth levels are expensive, but they can be helpful when you are backing up into your camping spot. If you don’t have a partner to help you, you can install a Bluetooth level to guide you when backing up.
These will connect with your smartphone through an app and guide you into the perfect spot as you are backing up.
2. RV Chocks
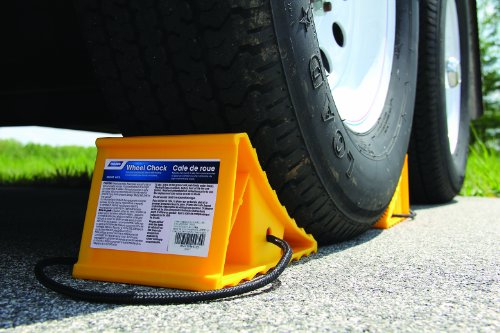
Chocks stabilize your RV’s wheels when parked, especially on an incline. You need to consider six things when you buy chocks:
- Durability: You should prefer heavy-duty crack-proof plastic or thick rubber-based chocks.
- Size: Your RV chocks should be at least 25% bigger than the width of your wheel
- Color: Try to get a brightly colored chock which you won’t forget to remove before you move out of your campsite
- Grip: While rubber wheel chocks are great at gripping all kinds of surfaces, plastic ones are not. So look for textured plastic chocks that have a better grip on the surface.
- Price: Do your research well because some very good wheel chocks come for great prices. Don’t fall for marketing gimmicks; instead, visit expert forums and take the opinion of regular RVers.
- Additional Features: Some chocks come with a handle which makes it easier to lift them. If you plan to camp at a sunny place, chocks with UV stabilizers will crack lesser under the sun’s rays. Rubber wheel chocks smell a bit, so PU and plastic chocks are better if you don’t like the smell.
3. RV Blocks

RV leveling blocks are the swiss army knives of leveling. They are easy to clean, store, and help you level your rig on any surface.
You should look for these things in RV blocks:
- Strength: Make sure they can carry the weight of your RV with all its paraphernalia.
- Size: As in the case of chocks, they should be at least 25% wider than your wheels.
- Weight: You will have to store these in the RV, so ideally, they are better if they are lighter. But being light should not mean that they should not be durable.
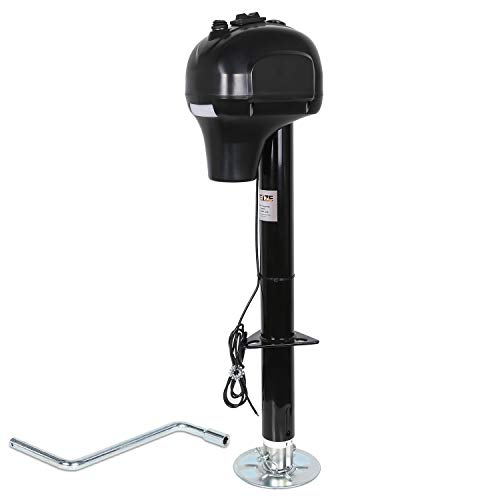
4. Stabilizer Jacks
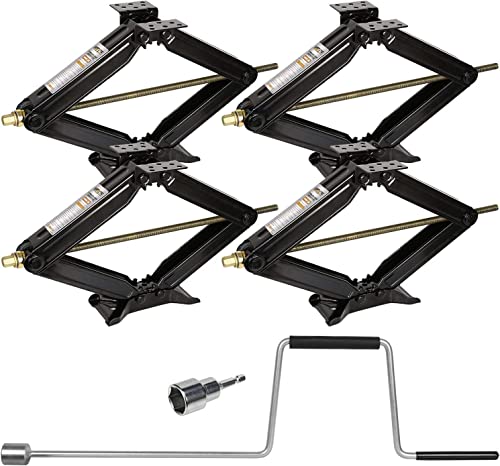
Stabilizer jacks help reduce your rig’s swaying and rocking motion after you have leveled it perfectly. There are ten types of stabilizer jacks that you can use in an RV, so you need to know which ones are best suited for your case.
If you are looking for an inexpensive option, you can use scissor jacks or screw jacks. For automatic solutions, check out electric jacks or full-width double stabilizers.
5. Several 2-inch Wood Plank Pieces (At least 10)
We will use these planks to support the tongue jack.
Steps To Level Your Travel Trailer When You Are On A Permanent Site
1. Choose Your Site
Ensure that your level indicator is not on the far left or right when parking your RV. If so, look for another place to camp. Otherwise, you will find it difficult to level the trailer later on.
Tips For Picking A Level Spot To Permanently Park Your Trailer
- A long concrete level is a great tool to give you at least a ballpark about how much adjustment you will have to do when you finally park.
- Check if the soil at the spot you have chosen is firm. If it is soft or soggy, you are better off picking a different area.
- Try to choose rocky ground during the rainy season because even firm soil will quickly turn into soft mud if it rains a lot.
2. Clear the Area of Debris and Clutter
Clear the area of rocks, debris, logs, branches, and any other clutter because these will cause problems when leveling. There are tree branches and sticks that you might also want to clear before you start the leveling process in many places.
You can ask for help from nearby RVers to move your vehicle in and out of the spot to check how level it is. You can even use the Bluetooth level we talked about earlier.
3. Check Your Travel Trailer With A Level
Now, bring out the RV level to see if it would be better to park your trailer head first or back first. The level will help you see which way the site is higher and which side is lower.
4. Place Leveling Blocks Near Your Travel Trailer’s Tires
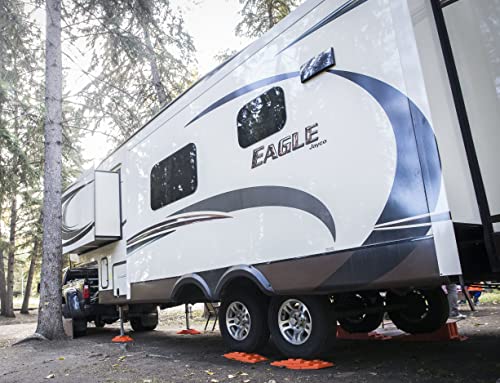
RV leveling blocks build a temporary foundation to help you raise that side of the trailer, which is lower as per your RV level. Bring out your RV leveling blocks, assemble them and place them in front of the tires on the side you need to lift.
If you do not have leveling blocks, a makeshift arrangement you can use is pressure-treated blocks of lumber wood. But if the RV will stay in one spot for several months, we would suggest you spend the extra money and get blocks instead.
After all, wood can rot and easily break. If it rains, the wood may absorb water and become bloated, raising the RV from one side. This will defeat the entire purpose of leveling.
5. Bring the RV onto the Blocks
Get some help from nearby RVers to drive your trailer on the RV blocks. Try to make sure that they can communicate well with hand signals because you will need them while backing up.
Driving onto the blocks is a slow process that needs finesse. If you are not a patient driver, give up the wheel to someone who can do a better job.
Make sure that blocks are completely under the tire, not partially. Otherwise, the part of the tire hanging out will get damaged in a few months and might blow out whenever you are ready to move out of the campsite.
If you miss the blocks the first time, or your wheel is not completely on the block, keep trying till you get it right.
6. Install the Wheel Chocks
Again, for a single season or a few weeks, you can get away with just using wood blocks to stop the wheels on both sides. However, if you are going to be spending a long time in this spot, there is no excuse for not getting quality wheel chocks.
Bring out your wheel chocks and install them under the tires. For extra safety, you can also get locking chocks. Make sure they are firmly in place, and you cannot move them with your hand on either side of the tires.
It might also be a good idea to get wheel-locking chocks for longer stints. These will give additional support to keep your wheels in place.
7. Slowly Start Lowering The Tongue Jack
Now, put a big paving stone, and then create a small pile of your 2-inch wood planks underneath the tongue jack. This will ensure that the tongue jack does not sink into the ground over time.
Now use your level somewhere in the middle of the RV. You can request a nearby RVer to watch over it and tell you when the bubble is centered while you slowly bring down the tongue.
8. Install Any Stabilizing Jacks
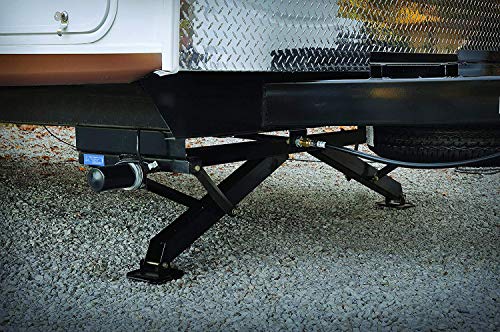
You may already have stabilizing jacks installed on your RV, but you can always purchase them online or at an automotive store if you don’t.
There are ten types of stabilizing jacks, and each has its pros and cons. In short, if you want a simple and inexpensive solution, use scissor jacks or screw jacks. If you are looking for something that can work at a button press, choose electric ones.
Whatever you choose, make sure that you use them to stabilize the RV because, without them, your rig will constantly sway and rock, which can eventually damage the nuts and bolts.
9. Make Final Adjustments
Once you complete the process, check your RV level both front to back and side to side. The ideal place to test this would be to put it in the center of the RV.
If you find that your level’s bubble is not centered, you can drive your RV out and make minor adjustments to the blocks, levels, or jacks as the case may be. Then bring your RV back and repeat the process of mounting your wheels on the blocks and locking them in with chocks.
FAQs
Are Permanent Travel Trailer Spots Level?
In most cases, no. Unless it is a professionally managed site that has taken the effort to make concrete spots for camping, you won’t find level spots anywhere. This is why the leveling process we explained above is very important.
How Do You Level a Camper Without Moving it?
If you plan to place your camper in a spot where you cannot tow it in or out, you might need to level the camper with some ingenious solutions.
One method you can try is to use a bottle jack to lift the RV’s lower side. Then reach under the wheels and add more blocks in the right spot.
After this, slowly bring down the jack, let the RV rest on the blocks, and check if it is level. You might have to try doing this three or four times before you get the right level for your camper.
Conclusion
The history of RVing has been one of innovation and finding new solutions, and regular improvements to every little detail. Leveling is one area where many small innovations have helped solve a problem that everyone knew but couldn’t do anything about.
Leveling your trailer is perfectly important, but once you get the hang of it and buy quality wheel blocks, chocks, and a good RV level, our guide should make the process very easy.
Angela Devaney

Angela Devaney, a former IT project management professional, embarked on an adventurous journey of full-time travel, which included touring West Africa in a converted overland truck and converting an ex-military 4×4 Sprinter van into a camper for a five-year South American expedition. She now utilizes her hands-on experience to create practical RV living and van life advice as a full-time digital media producer, reaching over a million users annually through her YouTube channel, blog, and newsletter. Angela also lends her expertise as the editor-in-chief of the Campervan Electrics Handbook.