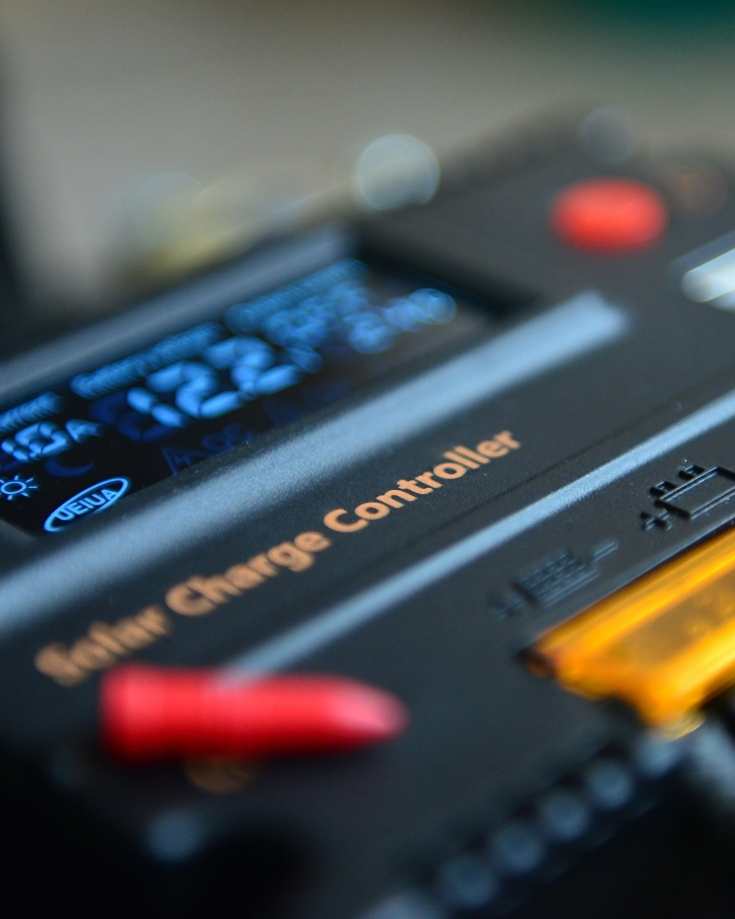
A solar charge controller is an essential component for getting the best performance from your camper solar setup.
But not all controllers are the same.
Different types, sizes, and features are designed to suit off-grid solar setups best.
It’s easy to get lost in the technical detail and buy an inferior product.
This guide will help you to choose and buy the best solar charge controller for your RV, motorhome, or camper van conversion and get the best performance from your panels.
We’ll show you some of the best solar charge controllers on the market today, explain the basic functions of the component, the different types available, and how to select the best one for your RV lifestyle.
And as an added bonus, we’ve included an easy-to-use calculator to make charge controller sizing a breeze.
If you’re new to electrics or van builds, look at our starter guide to camper electrics first.
When you click on links to various merchants on this site and make a purchase, this can result in this site earning a commission. As Amazon Associates, we earn from qualifying purchases. For more info, please check our disclosure page.
At A Glance: 5 Best Solar Charge Controllers For RVs
1. Renogy Rover Li 40a MPPT Charge Controller

Features
- A well-respected brand for solar components at affordable prices
- Compatible with 12v or 24v battery banks & lithium
- Up to 99% efficient
- LCD screen & packed with safety features
- Bluetooth enabled
- 2-year manufacturer’s warranty
Enter coupon code MowgliAdventures for 10% off at Renogy
2. Victron Energy SmartSolar 100/30 MPPT Charge Controller

Features
- Highly respected brand for solar components
- Ultra Fast MPPT Technology
- Bluetooth communication built-in
- Intelligent battery life management & lithium compatible
- Programmable charge algorithm
- Output short circuit protection (internal fuse)
- Over-heating protection
- 5-year manufacturer’s warranty
3. MidNite Solar Classic 150 MPPT Charge Controller

Features
- One of the most popular charge controllers in the US
- Battery Sensor for temperature correction on battery charging
- Wi-Fi enabled
- Safety features include Arc & Ground Fault
- Compatible with wind turbines too
- 5-year manufacturer’s warranty
4. ePever 60A MPPT Controller

Features
- High quality & budget friendly
- Compatible with 12v – 48v battery banks
- LCD screen & lithium compatible
5. Renogy Voyager 30a PWM

Features
- Backlit LCD displaying system operating information and error codes
- LED display for easy monitoring
- Compatible with Lithium-ion & LiFePO4 batteries
- Waterproof design, suitable for indoor or outdoor use.
- 5 Stage PWM charging
Enter coupon code MowgliAdventures for 10% off at Renogy
What is a Solar Charge Controller?
A solar charge controller is an essential electrical component in a solar setup, especially in RV campers, motorhomes, and camper vans.
The aim of the solar system is to harvest the sun’s clean, renewable energy in the form of sunlight and use it to charge deep cycle leisure batteries.
The solar panels take care of the harvesting.
A single solar panel is made up of multiple cells. Because the sunlight hitting them is sporadic and uneven, they don’t all receive the same amount of sunlight at the same time.
This results in the panels producing a wide range of energy, with the potential to fluctuate multiple times every second and spike often.
Depending on their type, deep cycle leisure batteries need between 12.6 and 14.6 volts to charge.
Anything less, and they won’t charge. Anything more, and they’ll start to cook, destroying the battery.
So connecting the batteries directly to the solar panels would result in damage.
This is where the charge controller steps in, taking over the entire charging process.
As its name suggests, its primary function is to control the solar charge, protecting the battery from harm.

How Does a Solar Charge Controller Work?
To prevent overcharging the RV batteries, a solar charge controller regulates the voltage passed to the battery from the panels.
It works by monitoring the battery voltage and regulating the battery charging in response.
Batteries take a different voltage for various charging states.
For example, a relatively flat battery may take as much as 14.4v until 90% charged.
Then it needs a lower voltage to trickle charge, maintaining it at a peak state.
The charge controller manages this dynamically, increasing or decreasing the charging current and voltage for the given state.
Do I Need One?
Typical RV solar setups need a solar charge controller installed.
Applying random and chaotic voltages from a solar panel directly will permanently damage the battery.
Not exactly what you want for your DIY campervan conversion, RV, travel trailer, or for a comfortable van life.
The only time you might get away without a solar charge controller is if the solar panel is really small – less than 5 watts.
But that’s so small it’s virtually handheld size, so not up to providing the energy demands of RV life.
In short, a charge controller is essential if you want a camper solar setup.
Types of Solar Charge Controllers
There are 2 types of solar charge controllers for your RV:
- Pulse Width Modulation (PWM)
- Maximum Power Point Tracking (MPPT)
PWM Solar Charge Controller
A PWM is a simple device.
Designed to handle a nominal 12v (or sometimes 24v) solar panel array, a PWM won’t cope with the large voltages produced by multiple panels wired in series.
The total nominal voltage of the solar panels must be the same as the voltage of the battery bank with a PWM controller.
So a 12v PWM charge controller must be paired with 12v solar panels and a 12v battery setup.
Therefore, using multiple panels in a solar array with a PWM charge controller must be wired in parallel.
A PWM controller takes the power from the panels, making it available to the batteries, depending on their charge state.
The maximum amps of the solar array cannot be exceeded.
Let’s say a battery is sitting at 12.6v.
With a 100 watt solar panel rated at 17.9 volts and 5.72 amps, the maximum watts you can pass to the battery at that time is 12.6v @ 5.72a, giving us 72 watts.
(Ohms Law states watts = volts x amps)
As the battery level increases, the PWM charge controller becomes more efficient. A PWM is at its most efficient when the battery is nearly full.
At 13.4v however, it can still only draw on about 75% of the watts on the roof.
13.4 volts @ 5.72 amps is 77 watts.

So a PWM isn’t incredibly efficient, even at its peak.
The Pros & Cons
Many campervan converters and RVers turn their backs on PWM charge controllers in favor of MPPT, but there is still a place for them.
If you intend to live in a van off-grid for anything more than a few days at a time, and depending on your camper electrics, a PWM charger probably isn’t the right choice for you.
It’s simply not efficient enough at extracting from the solar panels.
You’d need more panels to make up for it, if you have space on your roof for them.
But the more panels you have, the more evident those inefficiencies become.
In short, if you can’t manage without your fridge and lights, invest in an MPPT controller.
On the upside, PWMs are incredibly cheap.
A PWM charge controller for a 300w solar setup will cost in the region of £35 | $50 compared to a £110 | $150 price tag for the MPPT controller for a similar size setup.
PWM charge controllers are most efficient when the battery is nearly full.
So if you go off-grid for only a few days at a time, setting off with full batteries and in fair weather, a PWM controller may be all you need.

MPPT Solar Charge Controller
An MPPT solar panel charge controller is more sophisticated than a PWM.
It can handle much higher voltages, so wiring the panels in series is the best configuration.
MPPT controllers need certain conditions to be met to begin charging the battery.
Some will begin charging the battery when the input voltage is 5v higher than the battery voltage. Once charging, they continue to charge the battery when the voltage remains 1v or more above the battery voltage.
Others may need a minimum of 15v and won’t charge the battery with anything less.
To explain how an MPPT controller works, we need more maths.
Let’s consider the same 100w panel with an amp rating of 5.72 and an optimum operating voltage (Vmp) of 17.9v.
The battery is sitting at 12.6v.
The panel is putting out 17.9 volts and 5.72 amps. The MPPT controller knows it can only send 12.6v to the charging battery.
But here’s where the clever bit comes in. Rather than waste the excess volts from the panels, the MPPT controller converts them into amps.
Let’s look at the numbers:
17.9 volts is converted down to 12.6v (17.9 ÷ 12.6 = 1.42)
5.72 amps is converted up by the same factor to 8.12 amps (5.72 x 1.42 = 8.12)
So power into the MPPT is the same as the power out. (8.12 amps at 12.6 volts)
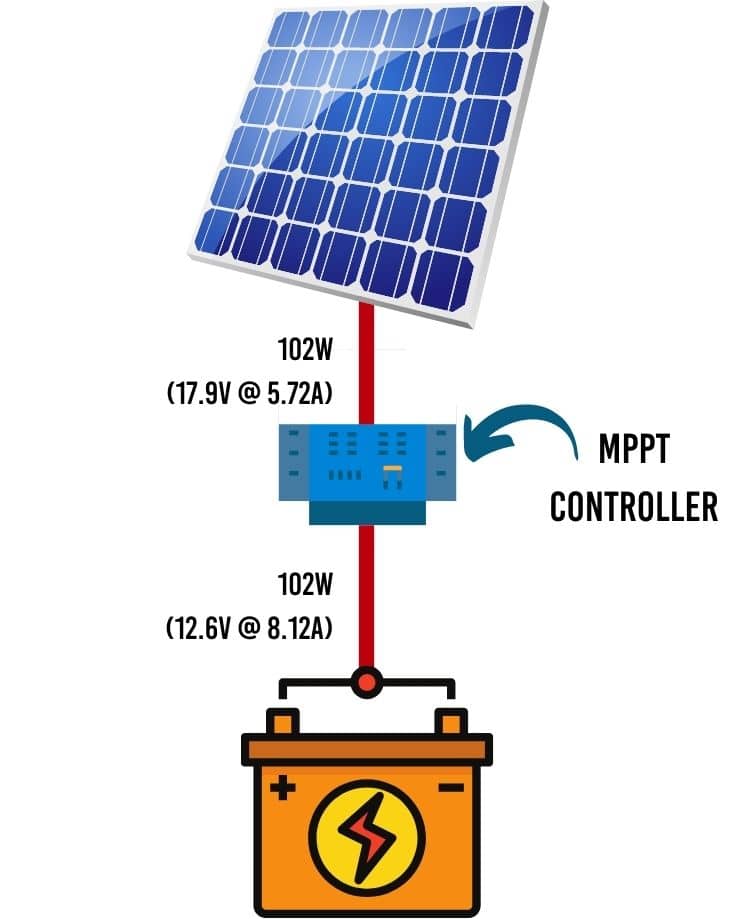
In reality, MPPT controllers are between 94-98% efficient, but the principle of the maths is the same.
The upshot is an MPPT controller can increase performance by up to 30% over a PWM.
Not too shoddy, eh?
The Pros & Cons

The benefits of MPPT charge controllers are pretty obvious.
With such high performance, they can keep batteries charged with fewer solar panels.
Because the controller can handle larger voltages, wiring the solar panels in series is an option.
Check out our complete guide to wiring your solar panels in series or parallel. It covers mixed panels, too, and includes an interactive calculator to find the most efficient setup for your solar array.
In summary, a series array will provide a high enough voltage to charge the batteries for longer than if they were wired in parallel.
All of this adds up to the opportunity to stay off the grid longer. We lived and traveled in a van in South America for over 4 years.
For six months during that time, we were in Patagonia, throughout the southern hemisphere winter and didn’t drive anywhere. The pandemic prevented us from traveling.
We weren’t hooked up; we had 320w panels wired in series with an MPPT controller, and we did just fine with careful management.
The only downside of the MPPT is its hefty price tag, about 3 or 4 times the price of a PWM controller for a similar size system.
However, to get the same battery charge from a PWM charger on a 300w solar setup, you’d need an extra panel and more cable connectors because you’d have to wire in parallel.
So overall, there’s little price difference between an MPPT controller and a PWM.
How to Connect a Solar Charge Controller to Solar Panels
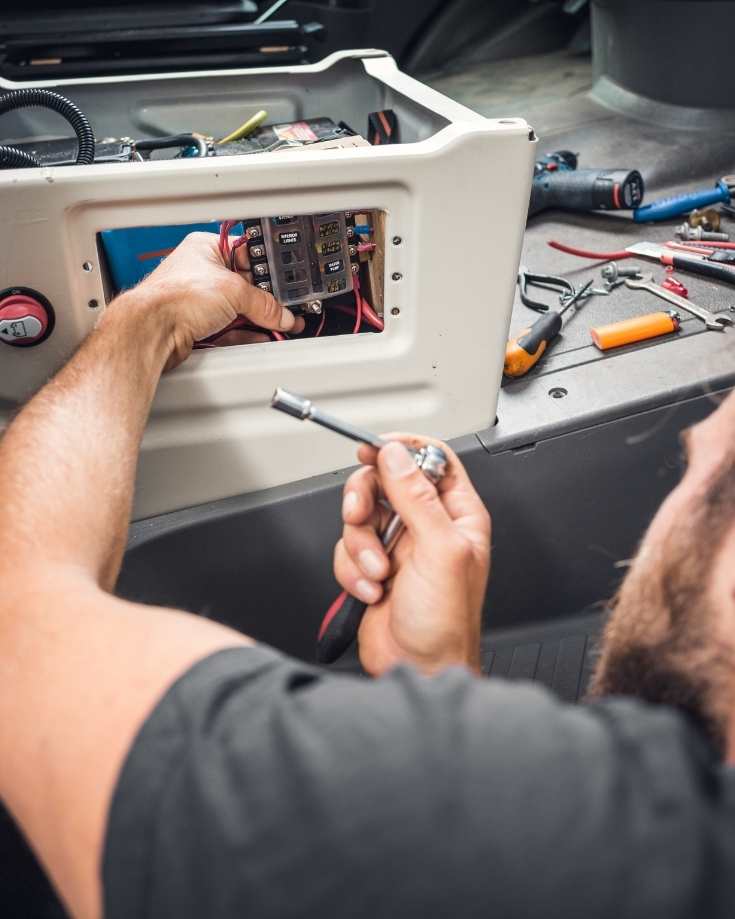
Fit the solar charge controller as part of installing the solar setup after fitting and wiring the panels.
Connecting the solar charge controller to the solar panel is pretty straightforward.
The cables and fuses should be connected in the correct order to avoid harm or damage.
Here’s a solar charge controller diagram with 2 panels wired in series, a single battery with fuses, isolator switches, and an earth wire.
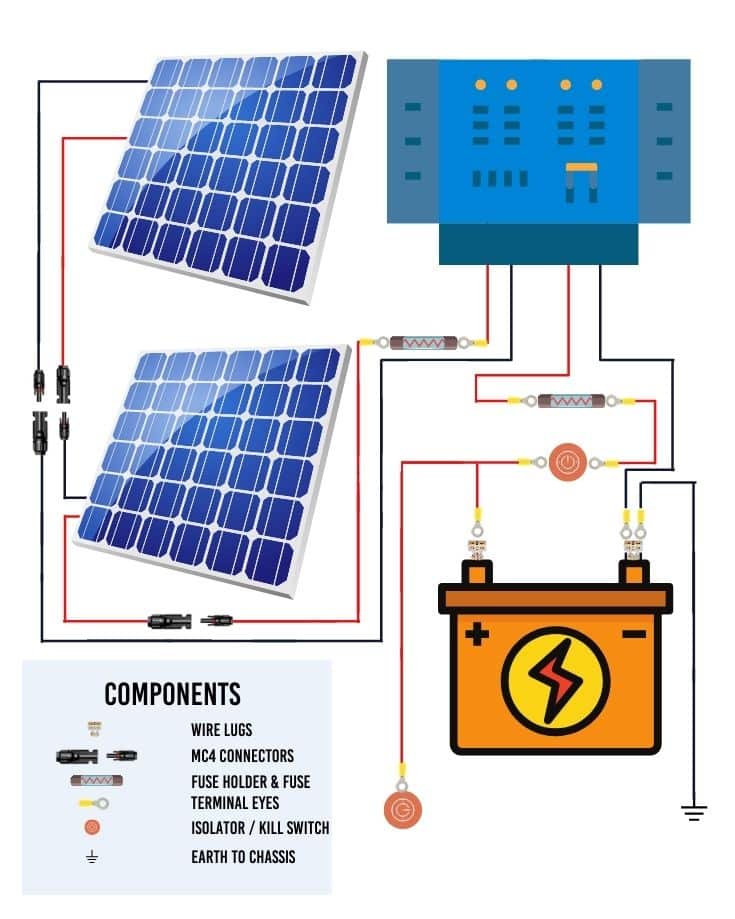
We have complete 12v solar panel wiring diagrams for 100w – 800w systems if you want to see the detailed design.
And we have a step-by-step guide on installing solar panels on RVs, campers, and motorhomes.
It includes installing the solar charge controller, so it’s the best place to see how and when to connect it to the solar array.
Everything you need to know about campervan electrics. Now available in ebook and paperback!
Learn how to design, size, install and troubleshoot your camper’s electrical system.
How to Use a Solar Charge Controller

Each solar charge controller model is slightly different in terms of its features and operating controls, so always read the instructions manual first.
Regardless of the model, though, the basic functions operate similarly.
The panels will produce an electrical supply once the controller is connected to the solar array.
This allows you to configure the controller to support your battery’s specific battery types and charging profile.
Follow the manufacturer’s instructions carefully.
Once the solar charge controller is set up and the batteries are connected, it usually needs no further intervention or maintenance.
Top tip | Keep the manufacturer’s manual in your RV camper. It helps to refer to it when monitoring the performance of your solar setup.
What to Look for When Buying an RV Solar Controller
Charge controllers, specifically MPPTs, are an investment, so selecting the best one for your use is essential.
Solar charge controllers come with different efficiency ratings and various extra features.
Here are the most common features and technical terms to look out for:
- Type | Refers to MPPT or PWM.
- Supported battery technology | The type of battery (FLA, AGM, Gel, or Lithium) the charge controller can work with.
- Efficiency rate | The higher the percentage, the more wattage the solar charge controller can extract from the panel. The higher, the better.
- Battery output voltage | Most controllers cover a range from 12v to 48v. Most RVs, camper vans, and motorhomes run on 12v systems, while 24v battery setups are less common.
- Maximum input voltage | The highest voltage the solar charge controller can accept from the solar panels. Determine the highest possible input voltage for your solar panel configuration, including future scalability. Remember, wiring panels in series provides a higher voltage.
- Maximum current output | The highest current (amps) the charge controller can send to the battery bank. If you size this too small, you waste the energy your solar panels harvest.
- LOAD or LVD output | Allows small devices to be charged directly from the solar charge controller instead of the battery (a waste of time, in our opinion).
- LED screens | For displaying system operation information and error codes (helpful because without them, you’ll need battery monitoring displays to monitor the system’s health).
- Bluetooth module | For remote control management and monitoring.
- Safety features to prevent overcharging, overload, short-circuits, reverse polarity, reverse current and electric arcs.
Charge Controller Sizing
Choosing the size of the controller requires some maths to help identify the correct-sized controller.
There are 5 factors to consider:
- How many solar panels are in the array
- How many watts are in the solar panel array?
- The open-circuit voltage (Voc) of each panel
- The short-circuit current (Isc) of each panel
- What battery bank voltage will you use?
With this information, you can calculate the minimum size solar charge controller you need for your setup.
Use the calculator below to find the right size for your setup.
If you don’t know the panels’ open-circuit voltage or short-circuit voltage, leave these values set to zero. The calculator will use an estimated value.
The calculator also recommends an MPPT and PWM charge controller to meet your needs.
For more help and information, check out the FAQs on our solar charge controller calculator post here.
For more help sizing your camper electrics and solar setup, check out our other electrical calculators for RVs and camper van conversions too.
Graham Bogie

Graham is a seasoned marine electrical engineer with two decades of experience designing customized electrical systems for plant machinery and converting campers and overland vehicles. His expertise has led him to author the reputable Campervan Electrics Handbook and become the chief designer of the RV Wiring Design Tool. As a knowledgeable figure in the field, his YouTube channel, blog, Facebook group, and newsletter, offering electrical advice and product reviews, reach more than a million users each year.