Wiring solar panels in series is a great way to maximize sunlight absorption and generate more electricity for your RV’s needs. Here’s a complete guide on how to wire your RV solar panels in series.
If your RV solar setup includes multiple panels, they must be connected to a solar array.
That may sound a bit techie, but it’s pretty straightforward.
A solar array is a term used to describe a group of interconnected solar panels that generate electricity using sunlight.
Connecting solar panels to create an array means you don’t need to install multiple charge controllers.
Instead, wiring the solar panels together basically turns multiple solar panels into one large panel.
In this guide, we’ll explore:
- a step-by-step guide on how to wire solar panels in series.
- the pros and cons of wiring your RV solar panels in series,
- when wiring in series is the best configuration, and
- wiring diagrams for connecting between 2 and 6 solar panels in series.
Let’s dive in!

How To Wire Solar Panels In Series
Wiring solar panels in series can increase the total system output voltage, but it's crucial to do it correctly.
We've put together a comprehensive guide that will take you step-by-step through the process of wiring solar panels in series.
Materials
- Solar Panels
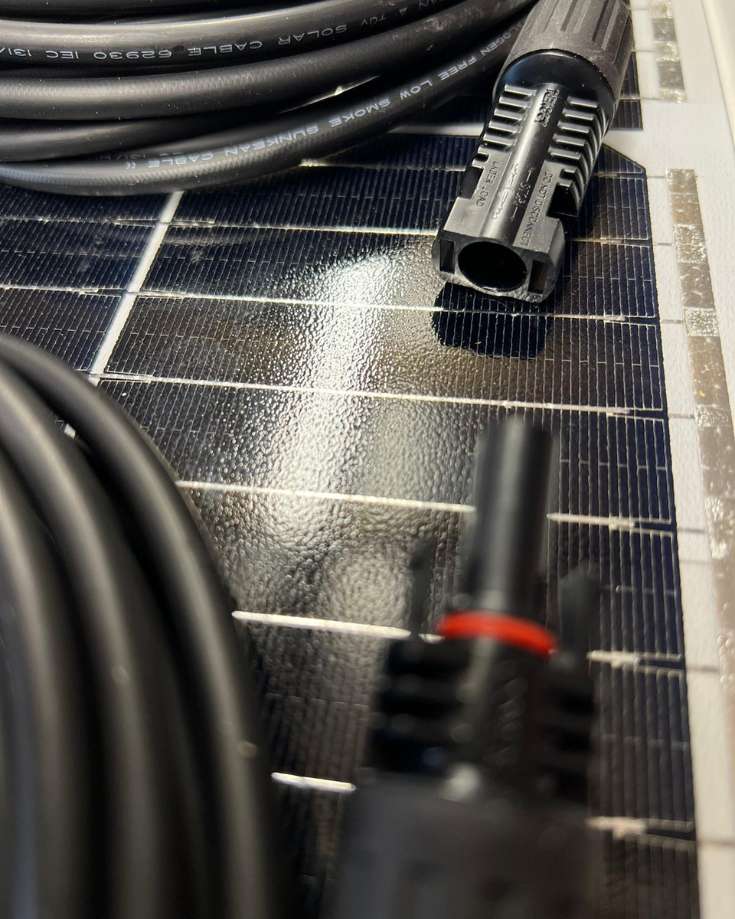
- MC4 Connectors
- Solar Extension Cable
Tools
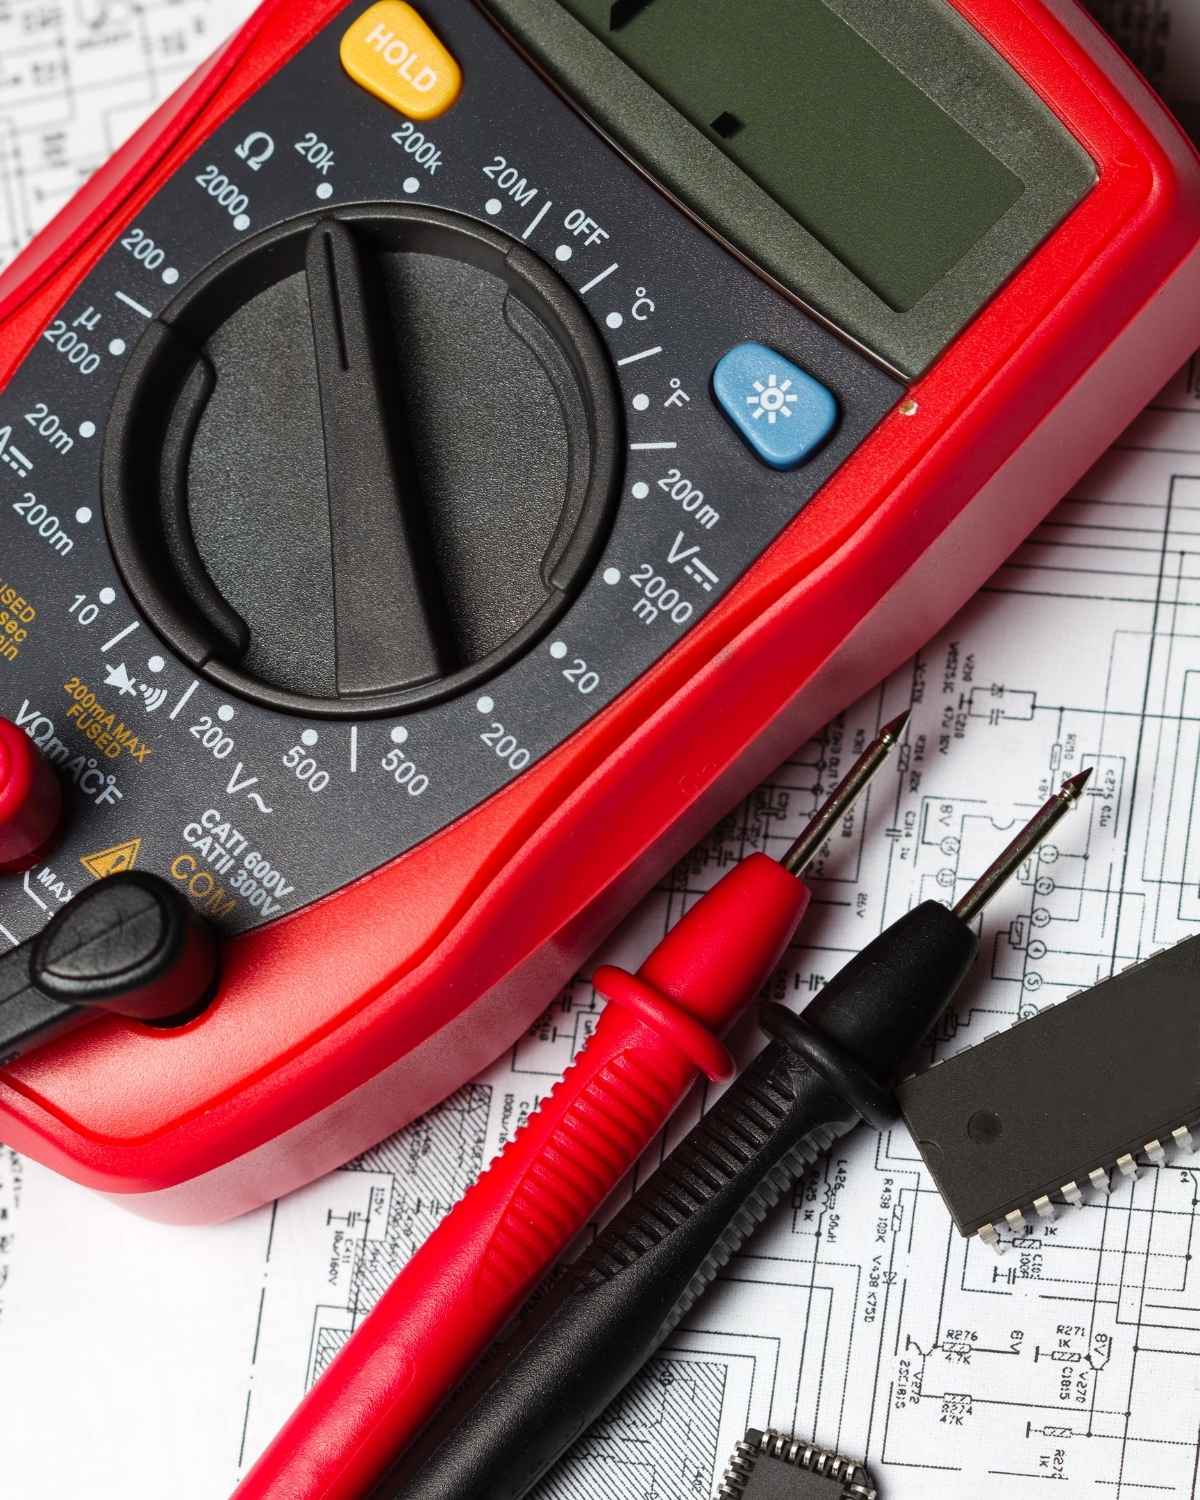
- Multimeter
- Solar Connector Assembly Tool
Instructions
- Test each solar panel with a multimeter to check that there is voltage.
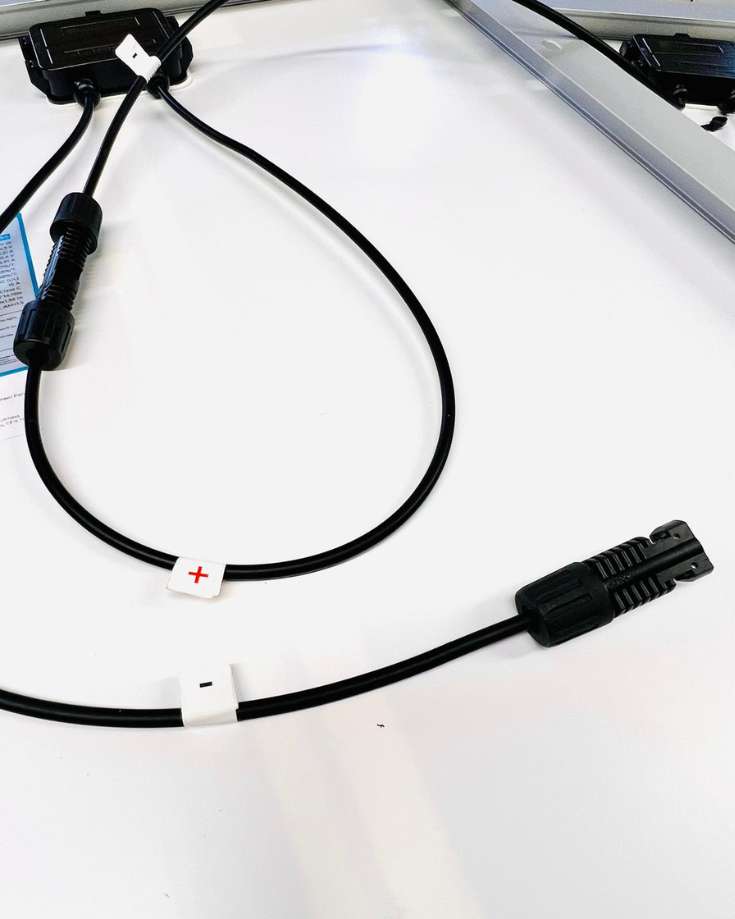
- Mark the positive cable with red electrical tape.
- Cover the panels so there they don't produce any voltage.
- Connect the +ve cable of one panel to the -ve cable of the next by pushing the 2 MC4 connectors together until you hear a click.
- Remove the covers and test the connectivity and voltage output of the solar panel array with a multimeter to confirm it's providing the voltage you expect.
- If you have more panels, repeat steps 3-5 until all panels are wired in series.
- Add PV extension wire as necessary with corresponding MC4 connectors.
- Add cable numbering.
- Once all are connected, uncover the solar panels and test the voltage.
- You're now ready to connect to the fuse and MPPT.
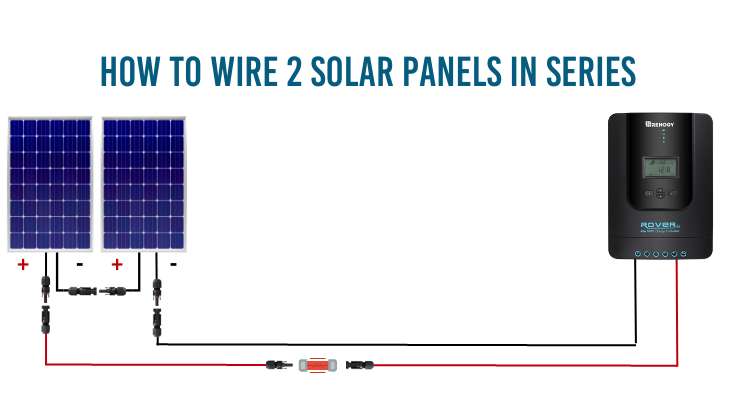
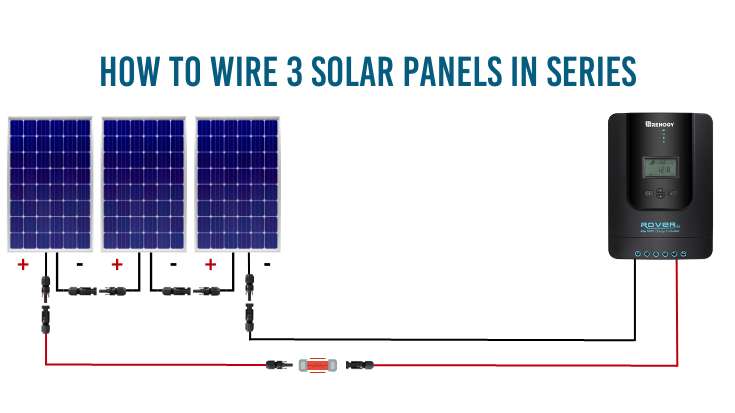
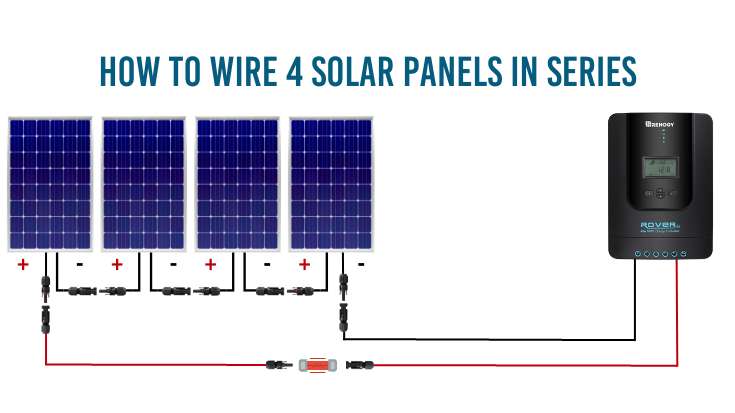
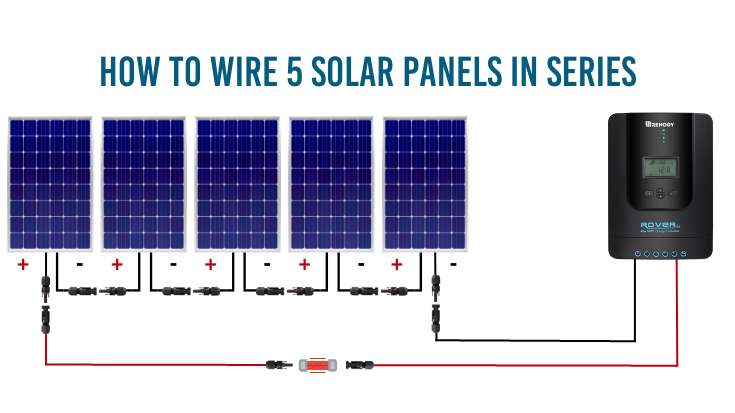
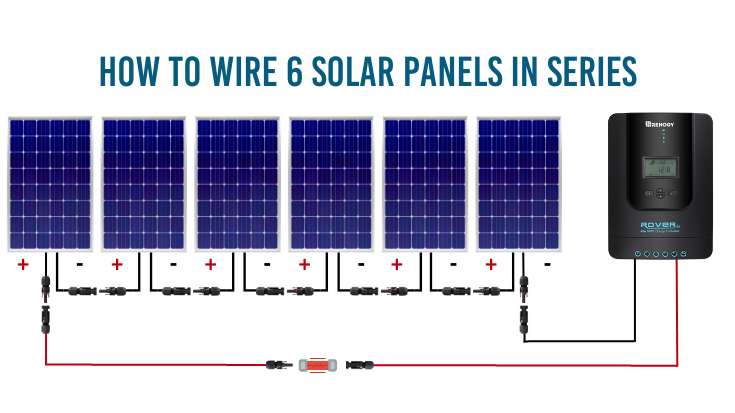
Wiring Diagrams For Wiring Between 2 and 6 Solar Panels In Series
How To Wire Solar Panels In Series: The Detail
To wire solar panels in series, you will need essential tools and parts.
Firstly, solar panels are the most crucial component. Preferably buy identical models to ensure they work effectively.
Secondly, you will need 2 pairs of MC4 connectors specifically designed for solar panels.
Lastly, extension cables will be needed if the cables aren’t long enough to reach the charge controller.
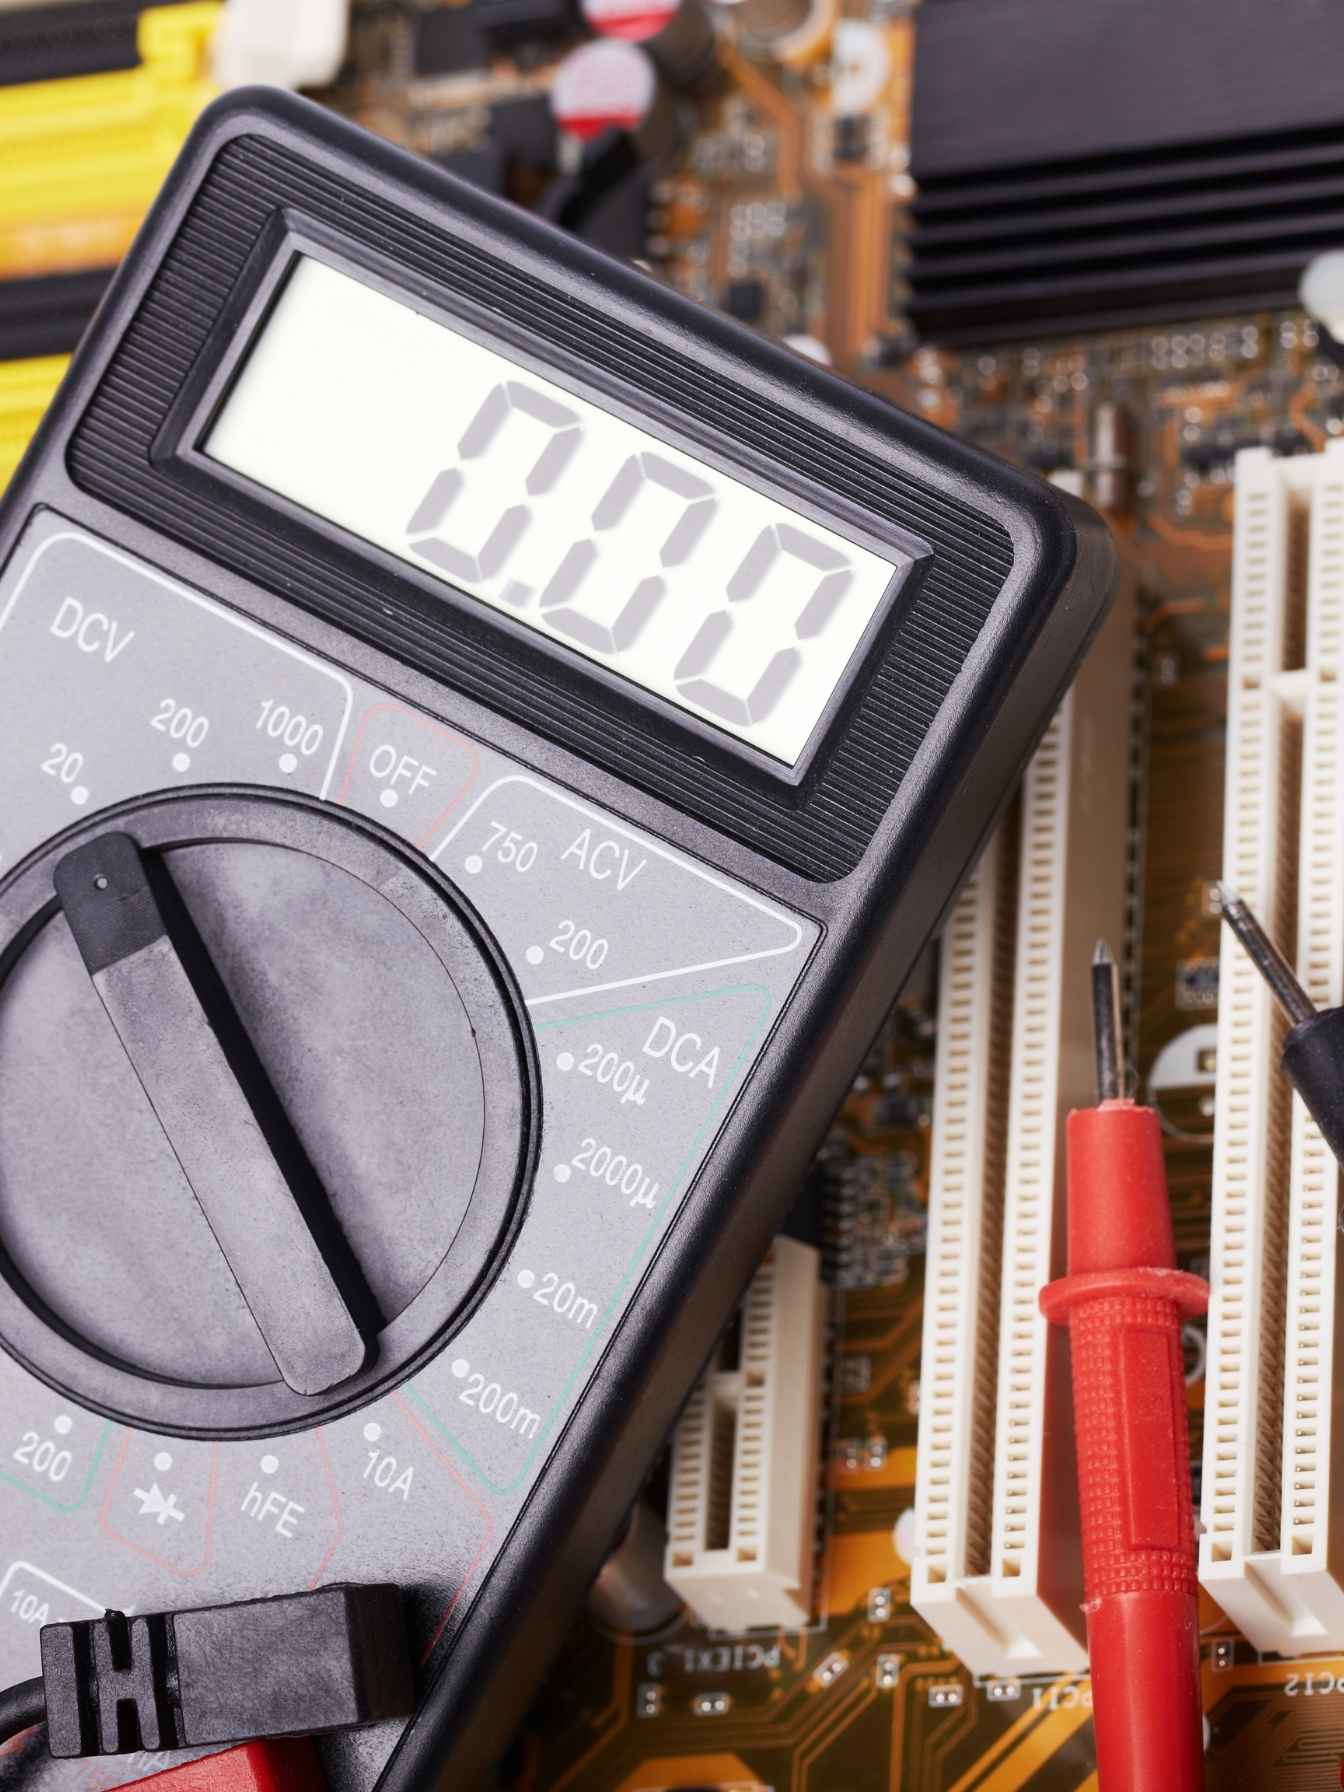
In terms of tools, a multimeter is necessary to test the voltage and connectivity of the panels throughout wiring solar panels.
A solar connector tool is also helpful, especially for separating the connectors during testing or replacing a panel.
Having these tools and parts ready will make your wiring solar panel project easier and more efficient.
Here’s a step-by-step guide to wiring solar panels in series:
Step 1: Test each panel
Most manufacturers aren’t inclined to give refunds if you’ve installed a solar panel, so it’s prudent to check it’s working correctly when you unpack it.
Test each solar panel with a multimeter to check each producing voltage.
You can test it by inserting the multimeter’s red probe onto the positive cable and the black probe onto the negative cable.
So long as it’s daylight, the panel should produce some output voltage.
If the voltage displayed on the multimeter is a negative number, you’ve inserted the probes onto the wrong cables.
Step 2: Mark The Positive Cable
The cables on pretty much all solar panels are black, regardless of whether it’s positive or negative.
It’s a good idea to mark the positive one with red electrical tape so it’s easy to identify later.
Step 3: Cover The Panels
If a solar panel is exposed to daylight, it produces voltage.
As you’re about to begin connecting live panels, it’s safest to cover them to prevent any voltage.
In theory, a live voltage could result in some sparking as you connect the panels. In reality, though, protected by the MC4 connectors, the live wires aren’t exposed, so it’s unlikely to cause any harm.
Still, it’s better to err on the side of caution.
The panels will probably already be mounted on your RV’s roof when you connect them, so use the cardboard delivery boxes or blankets to shield them from the sun.
Take care not to damage them.

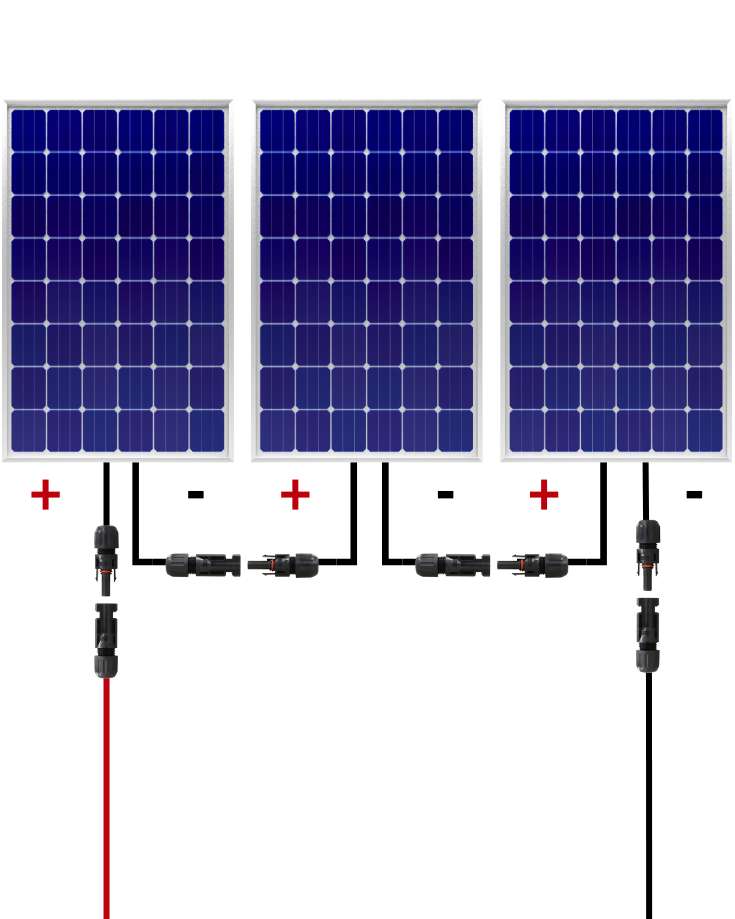
Step 4: Connect Each Panel To The Next
When connecting multiple solar panels in series, you begin by connecting two in series, then adding each additional solar panel into the array.
Take the first two solar panels and connect the first panel’s negative cable to the second’s positive cable.
The MC4 connectors slot together pretty quickly. You’ll hear a click when they’re snapped tightly shut.
Then you’ll be left with a positive cable dangling free from the first panel and a negative cable dangling free from the last one.
You should move on to the next step to test your connectivity at this point, but once you’ve done that, you’ll return to this step to add any additional panels.
Connect the negative cable from the last panel you fitted to the positive cable of the next panel.
After each panel is connected, you should always be left with a positive cable dangling free from the first panel and a negative cable dangling free from the last.
Step 5: Test Connectivity
After each panel is wired, test its connectivity to ensure everything works as expected.
Uncover the panels and test the array with a multimeter to check it is producing the expected voltage.
You can test it by inserting the multimeter’s red probe into the free positive cable and the black probe into the free negative cable.
So long as it’s daylight, the array should produce some output voltage, and you should notice it is increasing as you add each panel.
Step 6: Extend Solar Cable
The pre-installed solar panel cables tend to be short at around 3 feet.
Most RV solar installations will need more than that to reach from the solar panel, along the roof, down the wall of the camper, and to the MPPT controller.
Extend the cable using the correct wire gauge with MC4 connectors at each end.
The positive cable will connect to the MPPT controller via an inline fuse.
The negative cable connects to the MPPT controller directly from the last panel, so it doesn’t need an MC4 connector at that end.
Solar cable is usually 10 AWG, but you can use our wire size calculator to double-check.
Rerun the connectivity test after extending the cable to ensure it’s all in working order.
Step 7: Number The Cable
Numbering cables in an RV electrical system can be incredibly useful.
It makes identifying and tracing cables a breeze, especially when troubleshooting or repairing.
Numbered cables can also help prevent confusion and ensure everything is connected correctly.
Plus, it can save time, effort, and frustration in identifying and keeping track of wiring.
If you’re numbering your cables, do it now before connecting them to the MPPT controller, and make sure to note it down on your RV wiring diagram.
Step 8: Ready to Install Your Solar Charge Controller
That’s it! Your solar panels are wired in series and ready for connecting to the fuse and MPPT.
How Does Wiring Solar Panels In Series Work?
Wiring solar panels in series means connecting one panel’s positive terminal to another’s negative terminal to create a series connection.
This increases the array’s voltage while the current remains the same.
For instance, four 100W panels with a rated voltage of 20.3V and current of 4.93A wired in series can produce 81.2 volts (20.3 x 4) and 4.93 amps, delivering a total of 400 watts.
However, it’s crucial to note that solar panels’ wattage is rated under standard test conditions and may vary based on external factors like temperature and shade.
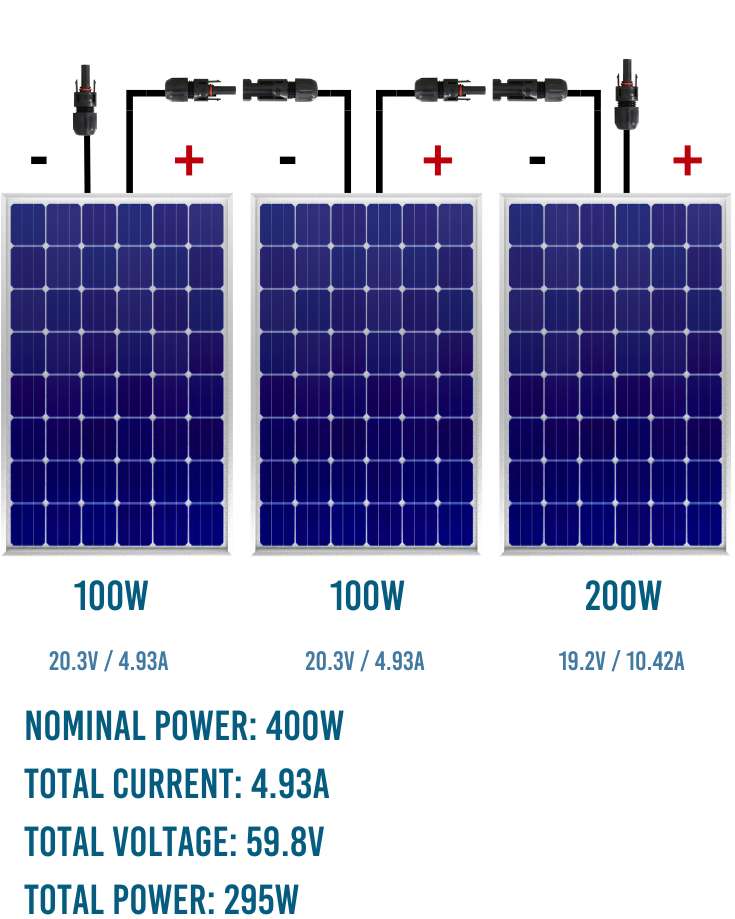
It’s also important to understand that the array’s current is restricted to the panel with the lowest current rating unless the solar panels are all of the same specifications.
For instance, three 100W panels with a rated voltage of 20.3V and current of 4.93A and one 100W panel with a rated voltage of 20.4V and current of 4.91A wired in series can produce 81.3 volts (20.3 x 3 + 20.4) and 4.91 amps, delivering a total of 399 watts.
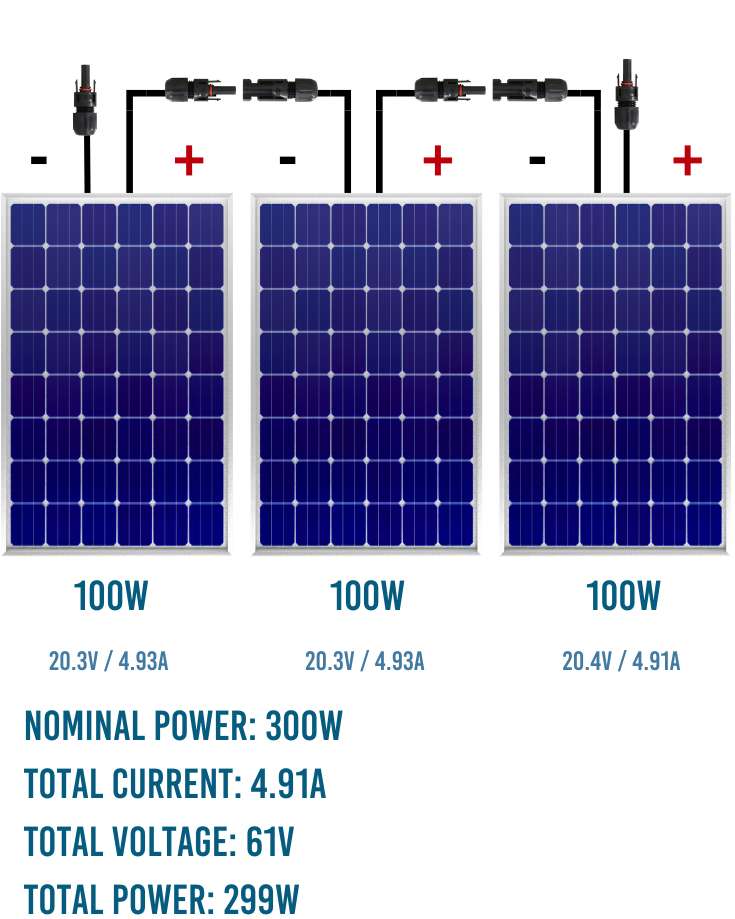
That example shows a slight difference but be wary of mixing different panels. The power loss can be significant, especially if you mix wattage sizes.
It’s best to work out the overall power the combination of panels will supply first.
Using identical solar panels will help ensure there are no differences that could affect the harvesting of energy.
But if you’re buying an extra panel to add to an existing setup, it’s best to check the specification matches precisely.
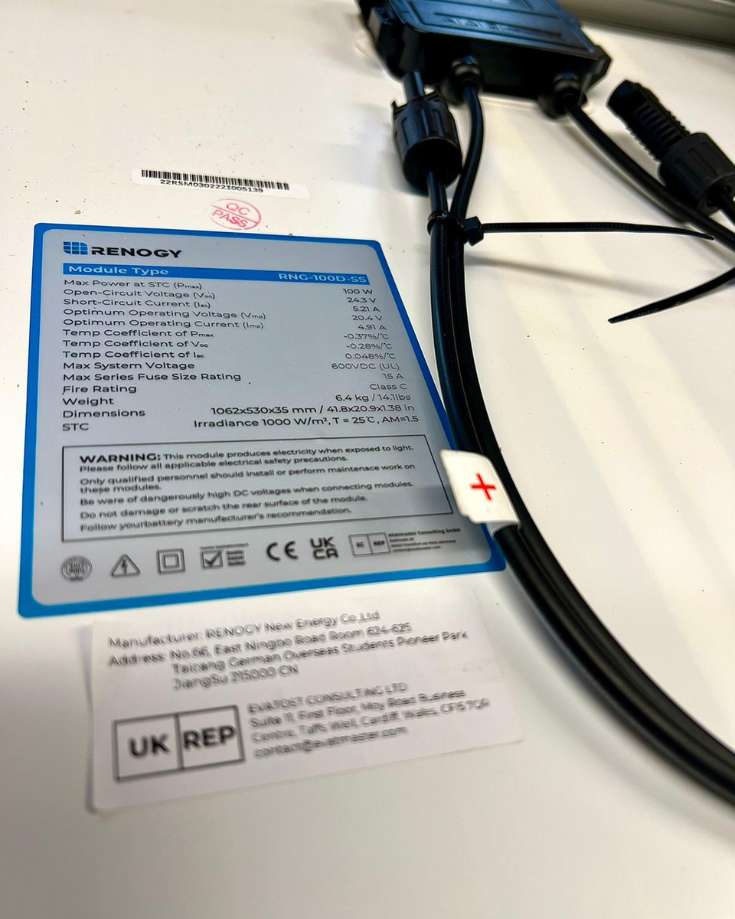
Specifically, check the following parameters match:
- VoC – open circuit voltage
- Maximum power – panel’s watt rating
- ISC – open circuit current
Advantages & Disadvantages Of Wiring Solar Panels In Series
A series configuration is a popular method of connecting solar panels with advantages and disadvantages, depending on your needs and circumstances.
RVers need to understand these pros and cons before making a decision.
Choosing the wrong method can significantly affect how much energy you can generate when boondocking and relying on your batteries.
This section outlines the key advantages and disadvantages of wiring solar panels in series for RVers.
Pros
Here are five key benefits of wiring your RV solar panels in series:
Charge RV Batteries For Longer
Did you know that wiring solar panels in series can help charge your RV battery for longer?
To understand why, let’s start with some basics.
First, a battery needs a minimum voltage of about 12.6v to charge.
If it is less than that, then it won’t charge.
Plus, some solar charge controllers need an input voltage from the solar panels higher than the battery’s voltage to operate.
So, the question is, how much voltage do our solar panels provide?
The output of solar panels varies throughout the day, depending on the sun’s angle.
Typically, more voltage is generated in the afternoon when the sun is high in the sky, and less voltage is generated in the morning and evening.
That’s where series wiring comes in. Solar panels wired in series produce higher voltages because they add the voltages of each panel together to increase the overall voltage output.
That means that even when the sun is low, the combined voltage output from the series wiring can still help to provide at least the minimum voltage needed to recharge your RV’s battery.
On the other hand, parallel wiring connects the positive terminals of each panel and the negative terminals.
This wiring method increases the current output while maintaining the same voltage.
While both wiring methods have advantages and disadvantages, series wiring is often the optimal choice for RVers.
Simple Wiring Installation
Unlike parallel connections, wiring solar panels in series is a straightforward and simplified installation process.
With series wiring, you only connect the panels end-to-end, with the positive terminal of one panel connected to the negative terminal of the next panel.
Creating this single electrical path increases voltage output while the current remains consistent. In addition, this method means you will have less wiring to manage, making it less complicated and time-consuming.
Parallel wiring, however, requires connecting every solar panel’s positive and negative terminals.
This can result in an intricate web of wires to manage, with multiple connector branches, which can be a hassle to set up, especially for novices.
Less Cable Needed
Wiring your RV solar panels in series means using less cable than wiring in parallel.
Solar panels are connected end-to-end in a series configuration.
For most RV camper installations, each solar panel has enough cable to connect them without extending the cable.
The only panel that may require a cable extension is the one farthest from the entry point.
Fewer MC4 Connectors
With each solar panel pre-installed with a positive and negative cable with an MC4 connector, you only need additional MC4 connectors for any cable extensions necessary to reach the solar charge controller.
The standard MC4 connector typically costs around $20 each, and the array wired in series might need two, bringing the total cost to around $40.
However, parallel connections are a bit more complicated. Each panel needs to connect to two branch MC4 connectors – one for the positive and one for the negative cable.
These branch connectors then require another pair of MC4 connectors to join the solar charge controller.
For instance, wiring four panels in parallel requires a minimum of one pair of 4 to 1 solar branch connectors and two pairs of MC4 cable connectors, costing around $80.
Plus, the cables on some of the panels may need to be longer to reach the branch connectors, so you’ll need an additional pair of connectors for each panel to extend its cable.
Lower Current
Because a series wiring configuration produces a lower current than parallel, smaller wire sizes can be used for installation. That benefits in terms of ease of installation and cost.
This is particularly relevant for RV and camper installations since space is limited, and heavy-gauge wiring can take up valuable space.
Moreover, smaller wire sizes are easier to handle, which reduces installation times and costs.
Cons
As RV campers, it’s important to understand the common drawbacks of wiring solar panels in series. Here are the main disadvantages to be aware of:
Shading Issues
When solar panels are wired in series, the output of each panel depends on the others in the series.
If even one panel experiences shading, it can significantly reduce the output of the entire solar array.
This can be a particular problem for RVers:
- We try to keep our camper’s cool in summer and head for shade.
- Solar panels are mounted on the RV roof and, unless fitted with tilting roof mounts, will rarely get direct sun.
- Most of us are mobile, so buildings, trees, etc., intermittently shade our panels as we drive.
Any shade falling on any part of the RV’s solar array will dramatically affect the energy captured.
One Damaged Panel Affects The Entire Array
It’s essential to keep in mind that one damaged or broken solar panel can affect the entire array.
This can be a significant problem, as a malfunctioning panel can reduce the system’s efficiency and power output to nil.
It’s critical to keep your solar panels in good condition and to inspect them regularly for signs of damage.
If you notice any issues, it’s best to address them immediately to prevent them from affecting the rest of the array.
If you damage a panel, you can easily disconnect it from the array and bridge the gap with some solar extension cable.
That way, you can still have your other panels providing power while repairing or replacing the damaged one.
Requires Larger MPPT Solar Charge Controller
Solar charge controllers play a critical role in RV solar panel setups by ensuring the correct flow of electricity between the solar panels and RV batteries.
The controllers are responsible for regulating the voltage and current received from the solar panels to safely charge the battery, protecting it from overcharge, over-discharge, and other issues.
Choosing the right size solar charge controller for your RV solar panel setup is important.
Controllers are sized based on the maximum voltage and current they can handle, and how you’ve wired your array is critical in determining the size needed.
In general, panels wired in series need a larger MPPT controller.
If we look at a 400w solar panel setup using 4 x 100w panels with a rated voltage of 20.3V and current of 4.93A:
- Wired in series, we’d need a solar charge controller to handle at least 81.2 volts and 4.93A.
- Wired in parallel, we’d need a solar charge controller to handle at least 20.3 volts and 19.72A.
Looking at Renogy’s range of MPPT controllers, you’ll need at least their 40A MPPT controller when wired in series for about $150. It has a 95 volt maximum voltage input, so it can easily accommodate our 80v.
If the same panels are wired in parallel, you can use the much smaller 20A MPPT controller for about $100. It has a 20 amp current rating, accommodating our 19.72A.
Even if you wanted a little more wiggle room on the current rating, the 30A version is still cheaper.
Limited Number Of Panels Per Solar Charge Controller
While it’s a disadvantage that you’ll need a larger MPPT controller if you wire your panels in series, the problem is even more complex if you have a lot of solar panels.
For example, Renogy’s Rover 100 Amp MPPT solar charge controller can handle up to 150 volts and 100A.
So, it can accommodate up to six 100 solar panels wired in series but 20 when wired in parallel!
For most of us, we’ll never be able to fit more than six solar panels on our RV campers, but for those lucky enough to have enough roof space, this is a limitation you could reach.
It’s not a complete showstopper, though. You can solve the problem by using more than one solar charge controller or by wiring your panels in a combination of series and parallel.
We’ll cover that more in another post.
When To Wire Solar Panels In Series
So with all that said, when is wiring your RV solar array in series the best configuration?
While both wiring options have their pros and cons, in our experience, in the vast majority of cases, series wiring is the best option for RVers.
It allows the battery to charge for many more hours daily, making installation easier.
However, there are some instances where it’s probably not the most efficient option:
- If the weather is so hot, you’ll likely park your RV for extended periods in the shade to keep cool, parallel wiring may be a better fit. This is because panels wired in series are less efficient when a single panel experiences shading, which can be an issue in shaded areas.
- Similarly, parallel wiring may be the better option if you expect to spend most of your time in shady areas. By wiring panels in parallel, one panel’s output won’t affect another’s output, ensuring maximum efficiency.
- A combination of series and parallel wiring might be the best option for very large solar arrays. This enables you to take advantage of the benefits of each wiring option, ensuring optimal performance.
- If your solar panels aren’t identical, wiring in series may not be the most efficient configuration.
Deciding whether to wire your solar panels in series or parallel, it’s important to consider your specific needs and circumstances.
For most RVers, series wiring is the best option, providing increased power output and easier installation. However, parallel wiring may be more efficient in some cases, particularly in shady areas.
Graham Bogie

Graham is a seasoned marine electrical engineer with two decades of experience designing customized electrical systems for plant machinery and converting campers and overland vehicles. His expertise has led him to author the reputable Campervan Electrics Handbook and become the chief designer of the RV Wiring Design Tool. As a knowledgeable figure in the field, his YouTube channel, blog, Facebook group, and newsletter, offering electrical advice and product reviews, reach more than a million users each year.