Whether you’re replacing an existing inverter or adding an inverter to your camper’s electrical system for the first time, there are a few different ways of going about the installation.
In this article, we’ll take you through everything you need to know about how to install an inverter in an RV camper. It includes tips on installing it, tools needed, and safety advice.
We’ll step through the different installation options and provide an RV installation wiring diagram for each.
Before you Start your RV Inverter Installation
Make Sure you’ve Bought a Compatible Inverter
Not all inverters are compatible with every RV electrical setup, so you must buy a model suitable for your needs. Our buying guide goes into more details but in summary, make sure:
- it outputs the correct voltage (110v or 240v),
- requires the correct input voltage (12v or 24v),
- is a pure sine wave version if you’re running sensitive electronics (not modified sine wave),
- has a good efficiency rating, and
- a low idle consumption rate.
Read the Manufacturer’s Manual
It may seem obvious, but the best source of specific information about installing your inverter comes directly from the manufacturer.
Whatever they say in their manual trumps anything you might read in this post. They know their products better than we ever could.
The manual will typically provide important safety information, installation guidance, and operating instructions. Therefore, we recommend reading the manual cover to cover before starting the installation.
Choose a Location to Install the Inverter
An RV inverter is an electrical device, so it’s crucial to install it in a dry area, well away from any water source.
If you’re converting a van, with good planning, you’ll have designed your water system as far away from the hub of your electrical system.
While inverters are operating, they generate heat, so they should be installed in a well-ventilated area, allowing air to circulate.
Some larger inverters have a fitted cooling fan (like the Renogy 3000w inverter), and they need clear space around them to work effectively.
Try to locate the inverter as close to the battery bank as possible so you can minimize any cable voltage losses.
The further the battery, the larger the wire sizes needed – the bigger wires cost more and require more space.
Grounding an RV Inverter
Inverters convert DC current to AC. AC current can harm (or even kill), so it’s best not to mess up the installation.
Grounding your RV inverter is critical to your safety.
Many inverters for campers have an external grounding point – usually a dedicated ground connection on the casing, or sometimes it will be grounded using the negative return cable.
That should be connected to the vehicle’s grounded chassis point.
The manufacturer’s manual will provide specific details for your model. Follow their instructions carefully; it could save your life!
Fuses
The manufacturer’s instructions will indicate the correct fuse size, and you should follow their guidance.
You could work out the fuse size the device needs (watts ÷ system voltage), but to be honest, if the manufacturer doesn’t provide the essential safety information, we recommend choosing an alternative brand.
Wire Sizes
A typical RV inverter needs 12 volts to operate – a 24v version will need 24 volts.
The voltage is transmitted from the 12v battery bank to the inverter along the wire. Ambient temperature and wire length affect how much of that voltage actually arrives at the appliance.
The manufacturer’s instructions should dictate the correct wire sizes to use over specific distances. Aim to use the largest wire size to reduce voltage losses.
If the manufacturer doesn’t provide the wire size, you will need to calculate it.
You can use our wire gauge calculator to size the wires or double-check that the manufacturer’s recommendations are bigger than the minimum wire size for its fuse rating and circuit length.
Calculate the correct wire size for the inverter power supply based on the current draw and the distance of the cable run.
If the cables are too small, you will cause too big of a voltage drop over the length of the wire and may even generate enough heat to start a fire.
If you don’t understand why this is important, you could read the chapter on Transmitting Electricity in our Campervan Electrics Handbook.
Safety Tips
- This post provides general information for installing an RV inverter only. Installation of an inverter charger, converter, or any other device is not the same. We’ll provide detailed instructions for those devices in separate articles.
- Always disconnect the battery bank power supply before installing the inverter.
- Always use the correct size wires and fuses.
- Always read the manufacturer’s installation instructions before you begin. They know their products better than we do, so their instructions always trump ours.
- Be clear about the grounding/earthing requirements for your inverter.
- Use a qualified electrician if you are not confident.
Tools & Materials Needed to Install an Inverter in a Camper
There are a few tools you’ll need to install an inverter safely:
- Multimeter: To confirm the electrical supply is off, you have correct voltage, cable continuity, and general electrical troubleshooting. Check out our post on how to use a multimeter – it’s not as complicated as it looks.
- Megohmmeter: or Earth insulation tester.
- Wire strippers: to remove the plastic sheath off the wire neatly.
- Heat shrink & heat gun: to finish connections and terminal joints.
- Terminal crimping tool: to attach connectors to the wire terminals.
- Drill: to drill holes to fix the inverter securely in place.
- Selection of screwdrivers: to fix and secure terminals and wires in place
- Cable ties or cable clips: to help secure cable runs.
- ANL fuse holder & fuses
- Correctly sized wire (red for positive and black for negative)
- Ring connectors: correctly sized for the wire and connection posts
- Pin connectors: to finish the wire ends neatly before connecting them to a screwed terminal
RV Inverter Installation Methods
There are three different ways to install an inverter in an RV:
- Cigarette lighter inverter installation
- Direct to the battery bank
- Direct to AC distribution box
Which installation option is best for you is in part determined by the inverter model and, in part, how you plan to use the AC supply it provides.
This article focuses only on the first two methods. Installing an inverter to the AC distribution box is more complex and deserves a dedicated post.
You can read that detailed post on an RV Inverter Transfer Switch Installation here.
Cigarette Lighter Inverter Installation
Some small inverters can run directly on the vehicle’s cigarette lighter – the Bestek 300w inverter is a good example.
This installation method has limitations in the use of the inverter.
The lighter’s circuit will have a relatively small fuse, probably a 20A fuse fitted by the vehicle manufacturer, but it could be as low as 10A.
The inverter is rated for 40A. If you use it to power a device greater than the vehicle’s fuse size, the lighter circuit’s fuse will blow.
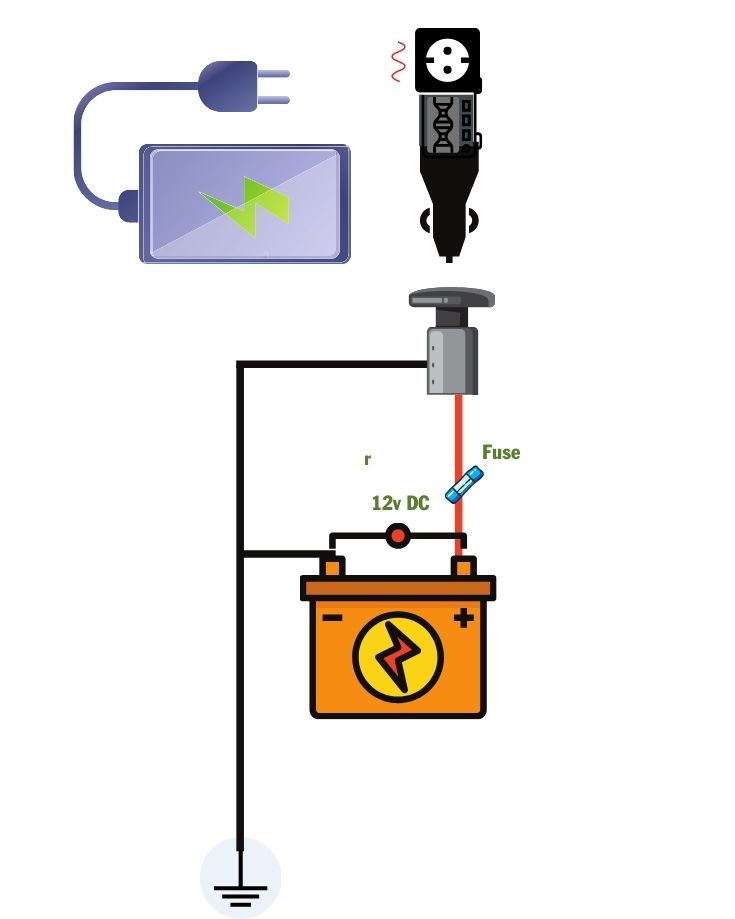
Warning: if you increase the manufacturer’s fuse size, you risk using the inverter to draw too much current for the vehicle’s wires, a potential fire hazard.
Increasing the fuse size is NOT a good idea as it reduces the protection of the circuit.
Additionally, the inverter runs directly off the vehicle’s starter battery, so it’s probably best to use it when the engine is running to avoid flattening it.
If you go down this route, you will need to accept the limitations.
In reality, installing these inverters using the cigarette lighter may be ok for car camping or where the need for an AC electrical supply is limited, but for longer-term RV living, they’re probably not a viable solution.
On the plus side, these inverters don’t need any installation, as such.
Instead, you simply plug the supply cable into the cigarette socket, switch it on (the inverter will probably have an on/off switch), and it’s ready to connect your AC devices.
How to Install an RV Inverter Direct to the Camper’s Battery
The primary purpose of an inverter is to power AC appliances when you’re boondocking and have no access to a mains electrical supply.
If most of your camper’s electrical circuits are DC and run off your battery bank, you may only have one or two dedicated AC circuits.
Our Sprinter van conversion is like that. We have a couple of dedicated AC circuits we only use when connected to a shore power hook up.
Because we spend more time boondocking than on campgrounds, we rely on our battery bank, so we use efficient DC alternative appliances wherever possible.
The upshot is we have only a few AC appliances, so we don’t need lots of AC circuits.
If this sounds like your situation, installing your inverter directly to your camper’s battery bank is probably the best solution.
The following sections detail how to install an RV inverter.
It uses terminology that may be new to you. Understanding your camper’s electrical system is critical before beginning this kind of project.
Our Campervan Electrics Handbook provides a complete understanding of electrical systems in campers, and it’s a perfect place to start for beginners.
RV Inverter Installation Diagram
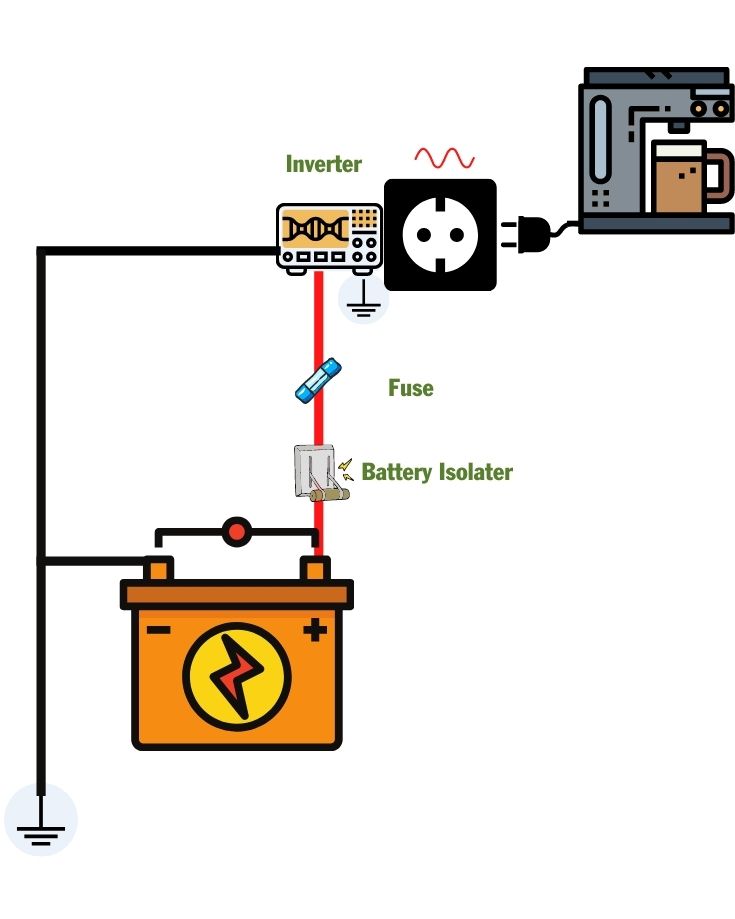
RV Inverter Installation Step-by-Step
Follow these steps for installing an inverter to your RV battery bank:
- Identify the fused circuit you wish to use. Note: if the fuse size needed for the inverter is greater than 40A, a regular blade fuse holder will not be large enough. You’ll need to install a larger ANL fuse holder and fuse.
- Ensure the battery bank is isolated by switching off the input and output cut-off switches.
- Disconnect from shore power and the generator.
- Secure the inverter to its operating position.
- Ground the inverter as per the manufacturer’s instructions.
- Secure the fuse holder in a location close to the battery or the positive supply busbar
- Connect one end of a red, positive cable to the ANL fuse holder and the other to the positive side of the battery or busbar terminal.
- Connect one end of the negative black cable to the negative side of the inverter and the other to the earth busbar or vehicle’s earth point. Note: use either a ring connector or terminal end crimp depending on the earth busbar or earth point configuration.
- Connect one end of another red, positive cable to the positive side of the inverter and the other end to the ANL fuse holder output terminal.
- Confirm all connections are secured and tight.
- Insert the fuse.
- Switch on the output battery isolator switch to allow power to flow through the new circuit.
- Switch the inverter on without connecting any AC appliances.
- Confirm you have a 12v DC supply to the inverter using a multimeter.
- If all is good, connect an AC appliance to confirm it is powered as expected.
- If the multimeter doesn’t indicate a 12v supply, you need to troubleshoot the circuit to identify the problem. Note: The Campervan Electrics Handbook has an entire section dedicated to troubleshooting DC circuits.
You can stop here if you plan to use your inverter by connecting appliances directly to it. Your inverter installation is complete.
Using an Extension Cord with an Inverter
Instead of connecting AC appliances to the inverter’s outlets, you could use an extension cord.
- Install the inverter as described above, up to step 15.
- Connect the AC appliance to the extension cord.
- Connect the extension cord to the inverter.
- Switch on the inverter and then the appliance.
- If you confirmed the inverter was good in step 15, you should have no problems unless the extension cord is at fault.
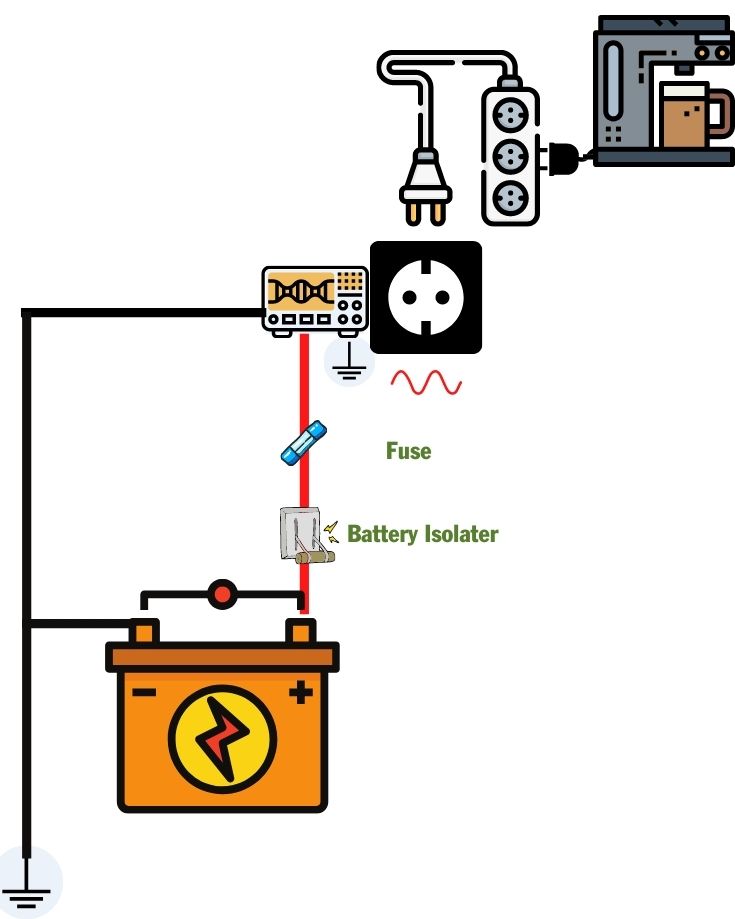
Notes on using an extension cord with an inverter:
- Always use an extension cord with a larger current rating than the combined current of the appliances you expect to supply at any one time.
- You should use an extension cable fitted with GFCI. The Iron Forge cable is a good example.
- Extension cords extend the length of the circuit, so expect some voltage losses. However, you can minimize the problem by using a short extension cord.
- Avoid using a coiled extension cable because it can be a fire hazard.
You can stop here if you plan to use your inverter with an extension cord. Your inverter installation is complete.
Connecting an Inverter to AC Receptacles / Sockets
Installing inverter wiring to fitted outlets means connecting your appliances to those sockets instead of the inverter or extension cable.
They will only be powered when the inverter is switched on.
If you want to be able to use these sockets when hooked up to shore power too, you’ll need to wire them to your RV’s AC distribution box.
Notes on installing AC circuits
- You are dealing with AC power, and that has the potential to kill. These guidelines do not replace the need for a qualified electrician but indicate the work involved. If you do not know what you are doing, always use a qualified electrician.
- Always use the correct wire size specification and color scheme conventions dictated by your local electrical regulations.
- Never cross-connect any wires between the live, neutral, and earth connection points. Live should connect to live, neutral to neutral, etc.
- Route cables in conduit and avoid laying them in a way where they could be crimped under paneling or wear on corners. This could lead to unprotected bare wires creating a fire and shock hazard.
- Always route AC cables in separate conduits and well away from your DC circuits.
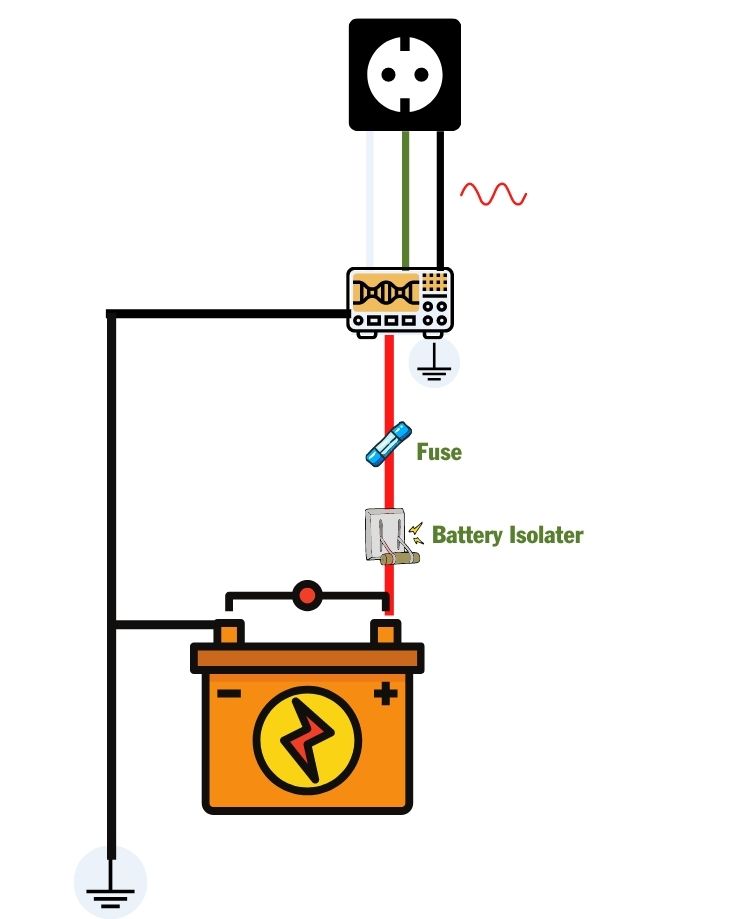
- Install the inverter as described above, up to step 15.
- Install the AC sockets/receptacles to their operating positions. They should be fitted securely. Wires or any internal connections should not be visible or accessible without exception. Note: follow local electrical regulations and manufacturer’s recommendations to confirm how to ground/Earth each component.
- Remove the inverter’s main supply fuse.
- Connect the cables from the AC sockets to their respective inverter outlet connections. Note: make sure you choose an inverter with AC output terminals, or you will be unable to connect it this way. The Victron Phoenix Smart 3000va is an excellent example of an inverter you can connect this way; the Renogy 3000w pure sine wave inverter is an example of one you cannot.
- Use a multimeter to confirm correct continuity on the entire inverter circuit.
- Use a Megohmmeter or Earth insulation tester to confirm the circuit is insulated from Earth.
- Insert inverter fuse, and assuming it does not blow, switch on the inverter.
- Using a multimeter, confirm each fitted AC outlet/receptacle has the correct voltage – 110v or 240v, depending on your setup.
- Connect a small AC appliance to each AC outlet/receptacle, in turn, to confirm that it is powered correctly.
- Continue to add more appliances (up to the inverter’s maximum rated output) in stages to confirm the entire system functions correctly.
- Monitor the battery consumption levels to ensure the system operates as you expect.
If you are installing multiple AC circuits to run from the inverter, you might consider installing an AC distribution box with individual circuit RCDs.
It is not essential because the inverter provides the overall circuit protection.
However, you should check the local regulations for the region you live in.
If you need to install an AC distribution box, the wiring diagram will look like this:
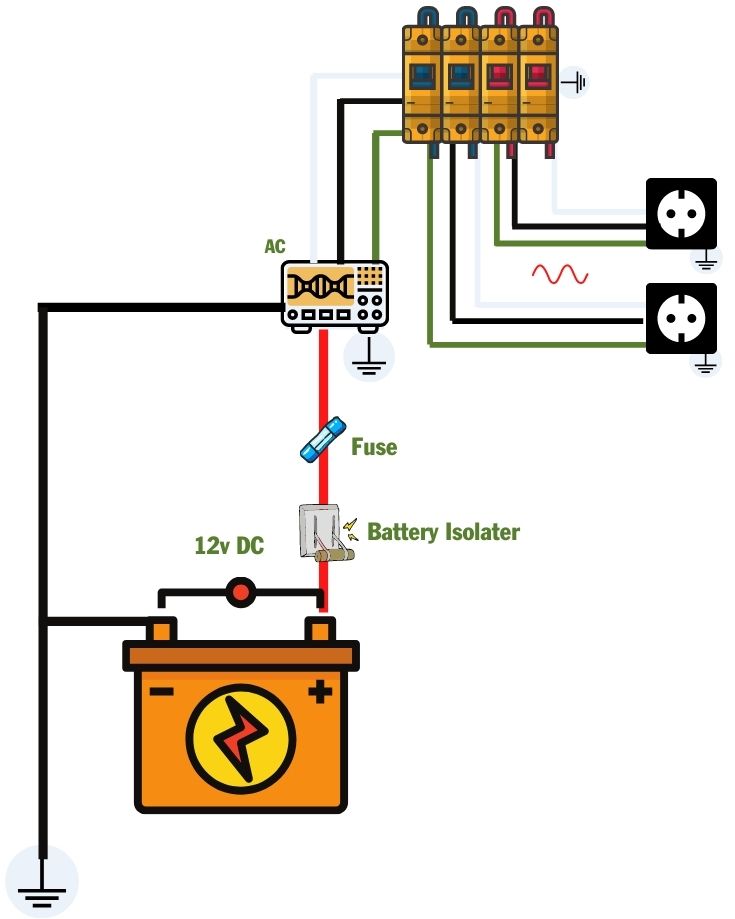
How to Install the RV Inverter’s Remote Switch
Remote switches are compatible with some inverters. They’re handy if you’ve installed an inverter in a hard-to-reach position.
Installation is pretty simple. Always follow the manufacturer’s installation guide, but they’ll probably go something like this:
- Secure remote switch in its operating location.
- Remove the fuse on the inverter’s circuit.
- Connect the remote switch to the inverter remote switch connections
- Insert the inverter’s circuit fuse and confirm remote switch operation.
Graham Bogie

Graham is a seasoned marine electrical engineer with two decades of experience designing customized electrical systems for plant machinery and converting campers and overland vehicles. His expertise has led him to author the reputable Campervan Electrics Handbook and become the chief designer of the RV Wiring Design Tool. As a knowledgeable figure in the field, his YouTube channel, blog, Facebook group, and newsletter, offering electrical advice and product reviews, reach more than a million users each year.


I have a question that is baffling me, we have a converter in our travel trailer, we also have 3 solar panels on roof to charge the batteries.
Where would the inverter go with all this..talking about wiring specifically?
I am assuming we would still keep our converter and install the inverter next to it and…..?
thanks for any help and thanks for this article!