Some campers have AC circuits powered by shore power. For RVers who spend most of their time on campgrounds, the need for DC circuits is fairly limited.
However, to continue to use AC appliances when boondocking or off-grid, an inverter is essential.
While you could install a separate inverter with dedicated circuits to run the appliances you’ll use when off-grid, you can leverage your existing AC circuits for a slicker solution.
By installing a transfer switch and inverter to the RV’s AC distribution box, you can flip between shore power and the battery supply on demand. Then you only need one set of circuits for your appliances.
In all likelihood, you’ll use a smaller number of AC appliances when off-grid.
Some appliances, like air conditioning units, use massive amounts of energy compared to the size of the battery bank and your ability to recharge them.
You can set up your camper’s electrical system so that the battery bank only supplies your priority AC circuits when off-grid.
Before You Start

- You are dealing with AC power, and that has the potential to kill.
- These guidelines do not replace the need for a qualified electrician but give an indication of the work involved. If you do not know what you are doing, always use a qualified electrician.
- Always use the correct wire size specification and color scheme conventions as dictated by your local electrical regulations.
- Never cross-connect any wires between the live, neutral, and earth connection points. Live should connect to live, neutral to neutral, etc.
- Route cables in conduit and avoid laying them in a way where they could be crimped under paneling or wear on corners. This could lead to unprotected bare wires creating a fire and shock hazard.
- Always route AC cables in separate conduits and well away from your DC circuits.
- Make sure you’ve bought a compatible inverter.
- Always disconnect the battery bank power supply before installing the inverter.
- Always use the correct size wires and fuses.
- Always read the manufacturer’s installation instructions before you begin. They know their products better than we do, so their instructions always trump ours.
- Be clear about the grounding/earthing requirements for your inverter adn any other electrical component you’re installing.
This post provides general information for installing a power inverter only. Installation of an inverter charger, converter, or any other device is not the same. We’ll provide detailed instructions for those devices in separate articles.
Although AC electrical systems are indeed dangerous, learning about your camper’s electrical system isn’t. We’ve written the Campervan Electrics Handbook to help all RV and camper owners understand their systems.
It’s perfect for anyone converting a camper from scratch, or upgrading parts of an existing setup. And with an entire section dedicated to troubleshooting, it’s also a perfect book to have on hand when you encounter problems and do your regular maintenance routines.
Tools & Materials Needed To Install An Inverter Transfer Switch
Of course, you’ll need a transfer switch. We recommend you buy only from a reputable brand and Blue Sea is probably the best out there.
There are a few tools you’ll need to safely install an inverter:
- Multimeter: To confirm the electrical supply is off, you have correct voltage, cable continuity, and general electrical troubleshooting. Check out our post on how to use a multimeter – it’s not as complicated as it looks.
- Megohmmeter or Earth insulation tester.
- Wire strippers: to remove the plastic sheath off the wire neatly.
- Heat shrink & heat gun: to finish connections and terminal joints.
- Terminal crimping tool: to attach connectors to the wire terminals.
- Drill: to drill holes to fix the inverter securely in place.
- Selection of screwdrivers: to fix and secure terminals and wires in place
- Cable ties or cable clips: to help secure cable runs.
- ANL fuse holder & fuses
- Correctly sized wire (red for positive and black for negative)
- Ring connectors: correctly sized for the wire and connection posts
- Pin connectors: to finish the wire ends neatly before connecting them to a screwed terminal
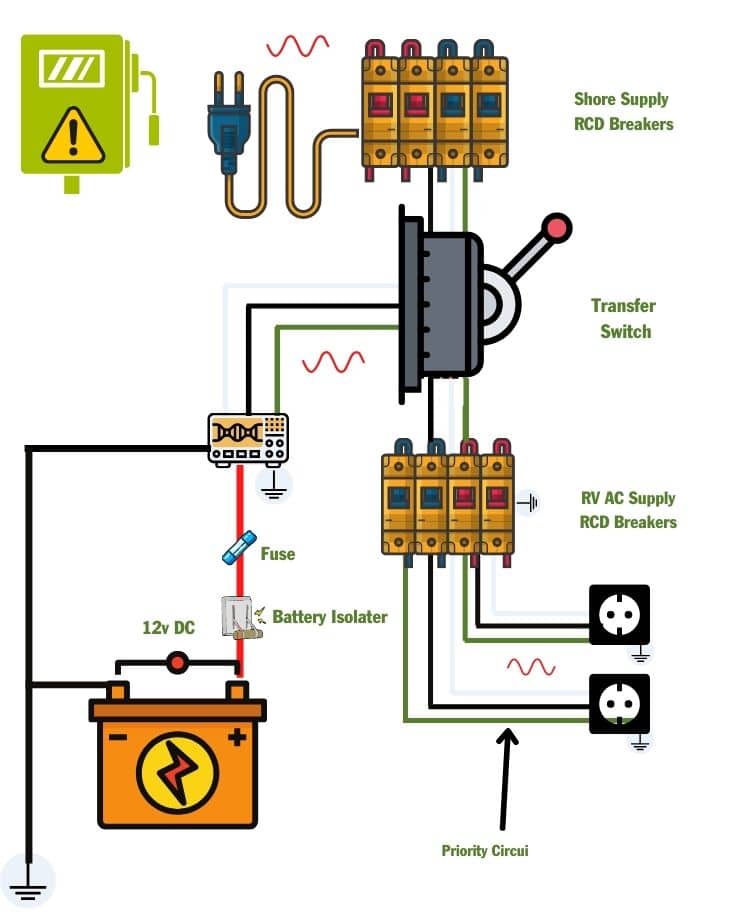
RV Inverter Transfer Switch Installation Diagram
How To Install An RV Inverter Transfer Switch
If this is an extension to an existing system, you MUST ensure all power to the RV is off. There must be no AC or DC power on the circuits.
Disconnect from the Mains
Disconnect from any shore power and generators and isolate your battery bank before you begin.
- Step 1: Identify your priority AC circuits. These will be powered by the inverter when you are off-grid.
- Step 2: Install your inverter, with an AC distribution box with individual circuit RCDs for each priority circuit. This is an example of the wiring diagram looks like:
- Step 3: If this is not part of an existing system, install your shore power and any non-priority AC circuits with their sockets and RCD breakers.
- Step 4: Ensure the system is grounded. Connect the earth points to both the external AC supply earth point AND the vehicle chassis earth point. If you do not understand this, please get a qualified electrician to help.
- Step 5: Any metal casing panels will need the correct earthing connections too. Check the manufacturer’s installation instructions.
- Step 6: Remove every RCD from the distribution box and the inverter’s fuse.
When using an inverter and shore power supply to provide power to the same AC circuits, you must install a transfer switch to isolate the different power sources.
It must be impossible for more than one power source to supply the circuit at any one time.
Install the Transfer Switch
The transfer switch must be rated for the AC voltage and the highest current supply of all the independent VAC power supplies – inverter, shore power and or generators.
- Step 7: Install the transfer switch in its operating location.
- Step 8: Connect the priority AC circuits RCDs to the transfer switch output terminals.
- Step 9: Connect the inverter supply to one branch of the transfer switch’s input connections.
- Step 10: Connect the shore power supply breaker output to the other transfer switch input connection.
NB remember to connect Live to Live, Neutral to Neutral, and Earth to Earth. Use the Manufacturer’s installation instructions to confirm which is the correct terminal on the switch for each circuit.
Connect Priority AC Circuits
- Step 11: Reinsert the RCD breakers for the priority AC circuits.
- Step 12: Use a multimeter and megohmmeter or Earth insulation tester to confirm correct continuity and insulation from the earth for the priority AC circuits.
Operate The Transfer Switch To Use The Inverter Supply
- Step 13: Switch the transfer switch to the position to use the inverter power supply.
- Step 14: Insert inverter fuse and assuming it does not fail, switch on the inverter.
- Step 15: Switch on the main supply breaker for the priority AC circuits and confirm the earth fault test function operates correctly.
If any safety feature on the VAC breakers doesn’t operate, disconnect ALL power and seek professional qualified assistance.
- Step 16: Switch on the individual RCD or circuit breakers to their ON position.
If any safety feature on the VAC breakers doesn’t operate, disconnect ALL power and seek professional qualified assistance.
Or if the individual RCD or circuit breakers fail to remain in the ON position, disconnect ALL power and seek professional qualified assistance.
- Step 17: Using a multimeter, confirm each priority AC circuit is supplying power at the correct voltage.
- Step 18: Connect a small AC appliance to each direct outlet in turn to confirm that it is functioning correctly and that the inverter is also operating correctly.
- Step 19: Continue to add more appliances in stages confirming the entire priority AC system functions correctly and monitor it to ensure the system is operating as designed.
Operate Transfer Switch To Use Shore Power Supply
- Step 20: Switch the transfer switch to the position to use shore power supply.
- Step 21: Connect the RV to a shore power supply.
- Step 22: Switch on the shore supply breaker and confirm the earth fault test function operates correctly.
- Step 23: Switch on the main supply breaker for the all AC circuits and confirm the earth fault test function operates correctly.
If any safety feature on the VAC breakers doesn’t operate, disconnect ALL power supplies and seek professional qualified assistance.
- Step 24: Switch on the individual RCDs or circuit breakers to their ON position.
If any safety feature on the VAC breakers doesn’t operate, disconnect ALL power supplies and seek professional qualified assistance.
Or if the individual RCD or circuit breakers fail to remain in the ON position, disconnect ALL power supplies and seek professional qualified assistance.
- Step 25: Using a multimeter, confirm each AC circuit is supplying power at the correct voltage.
- Step 26: Connect a small AC appliance to each direct outlet in turn to confirm that it is functioning correctly.
- Step 27: Continue to add more appliances in stages confirming the entire AC system functions correctly and monitor it to ensure the system is operating as designed.
Always follow the manufacturer’s operating instructions when switching between shore power supply and the inverter.
How Does an Inverter Transfer Switch Work?
An inverter transfer switch works by automatically shifting power sources when the mains power cuts out.
When the power goes off, the transfer switch disconnects the load from the mains power and connects it to the inverter, thus ensuring a continuous power supply.
Once the mains power or generator power is restored, the switch reverts the load back from the inverter to the mains supply, and the inverter goes into standby mode.
This seamless transition is crucial to maintain the functionality of essential devices and appliances.
Do You Need a Transfer Switch for an Inverter in an RV?
While often recommended for convenience and safety, a transfer switch is not always essential when using an inverter in an RV.
A transfer switch allows for the automatic transition from shore power (electricity supplied at a campsite or other location) to inverter power when shore power is unavailable.
This prevents two power sources from being connected simultaneously, which could cause damage or safety issues.
However, there are scenarios where you don’t need a transfer switch.
For instance, if you have separate circuits for your AC appliances that you run off your inverter, you wouldn’t necessarily need a transfer switch.
Similarly, if your RV doesn’t use mains AC circuits throughout and only has one or two AC circuits, a transfer switch might be more than required.
Ultimately, the need for a transfer switch depends on your specific setup and power needs.
It’s always a good idea to consider your unique circumstances.
Does an Inverter Have an Automatic Transfer Switch?
An inverter, by itself, doesn’t typically have an automatic transfer switch.
Some inverter chargers are integrated with built-in transfer switches.
When you unhook your RV from the generator or shore power, the integrated transfer switch will switch to using the stored energy from batteries.
How Do I Know if My RV Transfer Switch is Bad?
There are several signs you can look for to determine if an RV transfer switch is faulty.
Here are some common indicators that your RV transfer switch may be bad:
- Power Interruptions: Intermittent power supply or complete loss of power in your RV, it could be a sign of a malfunctioning transfer switch. The switch may not transfer power between the shore power or generator and inverter as it should.
- Burning Smell or Melting: A bad transfer switch may result in overheating, which can lead to a burning smell or even melting components. If you notice any strange odors or visual signs of damage near the transfer switch, get it checked immediately.
- Clicking Noises: Normally, you can hear a clicking sound when the transfer switch engages or disengages power sources. If you notice excessive clicking or the absence of any clicking sound when you switch between shore power and the generator/inverter, it could indicate an issue with the transfer switch.
- Inconsistent Appliances: When the transfer switch isn’t working correctly, the power supply to your RV’s appliances may become erratic.
- Failure to Switch Power Sources: If the transfer switch fails to switch between the shore power and the generator/inverter, you may need to manually intervene or bypass the switch to restore power.
- Tripped Breakers or Fuses: Frequent tripping of circuit breakers or blowing of fuses without any apparent reason could be a result of a malfunctioning transfer switch.
- No Power from Generator/Inverter: If you’re sure your generator or inverter is working correctly, but still don’t have power in your RV, the transfer switch might prevent the power from being properly distributed.
You’re unlikely to find replacement parts for a transfer switch, so you may need to replace a faulty unit.
Graham Bogie

Graham is a seasoned marine electrical engineer with two decades of experience designing customized electrical systems for plant machinery and converting campers and overland vehicles. His expertise has led him to author the reputable Campervan Electrics Handbook and become the chief designer of the RV Wiring Design Tool. As a knowledgeable figure in the field, his YouTube channel, blog, Facebook group, and newsletter, offering electrical advice and product reviews, reach more than a million users each year.

100% wrong you do not need a transfer switch if you simply plug your RV into the inverter. There are several ways to power an rv for your to say you Must have a transfer switch is wrong.
We’re 100% correct. You do not need a transfer switch. But thanks for taking the time to agree with us :-)