Over the last decade, solar panels have become more efficient and cheaper. Installing solar panels on your RV today is a beautiful idea. It adds to your ability to go off-grid and makes you more sustainable and reduces the noise and air pollution that gasoline-based generators bring with them.
But if there is one thing that still makes people hesitant about solar panels, it is the perceived difficulty in mounting them properly onto your camper.
In this article, we will look at some of the best solar panel mounting ideas that DIYers are using to install solar energy on their RVs. We will also talk about what you need to think about before choosing any of these methods, their pros, and cons, and have a small discussion towards the end on the benefits of permanently mounted panels vs. portable panels.
What Kinds of Solar Panels Can You Mount on an RV Roof?
You might think that you need special portable solar panels for your RV, but that’s not so important. In most cases, your regular residential solar panels are good enough to do the trick (They might be a bit heavy, though).
If you have a wide-open RV roof, you should be able to install residential solar panels. But if it is cluttered with other roof-mounted gear like a roof rack, roof vents, or satellite dishes, you need to choose panels that are smaller in size.
There are three main types of solar panels that you can opt for:
- Rigid Solar Panels
- Flexible Solar Panels
- Portable Solar Panels
Whatever you choose, the important thing is to make sure that you secure them properly on your RV. We will discuss how to do this in the sections that follow.
What to Consider When Choosing the Solar Panel Mounting Method

Here are five main factors you should consider before choosing your mounting method.
Type & Amount of Solar Panels
How you mount will depend on the choice of panels that you make. There are two main types of solar panels – rigid and flexible. In general, rigid panels require more permanent mounting solutions, whereas flexible ones are lighter, and you can tape or glue them down.
That said, we recommend adding at least one screw bolt fixing for added safety and preventing the panel from flying off as you drive. Fellow road users will thank you for it!
The number of solar panels also matters. The fewer the panels, the less the work involved in mounting them.
But this depends on what you want to use them for as well. If you intend to go full-on off-grid boondocking, you may need an extensive array of solar panels.
If you are only going to use them as backup power for occasional dry camping off-grid, one or two panels might be enough.
Remember, too, that the bigger the panels, the bigger the airflow, and therefore more secure fixings are required.
Weight of Mounting Hardware
How heavy your mounting hardware is will depend on the panels’ weight. If your panels are heavy, they will need stronger stuff to be secured on your RV’s roof.
However, all of this needs to be constrained by the actual weight capacity of your rig. You should not overload the trailer’s roof while trying to install panels.
Location
Since the panels are mounted on the roof, the wind is something for which you always need to account. For example, if a rooftop feature can help protect the panels from the wind, then that’s a great location to put them.
You need to think about whether the panels are going to lie flat or if you’ll ever tilt them. In the latter case, you will need to mount them more strongly because they will face more wind when they’re in use.
Ability to Tilt Solar Panels
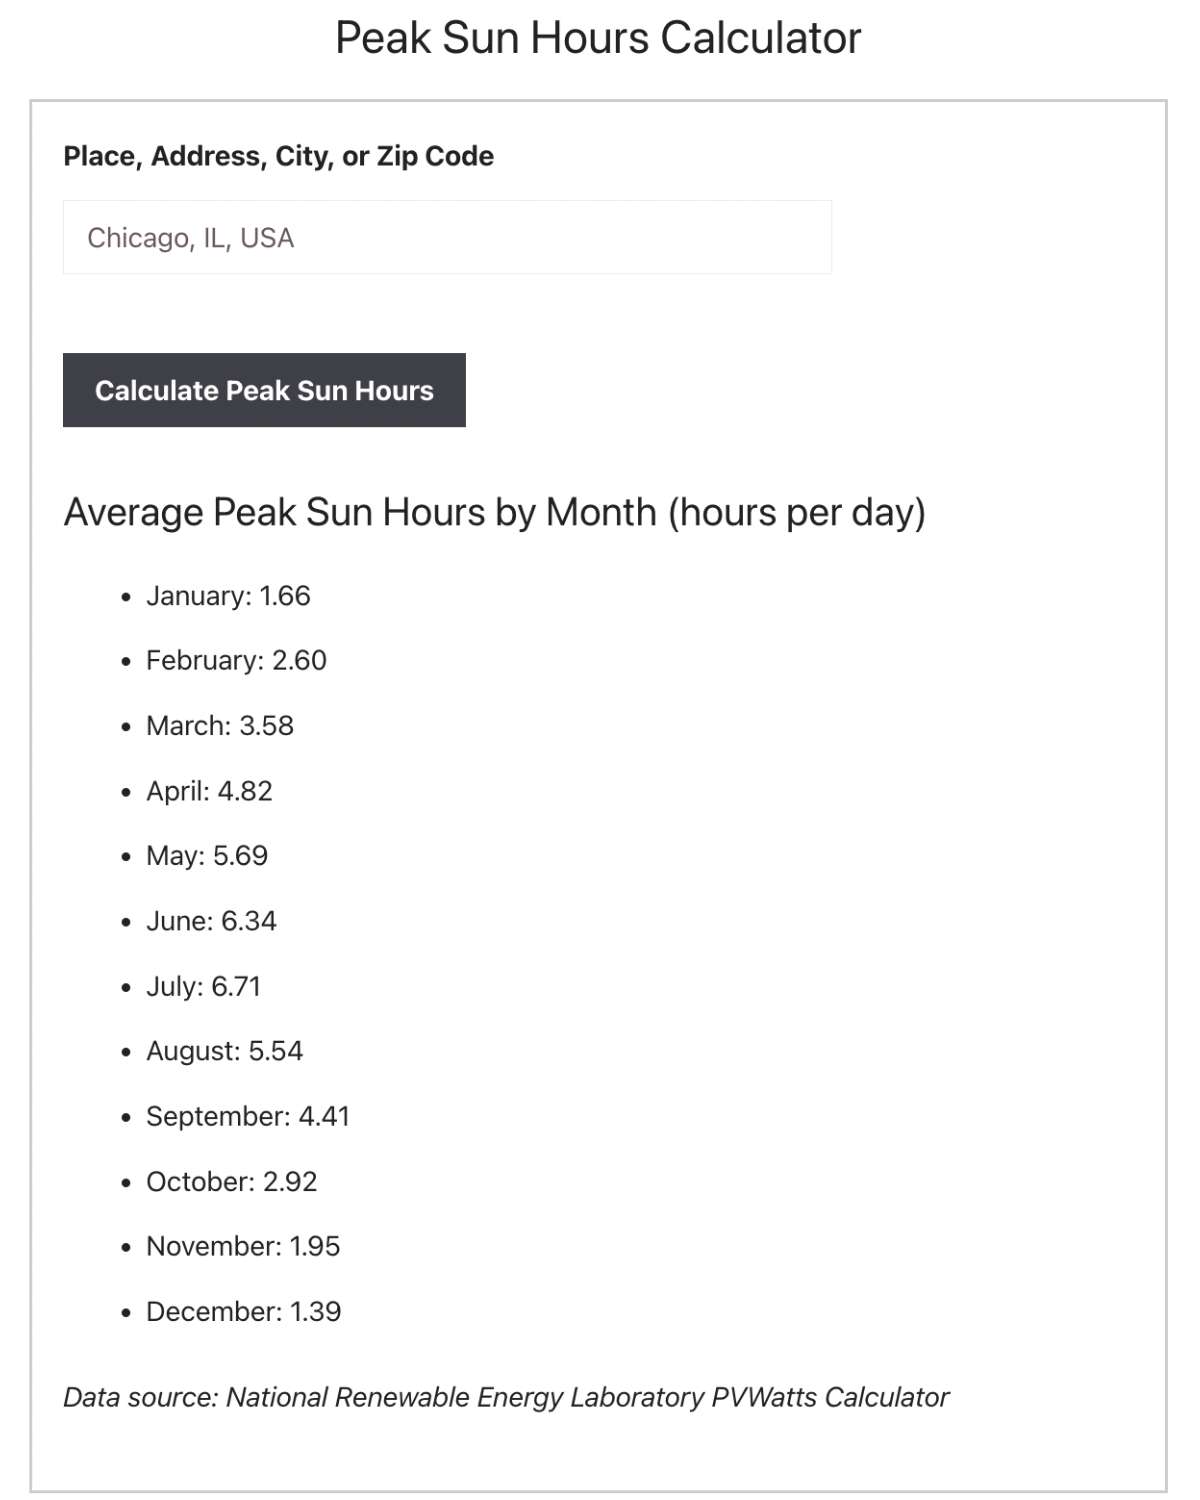
You may not always get the best angle for your panels to absorb maximum sunlight. Building or trees can cast their shadows on your panels, and during the winter months, the sun is much lower in the sky. That means your panels won’t be getting the optimum sunlight to recharge during the day.
Tiltable solar panels solve this problem to a great extent. They let you move the panels to align with the sun’s direct rays. Tiltable solar panels require special mounting techniques, which you need to plan.
RV Roof Type
The type of roof matters because it determines how much space you have to put the panels in. Another important thing is how curved the rooftop is – the curvier, the harder it is to secure the solar panels, the more mounting hardware you need.
Also, consider how stable the roof is. Some RV roofs are made from fiberglass or very thin metal and will naturally flex. That makes mounting more challenging as the movement will loosen fixings over time. If that sounds like your roof, make sure you check the mount fixings regularly.
Solar Panel Mounting Ideas
1. Mounting Rigid Panels
Rigid panels are the most commonly used variety of solar panels. They are durable and can be mounted to almost any surface. Their chief drawback is that you have to drill holes into the RV to install them, and that is always a potential cause for water leakage. That said, it’s the safest way to stop panels flying off when you’re on the move or in strong storms.
As long as you make a clean hole, install the bolt tightly (don’t overtighten because that can cause leakage, and apply a suitable sealant liberally, you should never have a leakage problem.
Let’s look at a few different ways in which you can mount rigid panels on your RV roof.
Installing on Roof Racks
Some RVs come with pre-installed roof racks, and others with factory drilled holes to install a roof rack. If you don’t have a rack installed, you can DIY one using aluminum struts with slotted holes in them.
You will need to install extended bolts in the pre-drilled holes to make sure that the struts are higher than the crown of your RV’s roof. Another advantage of motor mounts is that they absorb vibration, which keeps your panels safe.
You may also need to thread the struts with stainless steel threading rods to give them more stability. Once you have the rack in place, you can simply bolt the panels onto the rack.
Pros
- This method keeps the solar panels safe and avoids vibrations while traveling.
- It also keeps a gap under the panels to allow air underneath so that the panels can dissipate heat.
Cons
- It requires a fair bit of DIY work, so if you are not handy with tools, don’t try it.
Mounting Directly To Roof
Most solar panels will come with installation brackets and screws. You simply need to follow these steps:
- Attach the mounting brackets onto the four corners of the panel using the screws and washers provided.
- Drill holes into your RV’s roof in line with where the mounting brackets need to align.
- Install the panels using bolts and apply sealant. Let the sealant bond for at least 2-3 days.
One question that often comes up is, “what is the best spot on the roof to bolt the panels onto?”
Some people suggest that the roofing strut might be a good point to do this, while others feel that you should be able to install them anywhere you like.
In our opinion, it doesn’t matter. Secure the panels where they’ll fit; allow room for you to access and inspect the panels, trying your best to avoid any possibility of shadows from roof vent hatches, TV antennas, or satellite dishes.
Pros
- All installation material is already available with the panels, so you don’t need to spend extra money.
- This is one of the most solid arrangements for permanent mounting. There is nothing stronger than bolting down the actual panels.
Cons
- It requires drilling holes in the RV, so you need to ensure that it’s done properly and sealed well.
Taping Down
If you can get lightweight solar panels and strong adhesive tape (such as the 3M VHB), it is also possible to tape down your panels.
You need to first install long aluminum brackets onto the sides of the panels. Then simply tape the brackets down on your RV using the 3M VHB adhesive, and you should be good to go.
The portable SolarSaga panels that came with the Jackery portable power stations are ideal for temporarily taping down, and you probably won’t need to use the aluminum strips or brackets.
Here are a couple of tips when you are doing this:
- Install the panels on the mounting bracket to be slightly inclined, not completely straight. This way, water will easily flow off them when it is raining outside.
- Clean the RV roof properly before installing the adhesive tape to get a good bond.
Pros
- This is one of the easiest ways to mount your panels permanently. It does not require a lot of effort on your end.
Cons
- This method limits your choices in terms of solar panels you can buy.
- Most likely, you will need to buy more expensive panels that are lighter and can be held onto the RV using just tapes.
- It’s not safe to drive with your solar panels mounted to your RV only with tape, so you must remove them. That means you’re not generating solar power while you drive.
2. Mounting Flexible Panels
Mounting flexible panels is not as easy as it seems. Simply gluing them down to the RV’s roof can create a potential problem.
Solar panels absorb a lot of heat (there is a lot left even after whatever gets converted to electricity). They let go of this heat by letting the surrounding air absorb it through convection.
But if you glue the panels down to your RV’s roof directly, you will not leave any space for the heat to dissipate. Over the long term, the heat can damage your panels. We know because we made this mistake. Even though we bonded our panels to the Sprinter’s ribbed roof, in the extreme heat, the panels still didn’t have enough cooling.
So what should you do about this? The right way is to install the panels with a little bit of a gap between them and the roof to let air pass through. Here are three ways you can do this:
Using Velcro Tape
Velcro tape is thicker than adhesive tape, and you can use it to install your flexible solar panels, keeping a bit of space between the panel and the roof.
Just apply the velcro tape on the sides and back of the panel and stick it onto the roof. Then seal the sides of the panels with industrial strength tape to ensure that there is no water flowing under the panels.
Pros
- Easy DIY method to mount flexible solar panels
- Velcro tape allows for a lot of air to flow under the panel.
Cons
- This is another temporary solution, so you must remove them before driving.
- Need to apply sealing tape on all sides to ensure water and dust do not get in underneath the panels.
Screwing Down & Tying Down
You can also use rivets in your solar panels to secure them onto your RV roof. Use a washer in the rivet to increase the surface area for bonding. You can use the same method to install your flexible panels onto an awning.
If there are holes in the solar panel’s frame, you could use cable ties as a temporary solution.
Pros
- It lets you install the panels on surfaces like awnings and boat biminis, which you cannot do using any other method.
- The rivet washers leave space for air. Naturally, you do not have to make an artificial gap underneath the panels.
Cons
- Rivets are not as stable as bolts or other methods for mounting solar panels. They are generally made from aluminum and can fracture more easily than steel bolts when flexing.
3. Mounting Portable Panels
If you want to keep your panels portable but still want a good mounting solution for the roof, you can build one for yourself.
Get four galvanized angle irons about four inches longer than the panels themselves. Next, affix one set of angle irons on the RV roof using motor mounts to keep some space between them and the roof.
Now affix the remaining set of threaded angles on top of the two already affixed facing each other to make a rack that is open on one side. Use threaded steel rods on both sides to block both ends from letting the panels glide off during heavy wind.
You can place the solar panels inside the casing made between the four iron angles, and they will remain firmly in place, and you can even lock them from the outside.
Pros
- Creates a nice little holding space for the panels on the top of your RV. You can simply plug in the panels and take them out when you need to.
- It lets you lock the panels in place if you need to move away from the RV while letting the panels charge.
Cons
- Requires a bit of DIY effort, and you need to be handy with tools to get it perfect.
- Probably best to remove them for driving too.
Permanent Vs. Portable
You can choose either a permanent installation or a portable one, and each has its advantages.
Permanent Panels
With a fixed kit, you have a more durable arrangement and don’t need to worry about strong winds or harsh weather damaging your panels.
Secondly, fixed kits save space in your RV when traveling, and you can even charge them while you are en route.
Thirdly, once you set up the fixed panels on your RV’s roof, that’s it. You don’t need to install them every time you camp.
And last but definitely not least, permanent panels tend to be a more efficient size for size when harvesting the sun’s energy than temporary panels.
Portable Panels
With a portable setup, you lose a bit on the durability but get the option to remove the panels and recharge them in the sun if you want to park in the shade.
It is also handy in any place where the panels are getting in the way of moving your RV (like a low ceiling garage).
Portable kits do not require you to run wiring and drill holes in your RV’s rooftop.
Lastly, when you decide to change your RV, portable panels will simply shift to the new van. For fixed panels, you will have to do the entire work of uninstallation and installation.
Can You Install Solar Panels Without Drilling Holes?
Drilling holes in the RV’s rooftop is a tricky job. If you don’t do it right, you might have rainwater seeping in through the holes. If you want to avoid drilling holes, it is possible to attach solar panels without a holding screw. YOu’ll need to use professional panel bonding adhesives and the correct techniques – like those held in your windscreen.
Or you can choose light and flexible panels. These might be less efficient and have a shorter lifespan, but they give you one big advantage: you can mount them using adhesives or tape instead of drilling holes.
Just stick the mounting brackets onto the RV roof using adhesive, let it dry for a couple of days, and add a bit of sealant to make the bond stronger.
Conclusion
Mounting your solar panels may seem challenging at first, but it will ultimately be rewarding for you. You need to be prepared to understand the method you will use and why you choose to use it. We hope we have been able to give you enough information here to help you decide the best method to go about DIYing your solar panel mounting.
Graham Bogie

Graham is a seasoned marine electrical engineer with two decades of experience designing customized electrical systems for plant machinery and converting campers and overland vehicles. His expertise has led him to author the reputable Campervan Electrics Handbook and become the chief designer of the RV Wiring Design Tool. As a knowledgeable figure in the field, his YouTube channel, blog, Facebook group, and newsletter, offering electrical advice and product reviews, reach more than a million users each year.