When it comes to campervan conversions and living in a van, nothing is more important than the electrical system.
A well sized setup, suited for your lifestyle, will keep the lights and fridge running, start up the heater, provide running water and keep your gadgets fully charged.
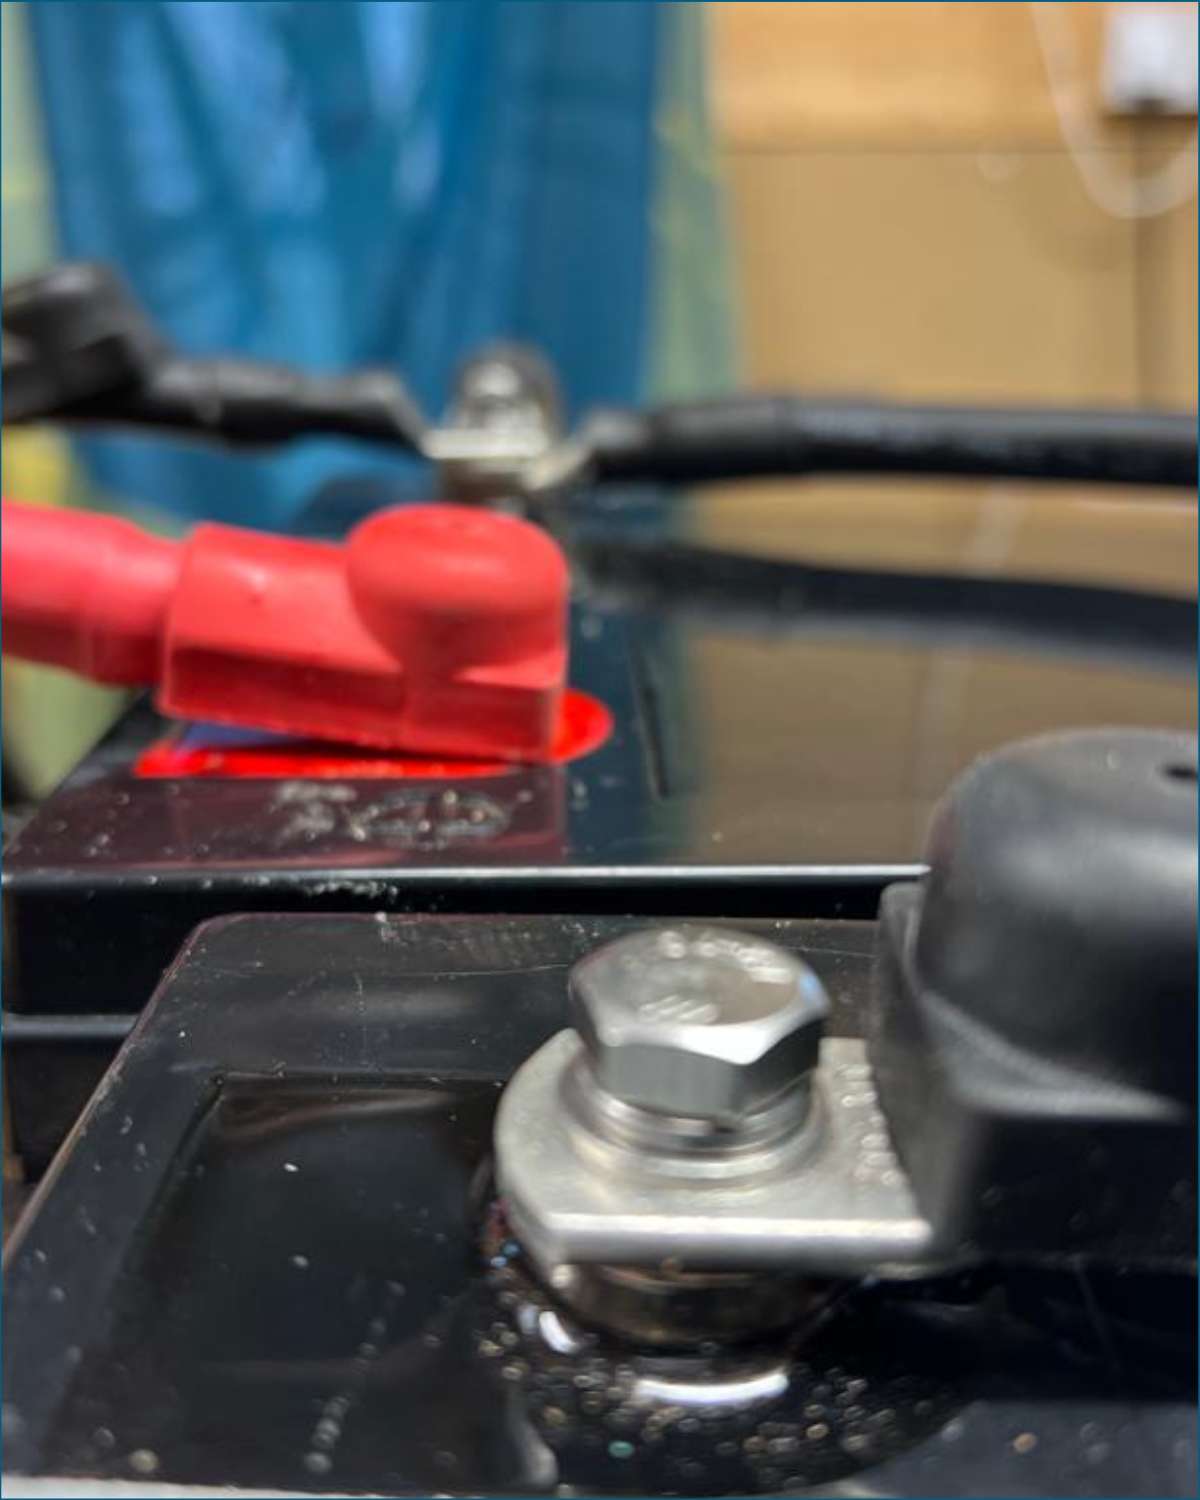
For off grid living, the campervan electrics are centred around the leisure battery.
As well as having the right size battery bank, it’s vital to have a means of charging a leisure battery.
Without this, you’ll flatten the expensive battery bank, potentially affecting its lifespan and certainly ruining your camping trips.
In our Sprinter van conversion, we have multiple ways of charging our onboard batteries including:
- Solar system
- Shore power/hook up
- Alternator (the van’s engine)
Of all these, a system to charge the batteries from the alternator is the most simple and easy to install.
It’s why it was the first method of charging the house batteries we fitted when we built our van.
There’s 2 approaches to charging leisure batteries form the engine:
- A traditional a split charging system or
- A battery to battery charger.
This article covers everything you need to know about a split charging system including what is does, how it works and the different types available.
By the end of this post you’ll have enough information to choose the best split charging system for your campervan and be armed with installation tips and wiring diagrams so you can get up and running fast.
This post is one part of our series on DIY campervan electrical systems.
When you click on links to various merchants on this site and make a purchase, this can result in this site earning a commission. As Amazon Associates, we earn from qualifying purchases. For more info, please check our disclosure page.
What is Split Charging?
Split charging means charging both the campervan’s starter battery and house batteries at the same time from the same charging source.
Starter batteries are quite different to the leisure batteries we use to power our campervan appliances.
Rather than release their energy slowly, they’re designed to provide a big hit of energy, enough to start the engine.
They discharge quickly so unless topped up, they flatten after only a few engine starts.
All engine vehicles have an alternator. It recharges the starter battery and provides power to the normal operating electrics of the vehicle like the headlights, windscreen wipers and so on.
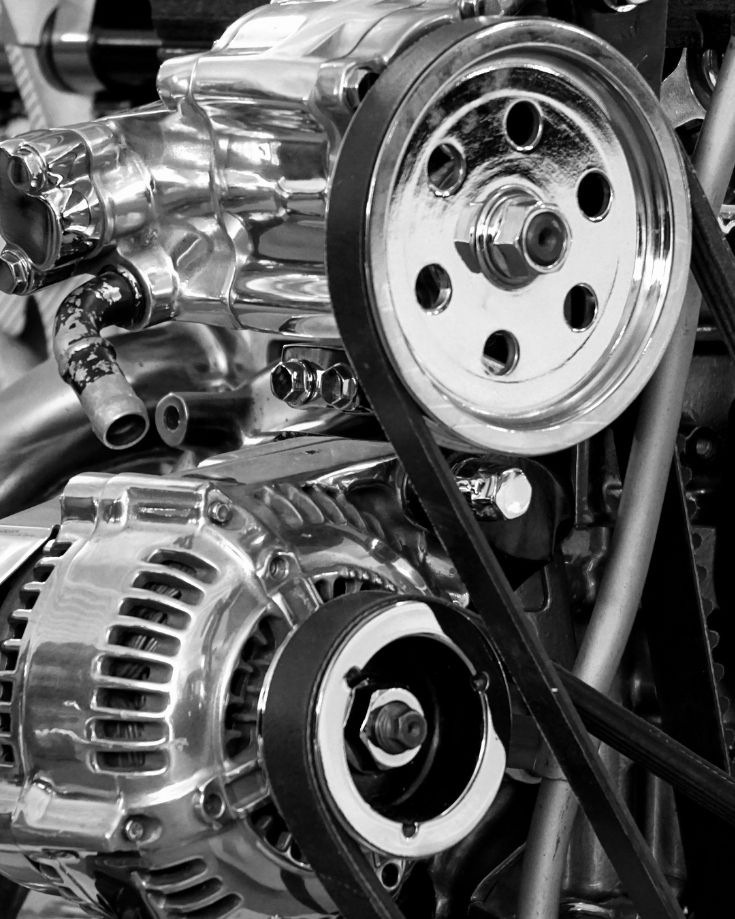
Powered by the engine, the alternator charges the starter battery as you drive.
Once the starter battery is charged, the work of the alternator is mostly done.
Any excess electricity generated and not used by the vehicle’s running electrics is, in effect, wasted.
For motorhomes, RVs and campervans this presents an ideal opportunity to use the alternator to recharge the house batteries too.
A split charge relay or switch is a device that allows us to tap into this.
Need help & advice with your electrical setup?
Join Our Facebook Support Group
How does Split Charging Work?
A split charge relay is a device connecting the starter battery and the camper’s house batteries together.
There are different types of split charge methods which we’ll come on to below.
Though they all work in a slightly different way, the basic principle is the same.
- Switched on, they allow power to pass through the relay to charge the leisure batteries.
- Switched off, they isolate the starter battery from the leisure batteries so you don’t drain it with your campervan appliances. Otherwise you may not be able to start the van.
A split charging system has no battery monitoring system in-built. This means they only provide a bulk single charge to the battery.
Read our post on campervan batteries for more information but this basically means split charging methods won’t ever fully recharge the leisure batteries but will top them up to 80-85%.
If you rely solely on driving to charge the leisure batteries, with no solar or frequent hookup to bring them upto 100% charge, we recommend installing a battery to battery charger instead.
Split Charging Methods for Campers
There are several methods and split charging devices to allow the vehicle’s alternator to charge the entire battery setup.
What follows is an overview of how each device works, a basic wiring diagram for each, their pros and cons and recommended products.
Note | Most modern Euro 5 and 6 vehicles have factory fitted “smart” alternators. Their output voltage is controlled by the engine’s control unit.
Once the starter battery is suitably charged, the output voltage drops to a level too low to charge the leisure battery.
If your vehicle has a smart alternator, you need a battery-to-battery charger instead of a split charge device.
Note Too | It’s best to charge lithium-ion batteries with a battery-to-battery charger, rather than a split charge relay, preferably one recommend by the battery manufacturers.
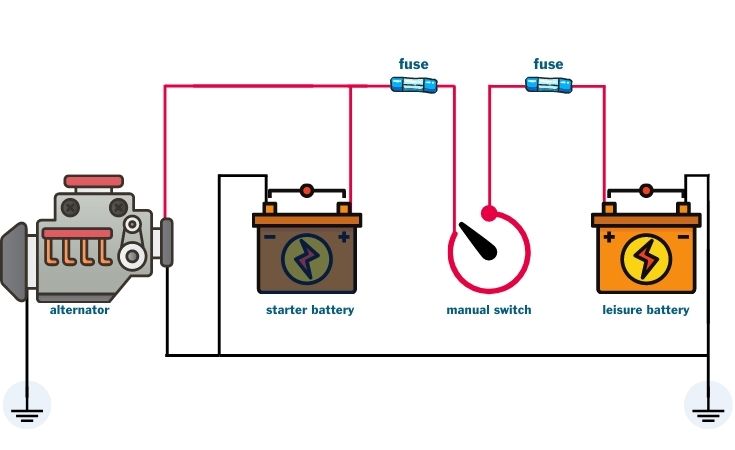
Manual Switch Split Charging
This is the most simple method to allow the alternator charging current to distribute to both the starter and leisure batteries.
It basically involves connecting the leisure battery to the starter battery in parallel and fitting a manual switch in between.
Once the engine is running, turn on the switch so all batteries receive charge from the alternator.
When the engine isn’t running, it’s important to switch it off so your campervan appliances don’t flatten the starter battery.
Manual Switch Split Charging Wiring Diagram
Pros
Inexpensive | Heavy duty manual switches are budget friendly
Simple & Robust | There’s often a tendency to favour more complex solutions but the simplicity of a manual switch means it’s less likely to fail.
If it does, it’s a very cheap fix.
Availability of heavy duty switches isn’t a problem either so it doesn’t matter where in the world you travel, you can probably find a replacement easily.
Hook up Starter Battery Charging | With the camper connected to a campground’s hookup facility, keeping the manual switch on allows the starter battery to be recharged too.
Convenient Emergency Backup | In the event of a flat starter battery, if necessary, switching on the isolator will allow you to start the engine from the leisure batteries.
This isn’t good for the health of a leisure battery bank but in the case of an emergency, it’s a good fallback option.
Cons
Manual | Because it’s a manual switch, this method depends on you remembering to switch it on when you begin to drive and off when you park.
It’s bound to happen at some point. You remember to switch it on at the end of a very long drive.
Or realise you forgot to switch it off when you attempt to start the engine 5 days later and it won’t start.
It’s called the Law of Sod.
Everything you need to know about campervan electrics. Now available in ebook and paperback!
Learn how to design, size, install and troubleshoot your camper’s electrical system.
Installation Hints & Tips
- The battery supply line fuses should be sized to the absorption rate (sometimes called maximum charge rate) of their respective batteries.
- Make sure the cables on either side of the switch are rated for at least the largest battery bank. Check our wiring gauge table to be sure.
- Remember – the bigger the cable, the more efficiently the battery will charge.
- Run the cables between the batteries along the shortest route, placing the manual switch as close to that cable as possible. This will help minimise voltage drops.
- Make sure to fit a manual switch sized to cope with your battery bank. So if you have a 200ah battery bank, the switch must be rated more than 200A.
- It’s prudent to go for a higher rating so you don’t have to change it at a later date if you increase your battery bank size. Remember though, the bigger the rating, the larger the physical switch.
Recommended Manual Switches
Blue Sea Battery Switch

- 350A
- Upto 48V
Amper Remote Battery Switch

- 1250A
- 12V
Top Post Knife Blade Master Switch
- 250A
- 12V
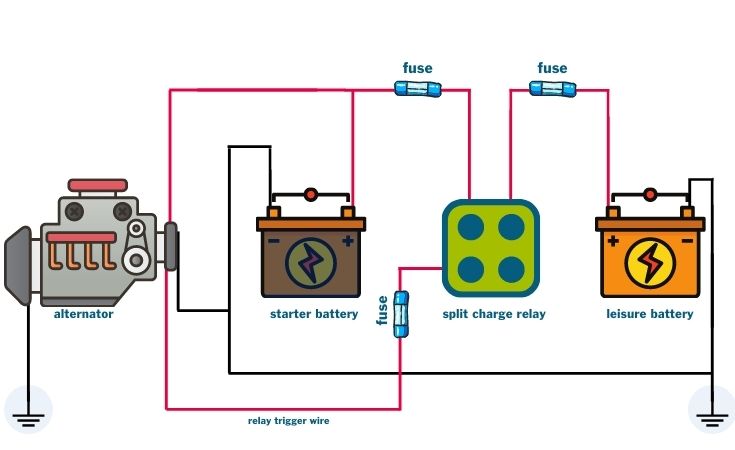
Split Charge Relay
A split charge relay is in effect quite similar to the manual switch, though without the manual bit.
The relay use an electromagnetic coil to pull a set of contacts to make or break a circuit.
The coil only operates when it receives a power supply above 12v.
As such, by connecting it to the alternator, it only operates when the engine is switched on and running.
When the engine is switched on, the relay receives a 12v supply, which is sufficient to pull the contacts to make the circuit between the starter battery and the leisure battery bank.
Both batteries draw power from the alternator to recharge.
When the engine is switched off, the relay loses its power supply. No longer able to pull the contacts, the circuit is opened, isolating the batteries from each other.
Split Charge Relay Wiring Diagram
Pros
Inexpensive | Split charge relays cost about the same as manual switches and about as easy to buy anywhere in the world too.
Automatic | No need to worry about remembering to switch this device on and off.
Simple construction | Because it’s simple, a split charge relay doesn’t have many component parts. With less things to go wrong, they’re pretty reliable.
Cons
Installation | Because a split charge relay is wired to the alternator, fitting involves tapping into the vehicle’s factory wiring. This could affect your warranty so check before going down this route.
Depending on your vehicle, the alternator isn’t always easy to get to and can be a bit fiddly, making installation more tricky.
Wear & Tear | The component contains moving parts so over time, these can wear. This can lead to voltage drops so charging the batteries becomes less efficient.
No Emergency Backup | A split charge relay doesn’t allow the starter battery and house batteries to be combined without adapting the wiring setup (more on that below).
Lacks Intelligence | Some might say this is a disadvantage, while others may argue it’s a good thing. Either way, it’s a fact that a split charge relay is either on or off, regardless of the charging state of either battery.
Installation Hints & Tips
- The battery supply line fuses should be sized to the absorption rate (sometimes called maximum charge rate) of their respective batteries.
- Check the relay specification for the trigger wire’s fuse size.
- The split charge relay should be bigger than the largest battery absorption rate though we recommend oversizing it to a heavy duty component.
- Make sure the cables on either side of the relay are rated for at least the largest battery bank. Check our wiring gauge table to be sure. The bigger the cable, the more efficiently the battery will charge so going up in size is a good thing!
- Don’t wire a split charge relay to the ignition. If you do, when you crank the engine, 12v will also be applied to the relay, combining the starter and house batteries. Your house batteries will not take kindly to this.
- Run the cables between the batteries along the shortest route, placing the split charge relay as close to that cable run as possible. This will help minimise voltage drops.
- Always lay cables and the relay in places protected from the elements and surface debris – so avoid places like the wheel arches.
- Split charge relays are so cheap and such a critical component, it’s worth keeping a spare in your onboard toolkit for long trips.
Recommended Split Charge Relays
Heavy Duty Split Charge Relay

- 200A
Voltage Sensitive Relay or VSR
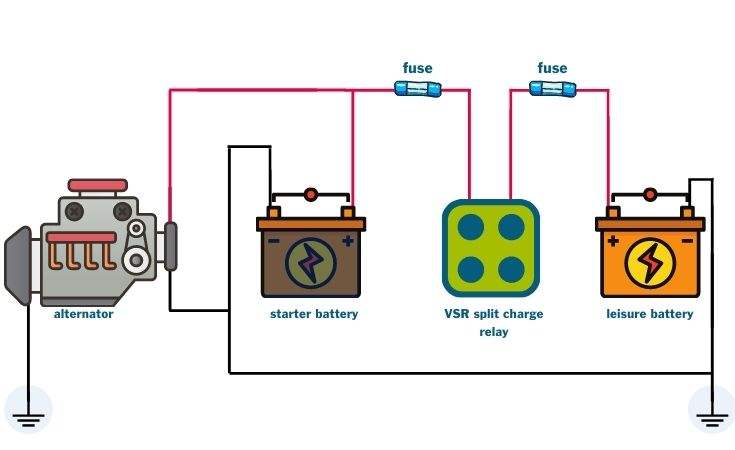
A VSR is often called a smart relay or an intelligent split charge relay and is the most popular split charging method in campervans and motorhomes.
Monitoring both the leisure battery and the starter battery voltage, a VSR is indeed smarter than a standard split charge relay.
With the engine running, when a VSR senses the starter battery is full (more accurately when it reaches a specified voltage threshold defined by the VSR manufacturer), it closes the circuit so voltage can flow to the leisure batteries.
Turn the engine off, the voltage of the starter battery drops quite quickly.
The VSR senses it drop below its pre-defined threshold level and opens the circuit, isolating the starter battery from the leisure batteries.
The slight difference then between a VSR and a manual split charge relay is the VSR doesn’t need a trigger wire because it operates when the voltage of the battery reaches a certain threshold, not necessarily when the alternator is running.
Dual sensing smart relays take this to another level by monitoring the voltage on both starter battery and leisure battery at the same time.
When the engine isn’t running the leisure batteries may be receiving a supply from other charging systems like shore power or solar.
The VSR senses when the leisure batteries are full then allows excess power to flow through to the starter battery.
Voltage Sensitive Relay Wiring Diagram
Pros
Inexpensive | VSRs are more expensive than a manual switch but they’re still quite affordable.
Automatic | No need to worry about remembering to switch this device on and off.
Installation | Because a VSR doesn’t need to be connected to the alternator, installation doesn’t breach the factory fitted vehicle electrical system or affect any warranty.
Intelligent | Dual sensing VSRs are smart enough to keep the starter battery topped up from solar or shore power without any manual intervention.
Cons
Wear & Tear | The component contains moving parts so over time, these can wear. This can lead to voltage drops so charging the batteries becomes less efficient.
No Emergency Backup | Some VSR don’t have an emergency override function so can’t be used to combine the starter battery and house batteries in the event of a flat starter.
Replacements | Finding a replacement voltage sensitive relay isn’t as easy as finding a manual switch, depending on where you are travelling if/when the component fails.
We recommend carrying a spare manual switch you can install in the unlikely event a VSR fails.
If you choose not to carry a spare, we recommend using one of the battery bank isolator switches as an alternative bypass in the event of failure.
Installation Hints & Tips
- The battery supply line fuses should be sized to the absorption rate (sometimes called maximum charge rate) of their respective batteries.
- The smart relay should be bigger than the largest battery absorption rate. Oversizing is better than undersizing.
- Make sure the cables on either side of the VSR are rated for at least the largest battery bank. For extra efficiency, install a cable capable of handling the alternator output. Check our wiring gauge table to be sure.
- Run the cables between the batteries along the shortest route, placing the VSR as close to that cable as possible. This will help minimise voltage drops.
- Always lay cables in places protected from the elements and surface debris – so avoid places like the wheel arches.
- Fit the VSR away from heat or water. Most are splash proof but even so. A corner of the engine bay near the starter battery or inside near the leisure batterie are both ideal locations.
Recommended Smart Relay

- 140A
Split Charge Relay Kits
Because these smart relays are so popular, you can buy complete kits containing everything you need to install them into your camper.
They include the smart relay, battery cables, fuse holders, terminal rings and even the heat shrink and complete installation instructions.
Split Charge Relay kit with Durite 12V 140amp Intelligent Relay
Recommended Split Charge Relay Kit

- 140A
Combining Starter Batteries and Leisure Batteries in an Emergency
In the event you’ve left your vehicle’s headlights on overnight, flattening the starter battery and there’s nobody around to help give you a jump start, you can use the leisure batteries to provide the starter battery with an extra charge.
You should note, this isn’t great for your leisure batteries so use this approach as a last resort.
With a manual switch
Step 1 | Switch off all vehicle electrics – headlights, windscreen wipers, air con and so on
Step 2 | Make sure all the electrical appliances in the camper are switched off and not drawing any current from the leisure batteries (don’t forget the fridge)
Step 3 | Switch the manual isolator on and wait for a few minutes. This will allow the power in the house batteries to equalise with the starter battery so they’re all at the same voltage. About 5 minutes should be enough.
Step 4 | Switch off the manual isolator
Step 5 Start the engine and hope it turns over
Step 6 | If it doesn’t start on the first attempt, give up. You’ll need to find another way out of your predicament. You might be tempted to leave the manual isolator on so the house and starter battery are connected when you start your engine. It may or may not work, but you run the risk of permanently damaging the house batteries.
With a Split Charge Relay
The only way to try to recharge the starter battery from the house batteries with a split charge relay is to fit a bypass switch.
If you plan to travel in your camper to remote areas this gives you a back up option.
This is what the wiring diagram would look like.

The bypass switch is the same as the manual switch and should be sized accordingly.
The switch will always be off (so the circuit will be open) until the time you need to combine the batteries.
Again, this isn’t good for the batteries but could help you out of an otherwise difficult situation.
If you need to use the house batteries to start the engine follow the exact same steps as for the manual switch option above.
With a VSR or Smart Relay
Some VSRs include a feature to allow you to override the system, closing the circuit to combine the batteries.
The instructions differ by device so check with manufacturer first.
Without an override function, you’ll need to fit a bypass switch as described above.
Automatically Create Your Bespoke RV Wiring Diagram
Includes 110v & 240v, solar, B2B, batteries, inverters, 12v, 24v & 48v systems, wire gauges in AWG & mm² & much more!
FAQs
Do I need a split charge relay?
A split charge relay provides an extra leisure battery charging system to your campervan. Because the kit needed to install the system is budget friendly, and the chances are you’ll be driving a fair bit, it provides a good chance to top up the batteries. We never turn down the chance for “free” power.
So while you don’t NEED a split charger relay, we recommend installing one as an easy means to charge the batteries.
How to check the split charger is working
If you have a voltmeter included in your leisure battery bank monitoring system, the reading will show an increased voltage level when the relay is on and charging the leisure batteries probably around 13.9v (ish).
If you have a solar array connected, a voltage increase is less obvious because the solar charge controller maybe providing a charge at the same time. In this case you might see only a slight increase in the voltage level.
Without battery monitoring, follow these steps:
– Switch off engine
– Disconnect the split charge relay output cable from the leisure battery
– Using a multimeter, measure the voltage at the end of that cable (it should be zero)
– Put the cable is a safe place so it isn’t touching anything – rest the cable on something non conductive so the end of it isn’t touching anything
– Turn on the engine
– Using a multimeter, measure the voltage at the end of that cable (it should be about 13.9v)
– Switch off the engine & reconnect the cable to the battery bank
How long does it take to charge leisure batteries while I’m driving?
How long it takes to charge leisure batteries while driving depends on the alternator’s output current and the size, spec and discharge level of the leisure battery bank.
To be conservative in our calculation, we assume the alternator is only 50% efficient. So a 140A alternator will only provide 70A charge per hour.
Now take a look at the battery bank.
Let’s say it’s 200ah made up of 2 x 100ah batteries each with a maximum charge current of 30A and it’s 70% charged.
We need 30% of 200ah (60A) to fully recharge the battery bank.
The batteries can accept 30A each per hour so 60A in total.
The alternator provides 70A so the battery bank will take a little less than an hour to fully recharge.
This of course assumes the campervan batteries have no load. They’ll charge quicker if you have solar panels too (and it’s daytime).
Please note that in reality, split charging can only charge a battery to 80-85% of it’s total capacity.
Can I use a split charger with a solar panel?
A split charger is a different charging source than a camper solar panel setup and your campervan electrical system can be designed with both.
An intelligent smart relay or VSR senses when the leisure batteries are full then allows excess power to flow through to the starter battery, so the solar panels can help charge the starter battery too.
Graham Bogie

Graham is a seasoned marine electrical engineer with two decades of experience designing customized electrical systems for plant machinery and converting campers and overland vehicles. His expertise has led him to author the reputable Campervan Electrics Handbook and become the chief designer of the RV Wiring Design Tool. As a knowledgeable figure in the field, his YouTube channel, blog, Facebook group, and newsletter, offering electrical advice and product reviews, reach more than a million users each year.