Wiring solar panels in parallel is a great way to maximize power in the shade and with mismatched panels. Here’s a complete guide on how to wire your RV solar panels in parallel.
If you have more than one solar panel for your RV setup, they all need to be connected to a solar array.
Don’t worry, it sounds technical, but it’s pretty simple.
Think of a solar array as a gang of solar panels working together to create electricity from the sun.
Wiring your panels together effectively makes them work as one giant panel.
There are several ways to connect solar panels, depending on your specific setup and needs:
- In series, the positive terminal of one panel is connected to the negative terminal of the next.
- In parallel, which involves connecting the positive terminals and negative terminals separately.
- Hybrid connections can also be used, which combine elements of both series and parallel connections.
This guide focuses on parallel connections only, and we’ll explore the following:
- a step-by-step guide on how to wire solar panels in parallel,
- the pros and cons of wiring your RV solar panels in parallel,
- when wiring in parallel is the best configuration, and
- wiring diagrams for connecting between 2 and 6 solar panels in parallel.
Let’s dive in!
How To Wire Solar Panels In Parallel
If you’re planning to wire your solar panels in parallel, you’ll need a few important tools and parts to get started!
Of course, it all begins with the solar panels themselves. It’s best to use identical models to ensure they work effectively together.
Next, you’ll need MC4 branch connectors specifically designed for solar panels.
These connectors will help ensure that each panel is correctly connected and harmonized.
It’s also important to have extension cables handy if the existing cables aren’t long enough to reach your charge controller.
And remember the tools!
A multimeter is an absolute essential. This handy device will help you test the voltage and connectivity of each panel throughout the wiring process.
A solar connector tool makes it super easy to separate connectors during testing or when replacing a panel.
You can complete your wiring solar panel project easily and efficiently by ensuring you have all the necessary parts and tools ready to go.
Here’s a step-by-step guide to wiring solar panels in parallel:
Step 1: Test Each Panel
Before installing the panels, it’s best to ensure each one works. After all, manufacturers aren’t always keen on giving refunds for panels that have already been installed!
To test each solar panel, you’ll need a multimeter to confirm each panel produces voltage as it should.
Testing the panels is simple – insert the multimeter’s red probe into the positive cable and the black probe into the negative cable.
The panel should produce some output voltage if it’s exposed to some daylight.
If you see a negative number on the multimeter, you’ve accidentally inserted the probes onto the wrong cables.
Don’t worry – it’s an easy mistake when starting out!
You can avoid potential headaches by testing each solar panel individually before installation.
Step 2: Mark The Positive Cable
Most solar panel cables are black, regardless of whether they transmit positive or negative energy.
This could make installation more challenging than it needs to be.
Plus, troubleshooting once they’re fitted is even more challenging when you can’t easily see which cable is positive.
To make your life a whole lot easier, we recommend marking the positive cable with red electrical tape.
This way, you’ll be able to quickly and easily identify the right cable for the job whenever needed.
It’s a super simple solution that will save you time and hassle in the long run.
Step 3: Cover The Panels
Exposing a solar panel to daylight is enough to produce voltage.
However, when connecting live panels, it’s always better to err on the side of caution.
We recommend covering up your solar panels while you work to keep things as safe as possible.
Sure, MC4 connectors generally protect the wires, but you can never be too careful when it comes to electrical wiring.
If your panels are already mounted, shield them from the sun and prevent any unwanted voltage by using things like cardboard delivery boxes or blankets.
Just make sure not to apply too much pressure or accidentally damage the panels while you work.
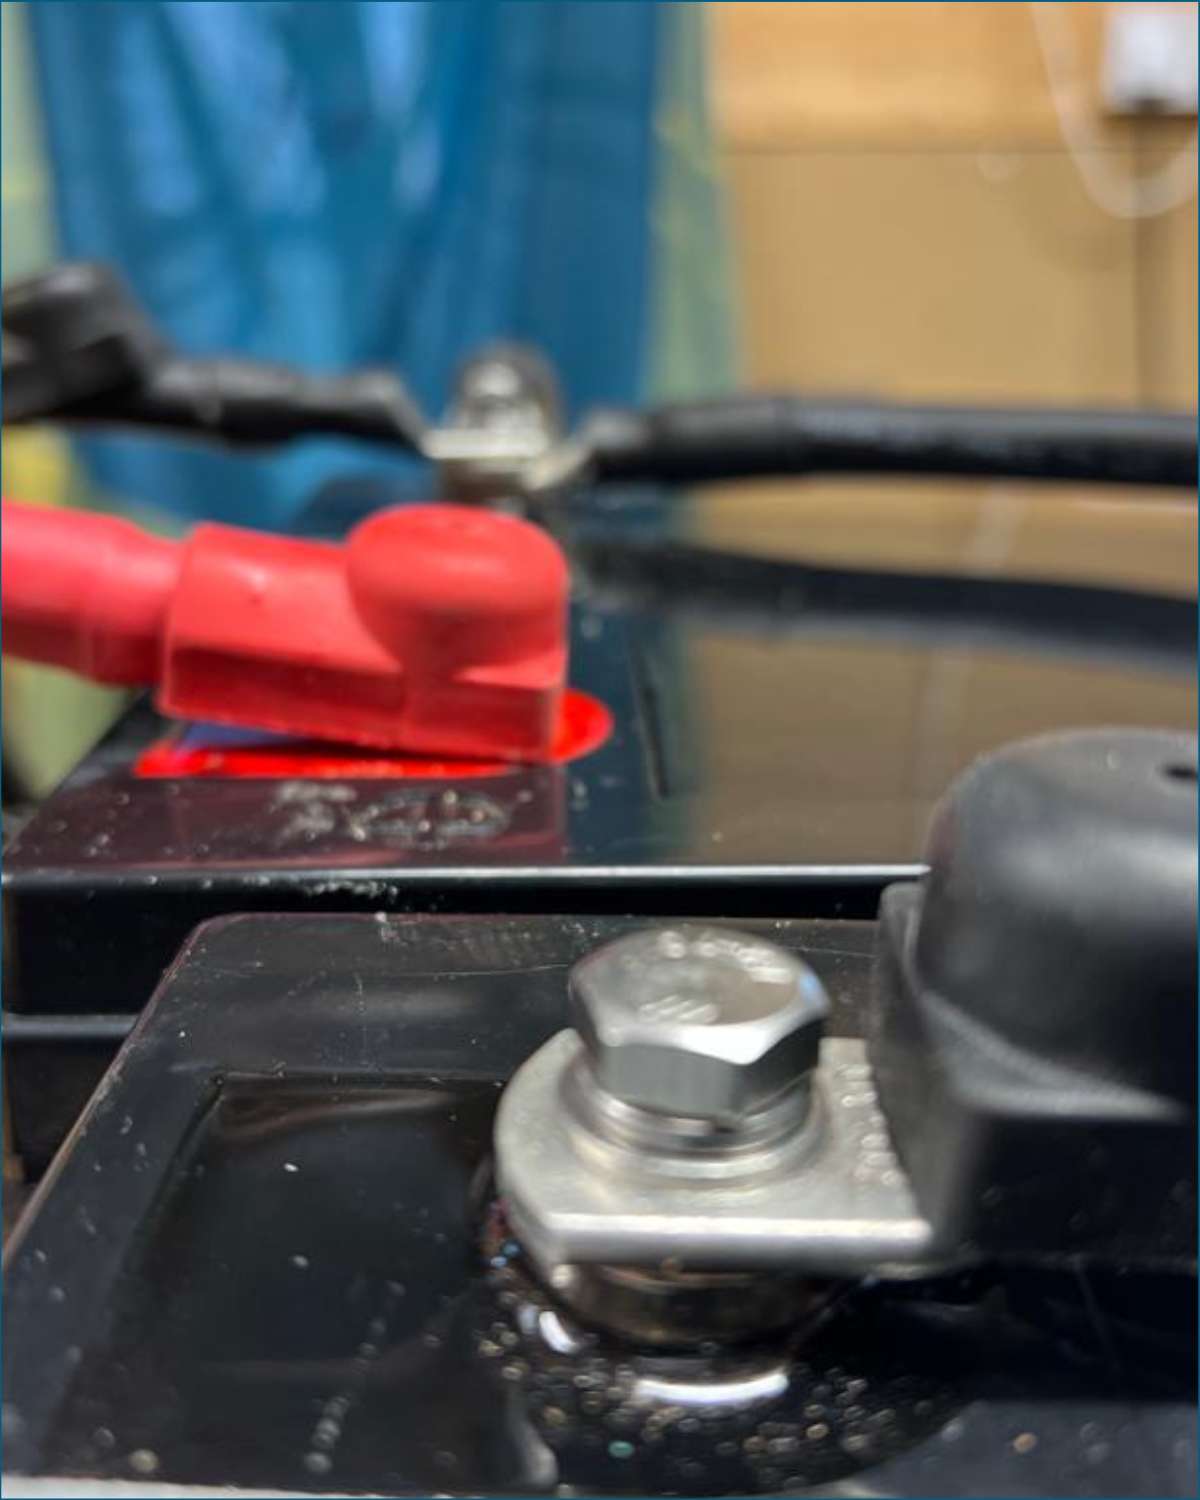
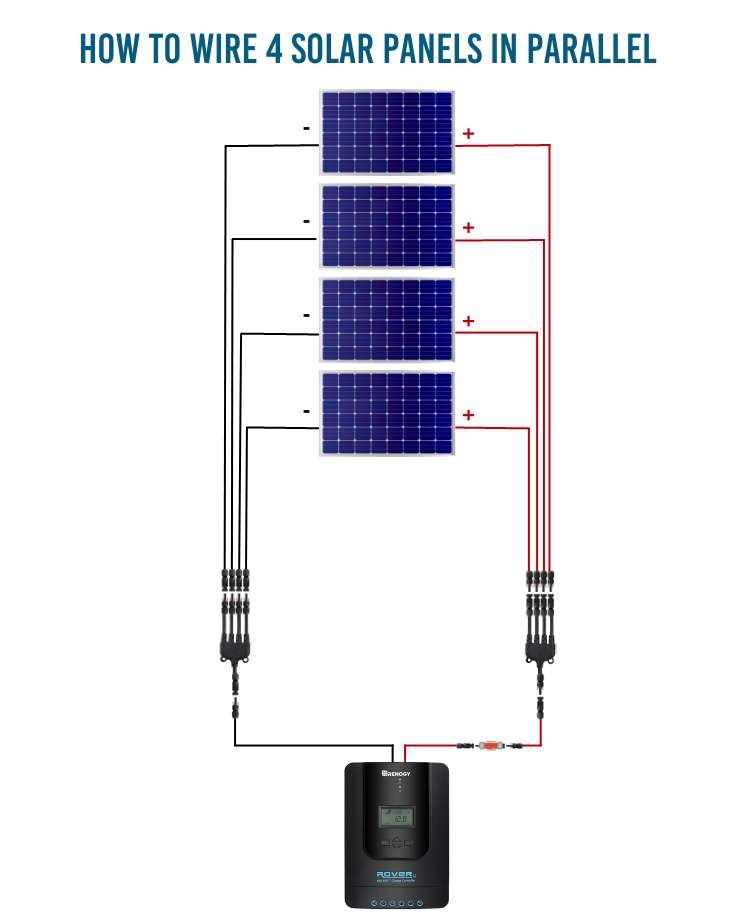
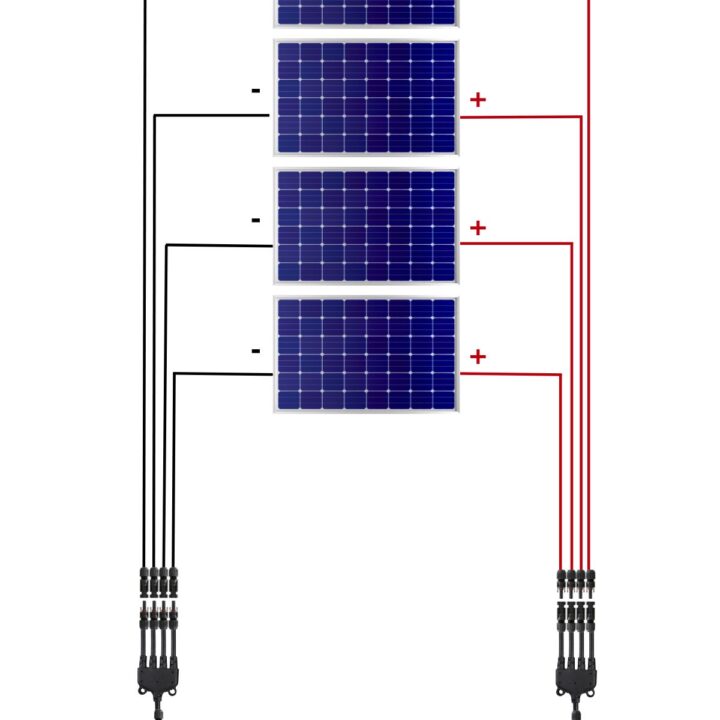
Step 4: Connect All The Positive & Negative Terminals
To connect multiple solar panels in parallel, follow these steps to ensure proper connectivity.
Begin by connecting the positive terminals of all panels, then connect the negative terminals of all panels.
To connect the panels, use MC4 connectors which easily snap together with a noticeable click when tightly closed.
Take the first two panels and connect their positive cables, then their negative cables.
This will result in a single positive cable from one branch connector and a single negative cable from the other.
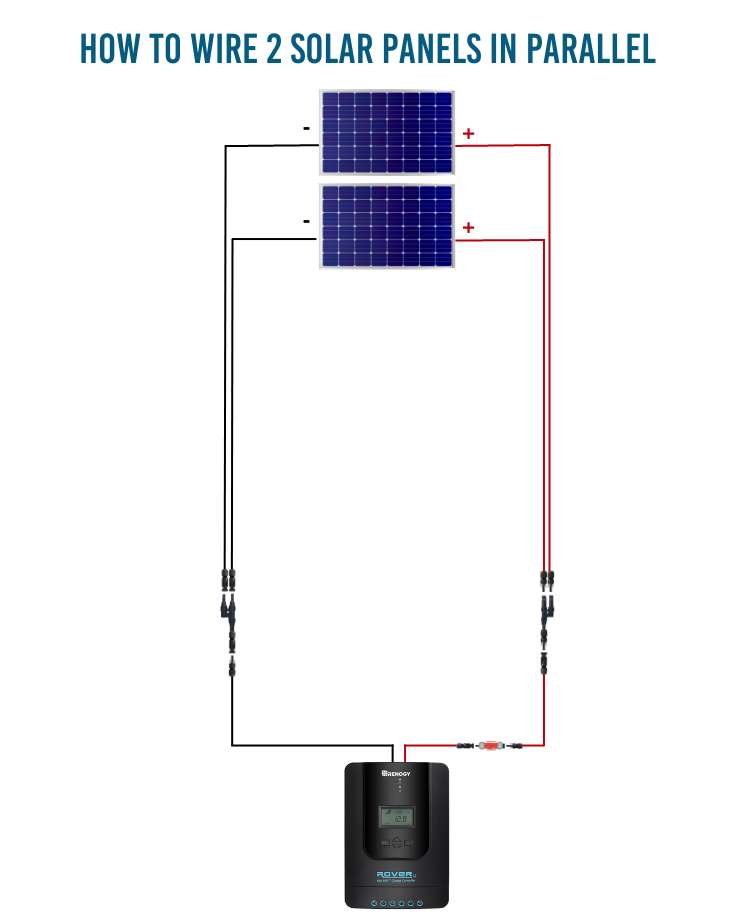
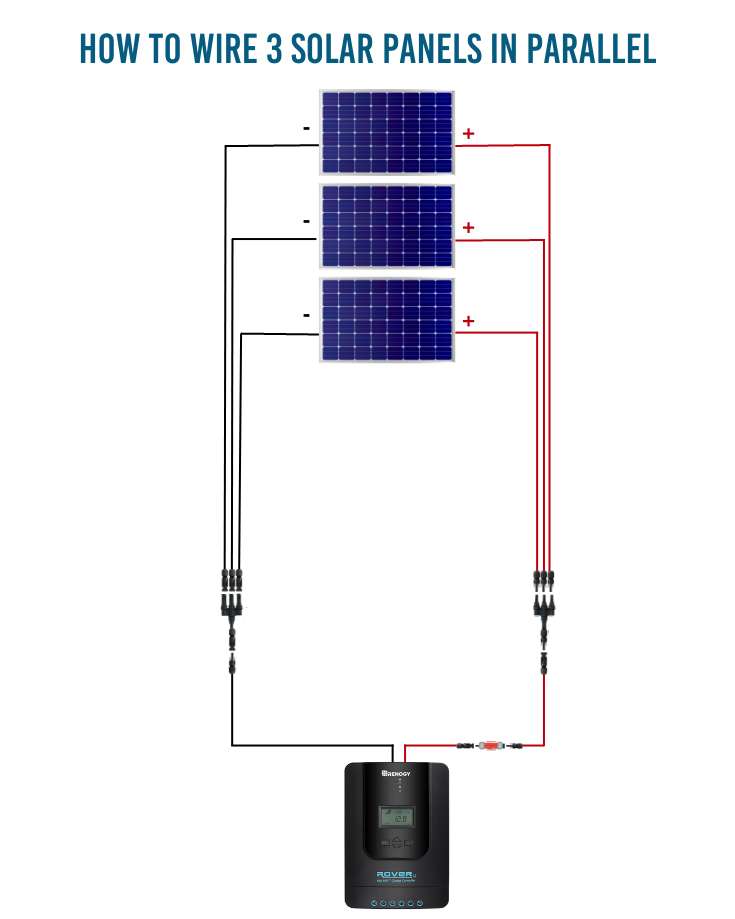
Here’s a diagram to help illustrate this:

Combining MC4 Connectors
If you have:
- 2 panels use two Y-branch connectors,
- 3 panels, use two 3-to-1 connectors, and
- 4 panels, two 4-to-1 connectors.
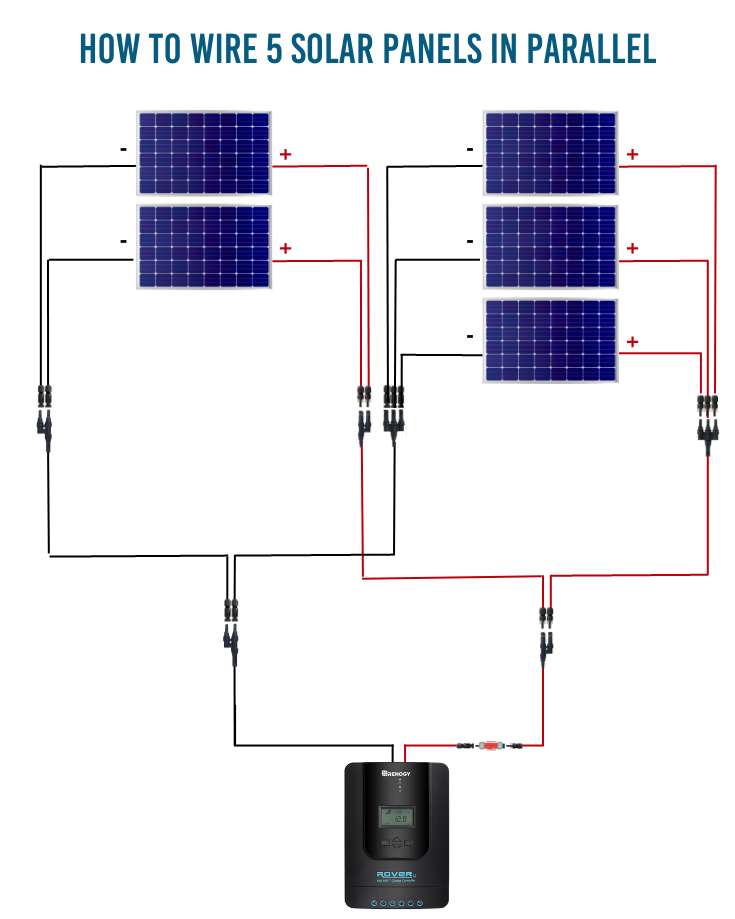
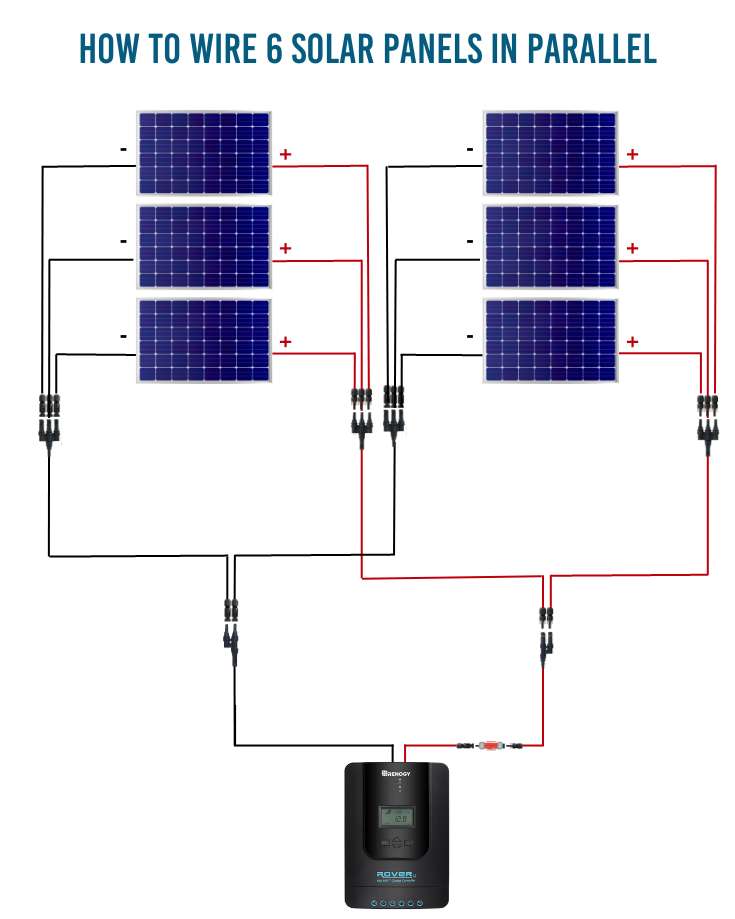
For anything more than 4, you’ll need to combine branch connectors. There are multiple ways to configure MC4 branch connectors, depending on how many solar panels are in the array.
For example, if you have six panels, you could use:
- six Y branch connectors and two 3-to-1 connectors, or
- four Y branch connectors, two 4-to-1 connectors, and a regular MC4 connector.
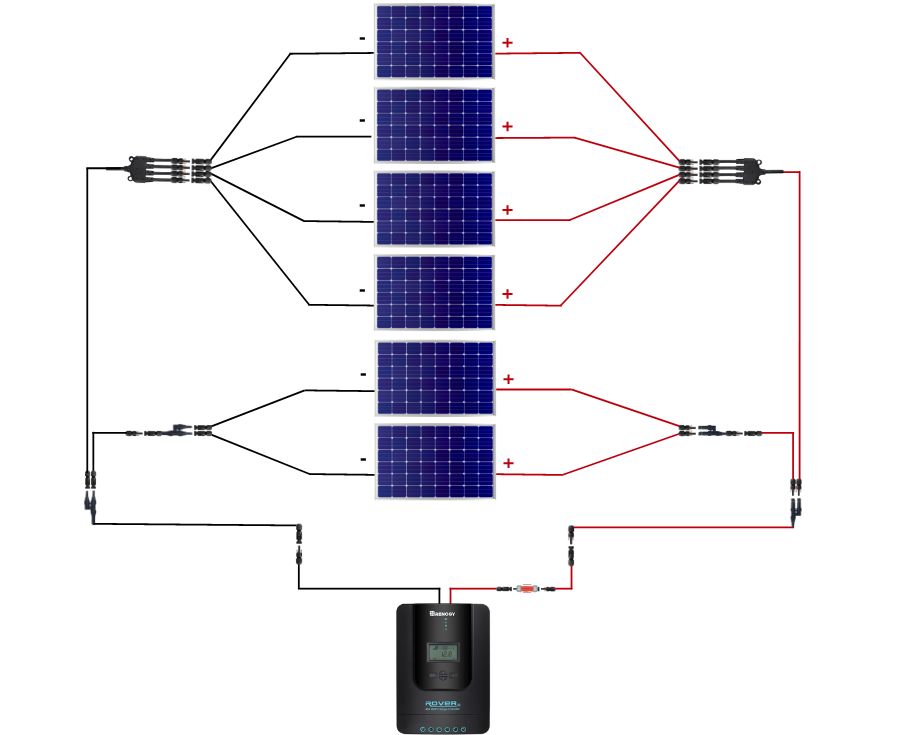

There are multiple other combinations of connectors you could use too.
How you configure them doesn’t make any difference to the power output, so base your decision on available connectors.
Extending Solar Cables
It’s common to need solar cable extensions on parallel wiring setups.
Most RV solar installations require longer cables than the pre-installed solar panel cables, typically around 3 feet. To extend the cable, follow these simple steps:
- Use the correct wire gauge to extend the cable with MC4 connectors at each end.
- Use our wire size calculator to double-check that you use the correct cable size. Solar cable is generally 10 AWG.
- After extending a solar panel’s cable, rerun the connectivity test in step 1 to ensure everything is working correctly.
Step 5: Number The Cables
Have you ever found yourself lost in a sea of electrical cables while trying to troubleshoot or repair your RV’s electrical system?
That’s why we highly recommend numbering your cables. It’s a simple, cheap, and incredibly effective way to keep everything organized and traceable.
Not only does numbering your cables save you time and frustration when identifying wiring, but it also helps prevent any confusion and ensures that you connect everything correctly.
If you plan to number your cables, the best time is before connecting them to the MPPT controller.
We also suggest taking notes on your RV wiring diagram so the information is easily accessible when you need it.
Step 6: Ready to Install Your Solar Charge Controller
That’s it! Your solar panels are wired in parallel and ready to connect to the fuse and MPPT.
However, you still need to test they’re connected correctly, so keep reading!
Step 7: Connectivity Testing Solar Panels Wired in Parallel
As each panel is added to a solar array, the current increases, and the voltage remains unchanged.
The only way to confirm that each panel is connected correctly is to test the current increases as each panel is added.
However, you need a connected circuit to allow current to flow and measure it.
That is, the solar panels need to be producing an output that is being used to power something.
The best way to test your solar panels wired in parallel is to connect them to a solar charge controller already connected to a battery.
Then the current will flow from the solar panels through the MPPT controller to charge the battery.
You can read the current flow from the MPPT controller’s readout.
However, the current reading will be variable, depending on the weather conditions and how much energy the panels are producing.
To be sure each panel is connected correctly, we recommend disconnecting and reconnecting each panel and checking the MPPT current reading in between.
It’s a bit of a faff, but it’s the only way to be sure.
Plus, disconnecting solar panels wired in parallel is simple and doesn’t affect the rest of the array.
How Does Wiring Solar Panels In Parallel Work?
Wiring solar panels in parallel means connecting the positive terminals of all the solar panels and all the negative terminals until all panels are wired in parallel.
You should be left with one positive cable and one negative cable.
This increases the array’s currents while the voltage remains the same.
For instance, four 100W panels with a rated voltage of 20.3V and a current of 4.93A wired in parallel can produce 20.3 volts and 19.72 amps (4.93a x 4), delivering a total of 400 watts.
However, it’s crucial to note that solar panels’ wattage is rated under standard test conditions and may vary based on external factors like temperature and shade.
It’s also important to understand that the voltage of an array wired in parallel is restricted to the panel with the lowest voltage rating unless the solar panels are all of the same specifications.
For instance, three 100W panels with a rated voltage of 20.3V and current of 4.93A and one 100W panel with a rated voltage of 20.4V and current of 4.91A wired in parallel can produce 20.3 volts and 19.7 amps (4.93 x 3 + 4.91), delivering a total of 399 watts.
When combining solar panels, it is crucial to be mindful of the potential power loss resulting from mismatched panels, especially with varying wattage sizes.
To ensure maximum efficiency, it is best first to calculate the overall power the combination of panels will supply.
If your solar array contains mismatched solar panels, parallel wiring is usually preferable to series wiring because it reduces power loss.
However, using identical solar panels is the best way to guarantee that there are no differences that could impair the harvesting of energy.
If you’re purchasing an additional panel to add to an existing setup, check the specifications and ensure they match precisely.
To avoid power loss, confirm that the following parameters match precisely:
- Maximum power (panel’s watt rating)
- VoC (open circuit voltage)
- ISC (open circuit current)
Advantages & Disadvantages Of Wiring Solar Panels In Parallel
Parallel wiring is a popular method of connecting solar panels on RV campers, but there are advantages and drawbacks too.
Parallel wiring doesn’t suit every circumstance, so it’s super important to understand these pros and cons to get the most out of your solar panel setup.
This section outlines the key advantages and disadvantages of parallel wiring for solar panels for RVers.
Pros
Here are the key benefits of wiring your RV solar panels in parallel:
Charging RV Batteries Even In Partial Shade
Shading is a common issue that can significantly impact the overall power output of a solar panel system.
When a single panel in your series setup is shaded, the system’s current drops to match the lowest-performing panel.
This dramatically reduces the output and efficiency of the entire system. Wiring solar panels is a series that overcomes this issue.
Parallel wiring means that each panel is connected to the same wires instead of being connected in a series where all panels are connected.
That means that the remaining panels are unaffected even if one panel is shaded or damaged.
As a result, the shaded or damaged panel will not weigh the system down or cause a disproportionate drop in output or efficiency.
Easy To Remove A Damaged Solar Panel From The Array
In a parallel solar panel setup, removing a damaged panel from the array is much easier.
Each panel can be disconnected and replaced without having to rewire the entire system.
Simply unplug the offending panel from the branch connectors. Plus, replacing a panel is just as easy.
If the array was wired in series, you’d need to:
- remove the damaged panel,
- connect the panels on either wise of it to each other, and
- possible add extension cables if they didn’t reach each other.
Mixed Solar Panels Wired In Parallel Is Generally More Efficient
When installing a solar panel setup in your RV camper, it’s crucial to ensure that all the solar panels are identical in specifications.
For example, if you have three 100-watt solar panels wired in series, they will produce 300 watts combined.
However, if the three panels are not identical, the overall wattage output may be significantly lower than 300 watts.
Ideally, installing identical solar panels is the best way to ensure maximum efficiency and output.
However, if you don’t have identical panels, wiring them in parallel can help minimize the power loss compared to wiring them in series.
Here’s an example:
Two 130w solar panels of 17.3V and a current of 7.5A each and a 90w panel of 21.1V and a current of 4.5A.
- Wired in series, these panels will provide 55.7 volts and amps 4.5 amps. Or 250 watts. Or a loss of 29%.
- Wired in series, these panels will provide 17.3 volts and amps 19.5 amps. Or 337 watts. Or a loss of 2%.
Smaller MPPT Controller Needed
When wiring solar panels, the MPPT (Maximum Power Point Tracking) controller must be sized based on the output of all the solar panels combined.
Controllers are rated by both maximum voltage and current. However, the voltage is usually the most limiting factor.
When wiring panels in series, this often means that the controller needs to be large and expensive to handle the total power output of the panels.
In contrast, if you wire solar panels in parallel, you have an advantage regarding the MPPT controller’s size and cost.
With parallel wiring, the voltage remains low, and the amperage increases. In practice, you can use a much smaller MPPT controller for the same panels wired in parallel and connect more panels to the same controller.
To illustrate this advantage, let’s say you have six 100w solar panels of 20.3V and a current of 4.93A.
- If you wire all of them in series, the total voltage output could be over 120 volts and the current a little under 5 amps.
- If you wire all of them in parallel, the total voltage output could be a little over 20 volts and the current a little under 30 amps.
So, with those calculations, you’d need the following:
- In series, a Rover 60 Amp MPPT Solar Charge Controller can handle up to 7 of these panels wired in series at around $300.
- A Rover 40 Amp MPPT Solar Charge Controller can handle up to 8 of these panels wired in parallel at around $150.
Cons
Less Charging Time Possible
The most significant issue is that parallel wiring may not provide enough voltage to charge a battery during all daylight hours.
A minimum voltage of about 12.6 volts is needed to charge a battery properly.
However, parallel wiring may not produce enough voltage output, especially during the morning and evening when the sun is low in the sky.
Additionally, some solar charge controllers need an input voltage from the solar panels higher than the battery’s voltage to operate.
While parallel wiring increases the current output, it may not provide enough voltage output to charge the battery correctly.
In contrast, series wiring produces much higher voltages, adding up the voltage of each panel to produce higher voltage output.
This can help provide the minimum voltage needed to recharge an RV’s battery for many more hours each day.
More Complicated Wiring
When it comes to wiring solar panels in parallel, one of the significant disadvantages is the increased complexity of the installation process.
A parallel wiring configuration needs branch connectors. The more panels in the array, the more connectors are needed, which can significantly increase the complexity of the installation process.
An intricate wiring loom on your RV roof will be troublesome for any future troubleshooting.
More Solar Cable Needed
Wiring your RV solar panels in parallel means using more cable than wiring in series.
In parallel, solar panels aren’t connected end-to-end as they are in a series configuration, which often results in the need for cable extensions on at least some of the panels in the array.
So the downside of all that? More cost!
More MC4 Connectors & Branches
When it comes to wiring solar panels, extra cable connectors can quickly add costs to the budget.
If you’re wiring solar panels in series, you’ll need standard MC4 connectors to join the cables.
Generally, each panel comes with a positive and negative cable pre-installed with an MC4 connector. You’ll only need additional connectors for cable extensions to reach the solar charge controller.
This connection method usually requires two standard MC4 connectors for the array, which costs around $20 each, bringing the total cost to about $40.
However, parallel connections are more complex and require more connectors. With this method, each solar panel must connect to two branch MC4 connectors – one for the positive cable and one for the negative.
These branch connectors, in turn, require another pair of MC4 connectors to join the solar charge controller.
For example, if you are wiring four panels in parallel, a minimum of one pair of 4 to 1 solar branch connectors and two pairs of MC4 cable connectors will be required, adding up to a cost of around $80.
Additionally, when wiring panels in parallel, some panels may be further from the branch connectors, meaning longer cables are needed. Therefore, extra connectors will be necessary to extend the panel’s cable.
This means that the overall cost of parallel wiring can be higher than series wiring.
Higher Current
Wire size plays a crucial role in the safe operation of RV solar systems.
Wire size is determined by circuit length and current rating to ensure the wires can safely carry the electrical current without overheating or causing a fire.
The amperage of the solar panel system determines the current rating. So for a parallel wiring configuration, that will be higher than in a series.
Solar panels usually include 10AWG / 6mm² wire as standard.
However, in parallel, it only takes a few panels in the array to exceed the limits of that.
When To Wire Solar Panels In Parallel
So with all that said, when is wiring your RV solar array in parallel the best configuration?
While both wiring options have their pros and cons, in our experience, in the vast majority of cases, series wiring is the best option for RVers.
It allows the battery to charge for many more hours daily, making installation easier.
However, there are some instances where connecting solar panels in parallel is the most efficient option:
- If you’re connecting mismatched panels, wiring in parallel tends to result in lower losses than in a series.
- If hot weather causes you to park your RV in the shade for extended periods to keep cool, wiring your solar panels in parallel may be a more suitable option. This is because series-wired panels are less efficient when a single panel experiences shading.
- If you anticipate staying in mostly shaded areas, parallel wiring is the preferred option for your RV’s solar panel system. Parallel wiring allows each panel to operate independently without one panel’s output affecting the others, resulting in the highest possible efficiency.
- A combination of series and parallel wiring might be the best option for very large solar panel arrays. This enables you to take advantage of the benefits of each wiring option, ensuring optimal performance.
When determining whether to wire your solar panels in series or parallel, assessing your specific needs and circumstances is important.
While most RVers wire in series due to the increased power output and easier installation, parallel wiring may be a more efficient alternative in shaded areas or specific situations.
Wiring Diagrams For Wiring Between 2 and 6 Solar Panels In Parallel
How To Wire Solar Panels In Parallel
Wiring solar panels in parallel is a great way to maximize power in the shade and with mismatched panels, but it's crucial to do it correctly.
We've put together a comprehensive guide that will take you step-by-step through the process of wiring solar panels in parallel.
Materials
- Solar Panels
- MC4 Connectors
- Solar Extension Cable
Tools
- Multimeter
- Solar Connector Assembly Tool
Instructions
- Test each solar panel with a multimeter to check that there is voltage.
- Mark the positive cable with red electrical tape.
- Cover the panels so there they don't produce any voltage.
- Connect the +ve cable of one panel to the +ve cable of the next by using an MC4 branch connector.
- If you have more panels, repeat step 4 until all panels are wired in parallel.
- Add PV extension wire as necessary with corresponding MC4 connectors and branch connectors.
- Add cable numbering.
- Once all are connected, you're now ready to connect to the fuse and MPPT.
- Connect the solar panels to the MPPT controller, ensuring the battery is connected too.
- Test the current readout on the MPPT controller.
Graham Bogie

Graham is a seasoned marine electrical engineer with two decades of experience designing customized electrical systems for plant machinery and converting campers and overland vehicles. His expertise has led him to author the reputable Campervan Electrics Handbook and become the chief designer of the RV Wiring Design Tool. As a knowledgeable figure in the field, his YouTube channel, blog, Facebook group, and newsletter, offering electrical advice and product reviews, reach more than a million users each year.