RV Shore Power Hookup is a game-changer for any camper. Learn how to safely and efficiently use it with our guide.
For those who spend time on campgrounds with a mains power supply, an RV electrical hookup (240v or 110v) is a perfect way to recharge leisure batteries and power household appliances.
With the proper setup, you can plug in your RV camper to a mains supply.
AC power is delivered to a breaker box, like in a house.
This allows you to use AC appliances on a mains circuit – ideal for running air conditioning units and microwaves.
A battery charger (or power converter) changes AC power to DC, so it charges the leisure batteries too.
This post takes you through everything you need to know about RV shore power and how to install shore power in your camper.
Need help & advice with your electrical setup?
Join Our Facebook Support Group
What is RV Shore Power?
RV shore power often called a hookup, is when you plug your RV camper into the AC electrical grid or mains supply.
It’s called shore power because it’s commonly used for ships and boats when they need a power supply or to recharge their batteries in a marina or harbor.
Shore power works by plugging a camper into a power source, usually an electrical pedestal on or near your pitch, transferring AC power to the camper.
You can also use a household electrical supply, so it’s ideal for weekend warriors who need to recharge the batteries after a few days away.
Do I Need Shore Power in my RV Camper?
If you’ve built an off-grid camper, you can charge your leisure batteries from a solar setup, a generator, or a split charge relay or battery-to-battery charger while driving.
If you can rely on enough daily sunshine to replenish any electrical demand, firstly, we envy you, and secondly, you don’t need an RV electrical hookup.
More commonly, the weather isn’t always kind. Cloud cover will hamper recharging from solar panels alone.
You could drive or run the engine to top up the batteries, but that’s not always convenient.
The ability to recharge the batteries from a mains supply is the best alternative. Not only can you top up the battery bank, but you can run household appliances directly from it too.
If you want to run an air conditioning unit, power-hungry microwave, or washing machine, shore power is the answer.
We live in our van full-time but rarely use campgrounds, preferring boondocking and wild camping where possible.
But we can pull into a campground to recharge our batteries if necessary.
Installing shore power capability in an RV camper isn’t expensive, so it’s well worth installing as a fallback.
If you only use your camper for a few days at a time, a hookup facility for use at home, coupled with charging the batteries as you drive, may be enough to avoid needing a solar system.
Safety Warning
Mains power voltages are big enough to kill, so if you don’t know what you’re doing, always use a qualified electrician.
How Does Electrical Hookup Work?
It’s helpful to understand how hookup works to figure out what you can and can’t do when installing, running AC appliances, and charging 12v batteries.
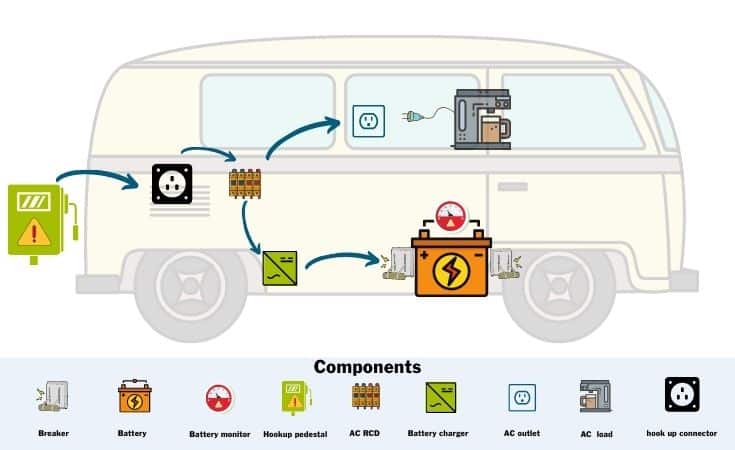
In the most simple terms, the diagram below shows how an installed hookup system hangs together.
Most countries have regulations governing electrical installations. They aim to ensure standardization and safety.
The regulations limit the maximum current any one circuit can handle and stipulate the total current of all the circuits combined must not be greater than the total current the grid is supplying.
This prevents burning out the large mains’ electric cable and tripping the entire electrical supply for your neighborhood.
You might have experienced a tripped breaker in your house.
This is due to trying to pull too much current on one circuit, either because you plugged in something too powerful, too many appliances onto one circuit, or a faulty appliance suddenly tried to draw too much current.
Either way, the breaker tripped to protect the circuit.
Plugging an RV into the mains electrical supply is like plugging in any electrical appliance; the same restrictions apply.
You can only draw a maximum of the circuit’s current limit without tripping the supply breaker.
Campgrounds limit the current supply, with each pitch usually having a dedicated breaker. Draw too much, the breaker will trip, and you’ll probably need to speak with the camp staff to resolve it.
With a mains supply, you can run AC appliances directly on an AC circuit and/or use a power converter to transform the AC power to DC, so you can charge your 12v batteries.
Components for RV Shore Power
A few components are needed to install and use an electrical hookup in a camper.
The first thing to note is the voltage of your appliances. If you’ve built your van in Australia, Europe, or the UK, you probably run 220-240v appliances; in Canada and the US, 110-130v.
All your AC electrical appliances must be the same, either all 110v or all 240v, because they all need to be compatible with the camper’s electrical components supplying them.
AC Power Pedestal / Mains Supply

Most campgrounds have a hookup pedestal to plug into. It’s important to know what voltage the mains supply is on – either 110v or 240v, depending on where in the world you are.
Some international campgrounds have both 240V and 110V AC.
It’s also important to check what the current limit is. This is often 16 amps in the UK but can be as low as 10 amps. It could be as low as 5 amps in Europe and as high as 20 amps.
With currents this low, you can see why you need to manage your load carefully.
Small currents may be insufficient in the US, where many RVers live full-time on campgrounds and use high-powered air conditioning units and other AC appliances.
The pedestals in the US have 3 current options: 15, 30, and 50 amps. Remember, these are all at 110v, not 240v.
The 15 and 30 amp sockets are similar to those in European sites. The small 15 amp socket is a good budget choice as campgrounds vary price based on which you use.
The 50 amp power supply is slightly different because it needs a 4 core cable, effectively providing 2 circuits instead of 1. This allows you to safely run higher total currents than would otherwise be possible.
Everything you need to know about campervan electrics. Now available in ebook and paperback!
Learn how to design, size, install and troubleshoot your camper’s electrical system.
Mains Hookup Cables / Shore Power Cord
The hookup cable connects the power inlet on your camper to the site’s power supply on the pedestal.
The cable should be rated higher than the maximum current expected from the supply for the given voltage.
So, for example, in the UK, the supply current could be as high as 16 amps at 240v. European and British standards (BS EN 60309-2 if you’re interested) state the cable should be rated for 25 amps.
In the US, the current can be as high as 30 amps at 110v. Remembering Watts Laws (Watts = Amps x Volts), a 25 amp rated cable is almost equivalent to 50 amps at 110v, so well sized.
Use our wire gauge calculator to check the wire sizes needed.
The 50 amp power supply needs a 4 core cable, so bear this in mind when buying.
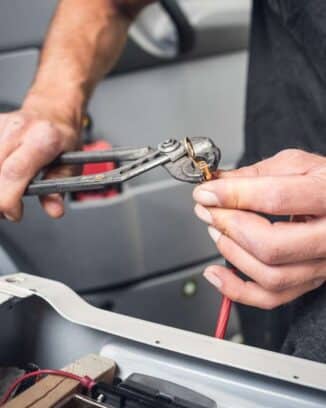
Mains Hookup Connectors
The hookup cable needs 2 connectors, one at each end.
Standard connectors are sold in pairs, one for each cable end, though you can usually buy the cable with them already fitted.
The end that connects to the van is standard for the country you buy it in, so make sure to get a compatible hookup box in the same country.
And be extra careful not to leave the cable behind, especially when traveling abroad.
Replacing the connectors to fit your van’s hookup box might be challenging.
European sites (including the UK) generally use these standard fittings. Though less common, sometimes you may find a campsite that only offers a local household socket.
In these circumstances, you’ll need to use an adaptor.
US pedestals have different sockets for each ampere type, so adaptors may be necessary.
With a 30 amp to 50 amp adaptor, you can use a 30 amp supply with the RV’s 50 amp, 4 core cable.
Remember, it will be limited to 30 amps, so you’ll need to manage your load.
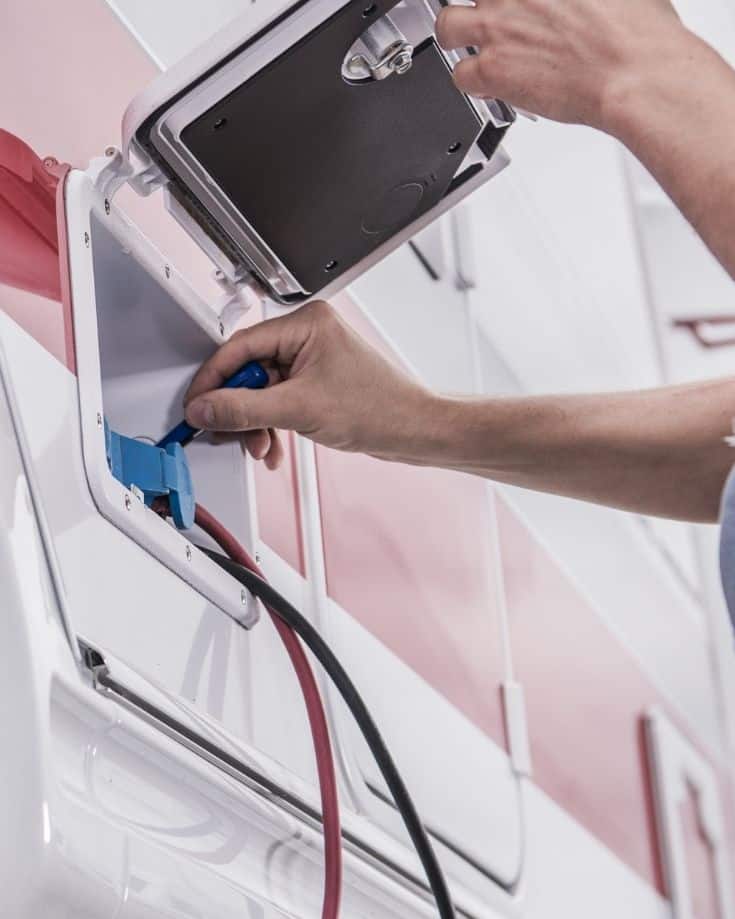
Hookup Box / Shore Power Socket
The shore power cord connects to the RV’s electrical system via the shore power socket.
If you’re converting a van to a camper, you’ll need to cut a hole in the side of the van to fit it.
The sockets are contained within a splash-proof and weatherproof housing.
RCD Breaker Box / Consumer Unit
A breaker box is often called an RCB, RCD, Consumer Unit, Ground Fault Current Indicator (GFCI), or just GFI, just to keep us on our toes!
Whatever you call it, it’s a distribution panel for electricity coming into the camper and a smaller version of a household unit you’ve probably seen under the stairs or in a utility room in a house.
It acts as a safety device. If the breaker detects power surges, improper grounding, short-circuits, faulty wiring, or appliances, it trips, protecting the entire electrical system and helping to avoid fires and electric shocks.
In Europe, fitting an RCD breaker in a camper is essential. Some campgrounds may even ask to see it before they allow you to hook up.
Regulations are more relaxed in the US.
Regardless of regulations, we prefer to take control of the safety of our camper’s electrical system and not rely on a campground’s breaker or their adherence to regulations to protect us.
There are 2 types of RCD – single-pole and double-pole.
Single-pole RCDs are used for low-current circuits. They monitor the live wire, tripping if they detect a fault.
Double-pole RCDs are intended for higher currents. They monitor the live and neutral wires, tripping if they detect a fault.
This is especially important in some European countries where reverse polarity can cause issues.
Reverse polarity is where the live & neutral wires are swapped. A single-pole breaker only trips one side of the circuit, potentially leaving power on the other side in the event of a fault.
We recommend double-pole RCDs. They provide extra protection for almost no extra cost and eliminate any reverse polarity risks, so why wouldn’t you?
Switched Sockets
If your camper’s electrical design provides AC circuits to run only when connected to a mains hookup, you can install the switched sockets directly from the RCD.
Locate the switches for convenience.
For those who spend most of their time in campgrounds, only use AC appliances, and have no intention of using them off-grid, this setup doesn’t even need a leisure battery.
We spend more time boondocking and wild camping than on campgrounds, so our hookup has a couple of switched sockets for occasional use.
Power Converter / Battery Charger
A converter is another name for a battery charger. It converts AC power to DC to charge the 12v RV camper batteries.
If you spend much time at campgrounds with hookup facilities, a converter is the best way to keep your batteries topped up.
They’re also helpful for topping up the battery bank at home for camping weekends.
We’ve written a detailed post on RV converters and battery chargers, so check that out for more details.
In the meantime, here are some tips for choosing the right one for your camper:
- Power capacity must be enough to charge the batteries in a “reasonable” time. Make sure you take into account any ongoing power usage as the battery is charging too.
- Look for easy-install units. Most converters are easy to install, but a few are a bit more tricky.
- Make sure the converter supports the correct battery type – Lithium-ion, Gel, or AGM.
- For the most efficient charging, choose a charger with at least 3-stage charging for AGM and Gel batteries.
- For Lithium batteries, choose a smart converter.
- For an ultra-simple AC installation, just use a converter without extra switched sockets. The downside is that you’ll need to plug the appliances into the converter box, so it needs to be in a convenient location.
Working with 240v when your Van is 110v or Vice Versa
We built our van conversion in the UK, so the system expects 220-240v AC power. But we travel globally, and some countries only provide 110-130v AC – Brazil & the US are just 2 examples.
Likewise, if your camper is designed for 110-130v, and you travel to some countries in South America or Europe, the AC supply is 220-240v.
Do not plug your 240v AC wired van into a 110v AC output. Nor should you plug in a 110v AC system to a 240v AC supply.
The RCD should trip to keep you and your electrical system safe, but it might not work correctly at the wrong voltage. You risk significant damage and potential personal injury if you don’t have one fitted.
This is why it’s essential to understand what voltage the power supply is BEFORE you hook up.
Using a transformer is a safe way to overcome the voltage difference. If your van is 110v, you’ll need a step-up transformer to go to 240v. If it’s a 240v camper, you’ll need a step-down transformer to use 110v.
AC power has a frequency, and most countries use 50Hz per second. Some countries, the US included, use 60Hz.
Our van is 240v for 50Hz. When we hook up to shore power in the US with a step-up transformer to increase the 110v to 240v, the supply frequency is unchanged. We’ll get 60Hz instead of 50Hz.
This won’t do any harm to the appliances, though. We may notice a difference in operating speed for fans and motors, but that’s all.
What if You Don’t have a Transformer?
In remote locations with limited shopping outlets, you have more chance of finding a battery charger than a transformer.
If you find yourself stuck and can run all appliances off the battery bank, buy a battery charger for the local voltage and use this to charge the batteries.
It’s not ideal if your batteries aren’t easily accessible or you can’t shelter the charger from the weather, but it may help you in a tricky situation.
How Long Does it Take to Recharge Batteries on Shore Power?
To recharge a battery bank from shore power, you need a battery charger to convert the AC supply to a 12v DC supply.
The battery charger’s size and the battery bank’s state determine the hookup time needed.
Let’s assume we have a 20A battery charger unit. We’ll also assume we have 1 x 140ah battery, and it’s 50% full. Its maximum charging current is 30 amps.
To fully recharge the battery, we need 70ah. The charger can provide up to 20ah per hour.
Even with no other load on the batteries, in theory, we need to hook up for 3.5 hours to recharge.
You can read more about battery profiles in our post about charging leisure batteries, but this is a close enough approximation.
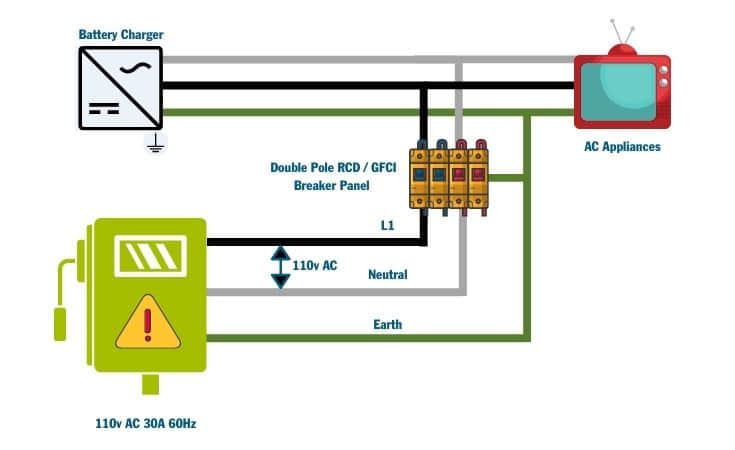
RV 110v 15A & 30A Wiring Diagram
The wiring diagram below is for a 110v AC supply, including a double-pole RCD breaker, at least one switched socket for AC appliances, and a circuit to the battery charger/power converter.
Any DC appliances can continue to run as the battery bank is charging.
It is identical to the 240v wiring diagram above, but the wire colors follow the US color and naming conventions.
This is suitable for 15 amp and 30 amp 110v systems.
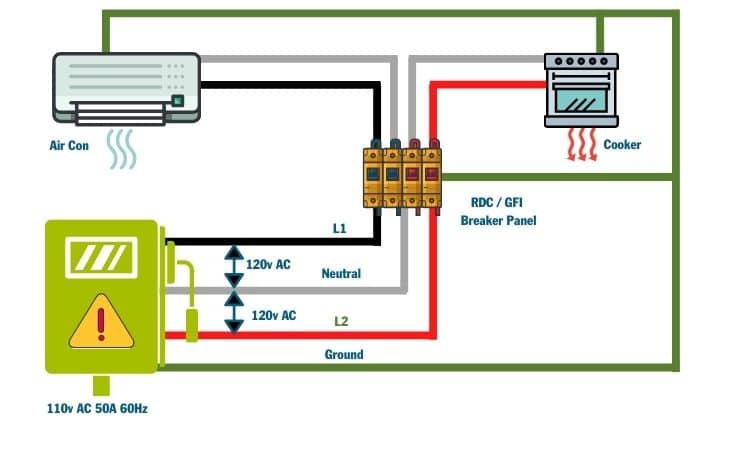
RV 110v for 50A Wiring Diagram
The wiring diagram below is for a 110v AC supply with a 50 amp connection. It includes a double-pole RCD breaker and at least 2 switched sockets for powerful AC appliances.
Depending on the load, a battery charger can be wired into either circuit.
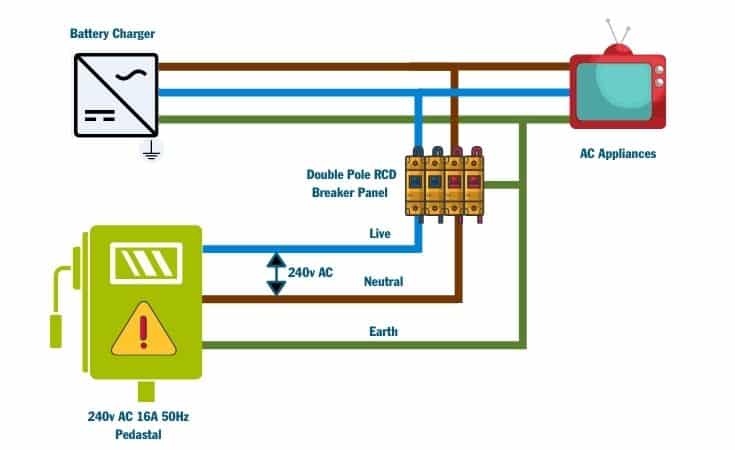
Camper Van 240v Wiring Diagram
The wiring diagram below is for a 240v AC supply, including a double-pole RCD breaker, at least one switched socket for AC appliances, and a circuit to the battery charger/power converter.
Any DC appliances can continue to run as the battery bank is charging.
Installation Tips
- Carefully plan where you’ll fit the RCD before cutting a hole in the van for the hookup box. Aim to locate them near each other on either side of the van’s skin.
- Don’t fit the hookup box near the camper’s fuel or water-fill inlets.
- Avoid fitting the hookup box too low down on the vehicle to reduce water spray and debris from damaging it when driving.
- Do not run DC and AC cables in the same conduit because any live fault from the AC circuits can power the DC circuits with a lethal level of electricity. Keep DC and AC cable runs at least 50 cm apart.
- All AC components and your system must be correctly connected to the grid supply Earth systems and include all safety trip devices as per local regulations. If in doubt, consult or employ a qualified electrician every time.
Common Problems with RV Shore Power
- Moving vehicles like campervans, motorhomes, and RVs generate vibrations, which can lead to connections becoming loose over time. Because of the voltages involved with AC power, loose wires are best avoided. Check the connections monthly and keep them in good order.
- We’ve come across some hookup facilities without an Earth connection. Look before you touch. If in doubt, do not use it or even touch it. You may become the route to Earth which will hurt, if not kill you.
- If you have any problems with your AC supply or circuits in your camper, always seek the advice of a qualified electrician.
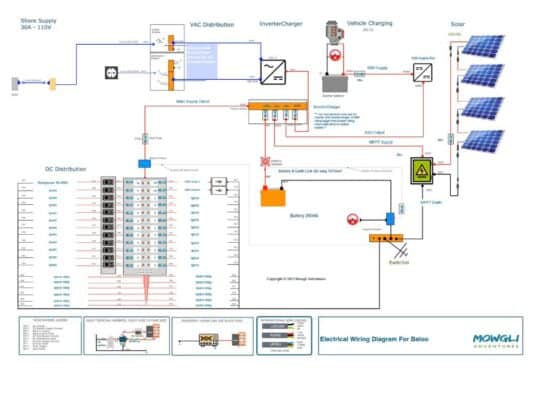
Automatically Create Your Bespoke RV Wiring Diagram
Includes 110v & 240v, solar, B2B, batteries, inverters, 12v, 24v & 48v systems, wire gauges in AWG & mm² & much more!
Graham Bogie

Graham is a seasoned marine electrical engineer with two decades of experience designing customized electrical systems for plant machinery and converting campers and overland vehicles. His expertise has led him to author the reputable Campervan Electrics Handbook and become the chief designer of the RV Wiring Design Tool. As a knowledgeable figure in the field, his YouTube channel, blog, Facebook group, and newsletter, offering electrical advice and product reviews, reach more than a million users each year.

I’m late to this thread, but still hopeful that you can help. My question is about the battery charger connecting from the RCD to the battery. From the initial wiring diagram it connects straight from the RCD (15a for example) through a fuse then to the battery. What I’m not clear on is the actual physical layout of the charger, do you simply use the alligator style clips when needed on the terminals, or fasten them on permanently so it’s always charging whenever the breaker is on and the AC is connected? Do you remove the plug from the charger and wire it straight to the breaker box or plug it into a socket connected to it?
Would appreciate any help available, it’s not easy to find here in Spain at the moment.
Thanks a lot!
Hi,
I am currently building a van in the UK to travel to South America for a year.
My plan is to install a 2000w inverter/charger in order to convert my 240v appliances to 12v.
should I just get a standard inverter without the charger?
what additional items will I need in order to connect to shore power in Latin America?
thanks a lot,
Colm Shea
Hi Colm
A year isn’t much time in South America & shipping costs are pretty high, especially for such a short trip. There’s loads of campers for sale over here at the minute – many abandoned in Santiago, Chile due to Covid so already expedition ready. Chile is the best place in S.A. to buy a van as a foreigner.
Anyway that aside, a 2000w inverter is pretty big – we manage on a 300w and we run 2 laptops and camera batteries all on 240v. We don’t use a combined inverter charger – we use a simple pure sine wave 300w inverter and a separate battery charger to recharge from shore power. A combined unit would be difficult to replace in SA if there were any issues and I prefer not to have all my eggs in one basket.
Are you planning on travelling in Brazil? A lot of places in Brazil run on 110v so we needed a step up transformer to use the shore power. Otherwise, most of SA is on 220v so you should be fine. Hope this helps but let me know if you have any other queries.
I really need help on what to do and other times to get to finish my off grid system.
Hi Alicia – Can you be more specific about what part of your electrical system you need help with?
hi, thanks for the awesome article.I just had a question on how to connect a switched socket (ac socket) to an inverter. I am looking for 2 days now and nobody really explains it or skips it in their articles/video’s. Nobody sais what wires to use or what rcd to use (a double pole but what Amperage?). do U need 1 rcd per ac socket? Can U just take an extension cable and cut the ac sockets of, plug it in the inverter and wire the place where u cut it to rcd? I really hope U will know the answer.
Hi Thomas
Glad you like the article. I need to check I understand your question correctly.
If you want to use multiple AC appliances directly from your inverter, you can use a normal household extension cable. Plug that into the inverter and the appliances into the other end. No need for extra RCDs as you have no mains AC supply, and the extension already includes the necessary plugs.
On the other hand, and I think this is more likely what you’re asking, you want to power your existing AC circuits from the inverter as you might if you were hooked up to shore power.
If this is the case, the first thing to consider is your safety. You must not wire your RV so you could ever accidently connect 2 AC supplies at the same time. If you use an extension cable from your inverter and plug it into the shore power hook up on the outside of your RV, this will be safe because you’ll have to unplug it before you connect the shore power. So no chance of multiple simultaneous AC supplies.
Otherwise, if you want to keep the wiring inside, you must use a transfer switch to protect you. Fitted before the RCD, it will ensure only 1 AC supply is provided at a time. We have a little more information about transfer switches here.
If you plan to plug the inverter into the shore power inlet on the outside of the RV, the RCDs are probably already installed. You need a correctly rated shore power cable (25A). The connector that normally plugs into the pedestal won’t fit into the inverter so cut it off and replace it with a normal household plug to fit the inverter. That’s it.
If you’re building a conversion and the RCD isn’t yet fitted, I should update the article to explain how to size it correctly. In summary, the consumer unit RCD should be rated to cope with the ampere from the shore power – so 15a, 30a or 50a at 110v. The combined amperes of the breakers should not exceed the rating of the main RCD. So in a 30a unit, you could use 3 x 10a breakers or 2 x 15a breakers but not 2 x 20a breakers.
Each AC circuit should have a dedicated breaker. If the double socket you are asking about is on a dedicated circuit, we recommend a double pole RCD. You can use multiple appliances on the circuit so long as their combined amperes don’t exceed the breaker’s rating, so size the breaker for what you plan to use on the circuit.
Make sure to use the correct size wires throughout.
I hope this answers your question but let me know if not.
Regards
Graham
Hi Graham, thanks for the explanation. I knew it was possible to use extension cables but they dont look as nice as aluminium ac sockets for example. So if I dont have shore power in my van and my inverter is in the back and I want an ac socket in the kitchen in the front of the truck I need to pull a cable from the inverter and connect it to the ac socket in the front with a consumer unit with an rcd between right? lets say I want to use the ac socket for a 100-240V 1.5A 50-60Hz laptop charger that has an output of 19v 3.42A how much A should the rcd be between the inverter and ac socket?
Aaah! Ok. You don’t need an RCD. Use a correctly rated cable – probably 10 or 12 AWG, depending on length. At one end attach a household plug to connect to the inverter and connect the double socket to the other end. You’re basically making a pretty extension cable. Because the inverter is already grounded and has internal fuses, the RCD is unnecessary. All your power is coming from the battery bank via the inverter and not from a high voltage mains supply. Make sure to ground the aluminium socket cover too!
Hi
Great site, but I can’t find an answer to this question…
If my RV has a solar system with an MPPT charge controller, but I also sometimes need to use shore power to charge the battery, how do the two power sources merge at the battery? Can I just connect the battery charger as usual and leave the charge controller to sort itself out, or do I need some more sophisticated arrangement?
Thanks!
Hi Peter.
You don’t need anything sophisticated, it all just works itself out.
The battery charger and MPPT both have in-built charging profiles and control what voltage they send to the battery, based on the battery’s charging profile.
Because they both join at a common point (i.e. the battery’s positive terminal), the combined current is available to the battery. The battery determines how much to take based on its absorption rate and charging profile. If you have a B2B or split charge relay fitted as well, and turn the engine when hooked up and/or on solar, the same applies.
I hope this helps. Graham