Do you want to know how to hook up solar panels to RV batteries?
You’re in the right place.
This post is one part in our DIY campervan solar system series.
If you’ve arrived on this page and need to know more about solar system set ups before you start your own DIY installation, browse through our other posts first.
If you can’t find the answer you’re looking for, just drop us a line and we’ll get back to you.
The purpose of this post is to share with you our DIY solar wiring diagrams, provide a brief glossary about each component of a solar system and to explain a little of the theory behind our diagrams.
Calculating Your Campervan Power Usage
Before you decide what size solar system to install in your campervan, we highly recommend calculating your needs first, then matching those needs with solar panels.
You can check out our complete set of electrical calculators for RVs and campervan conversions to help size your entire solar setup.
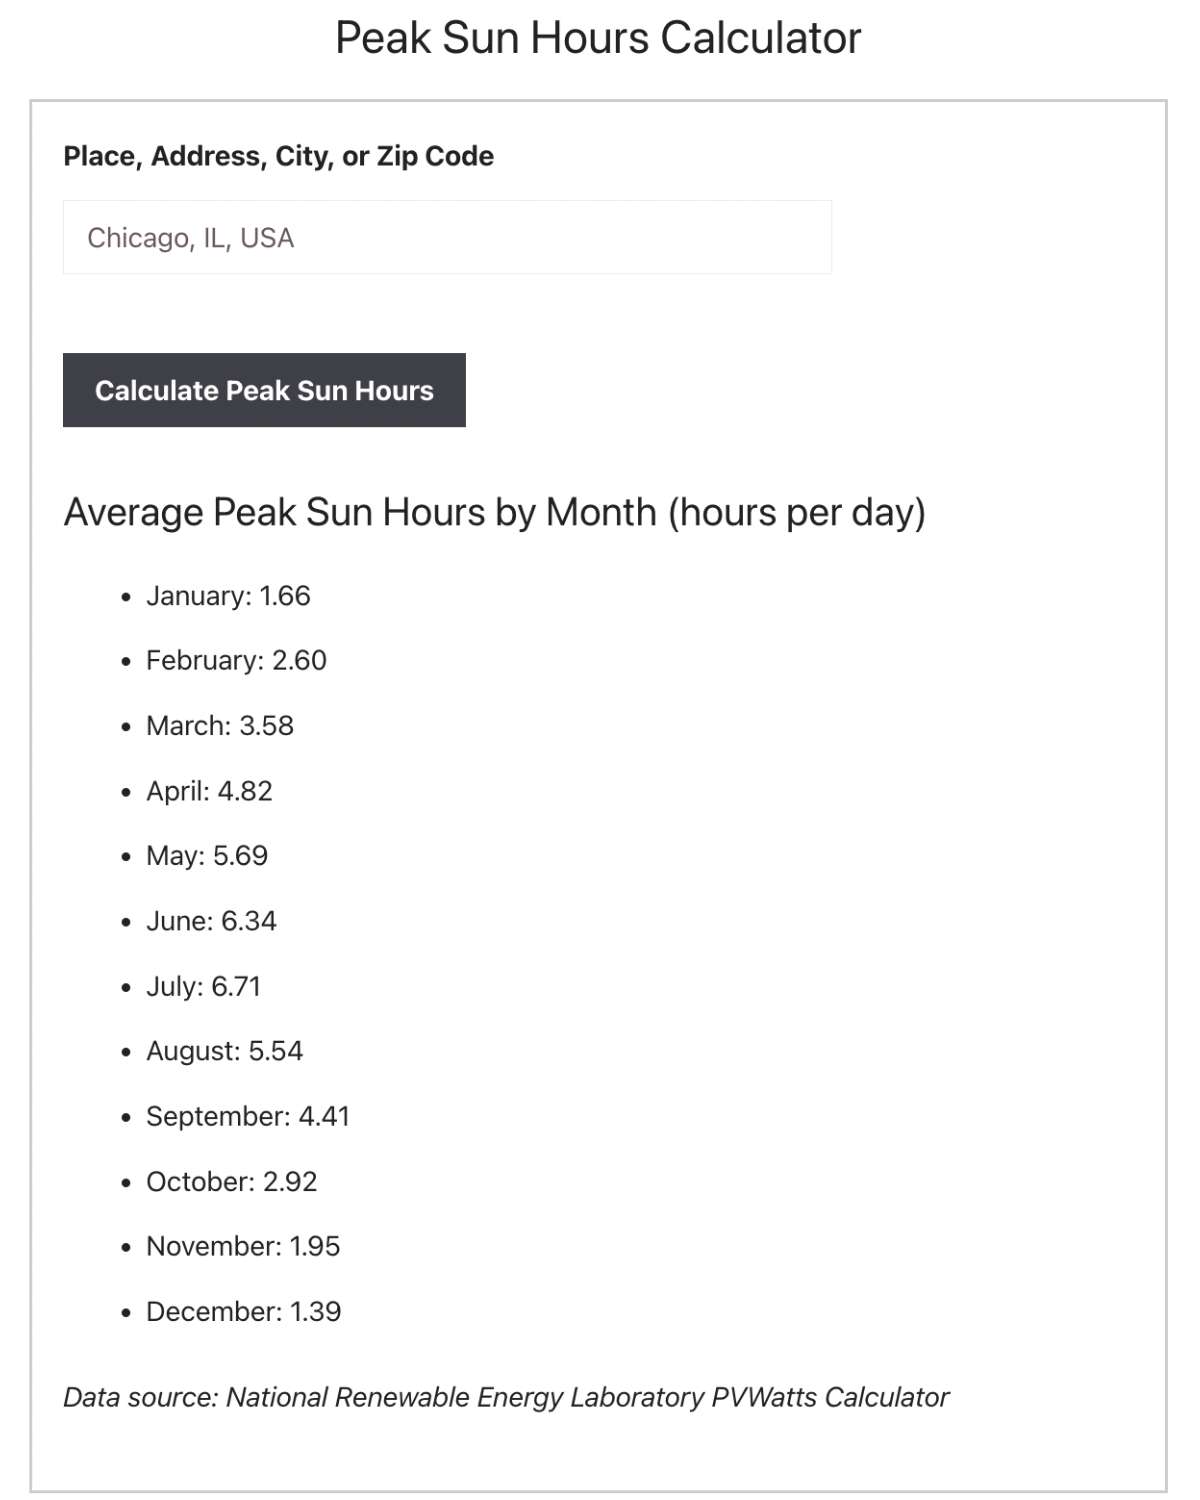
How much a solar panel can power depends on a number of variables including the time of year, the weather, your location and the type of charge controller you install.
To give you a visual idea of what you can expect to power from different size systems, check out this image below.
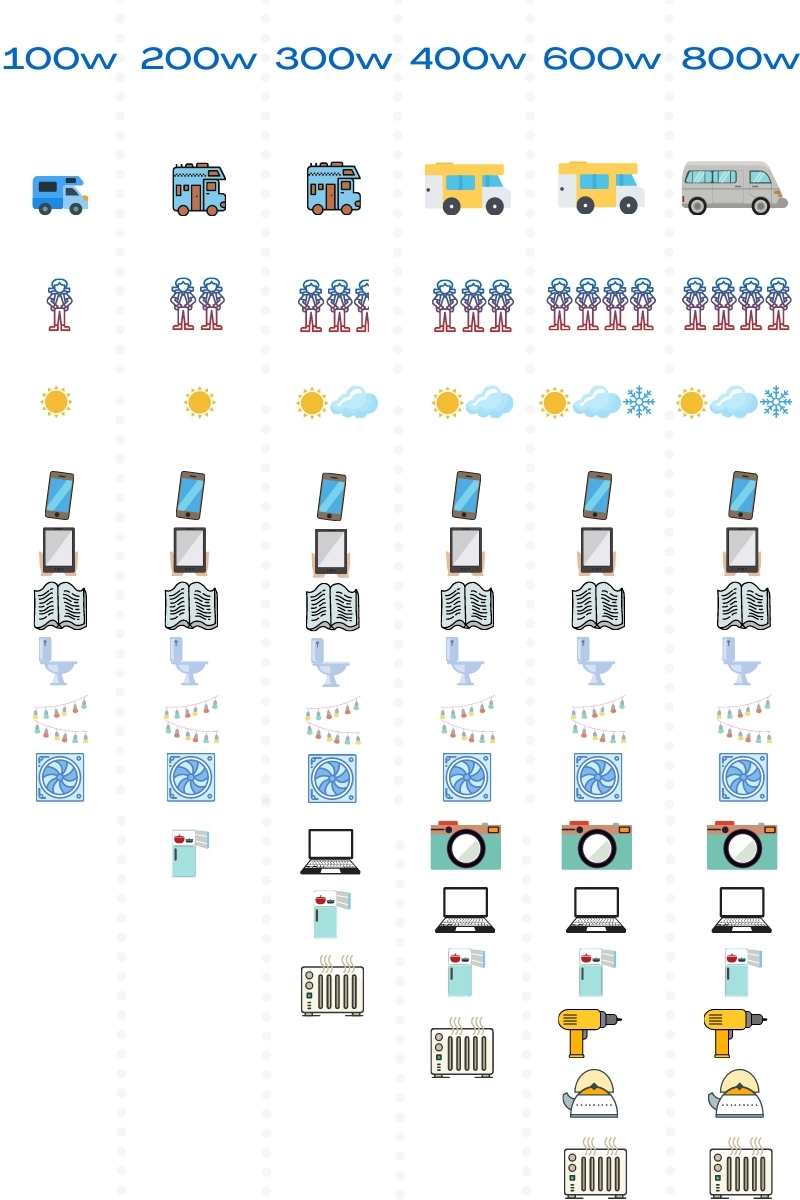
While this is of course only indicative, it does illustrate that to be in with a chance of living completely off solar generated energy in a van, you need a minimum of 400w of solar panels.
But every little helps keep you off grid for longer.
If you only have space or the budget for 100w, even a small set up can make a world of difference.
Need help & advice with your electrical setup?
Join Our Facebook Support Group
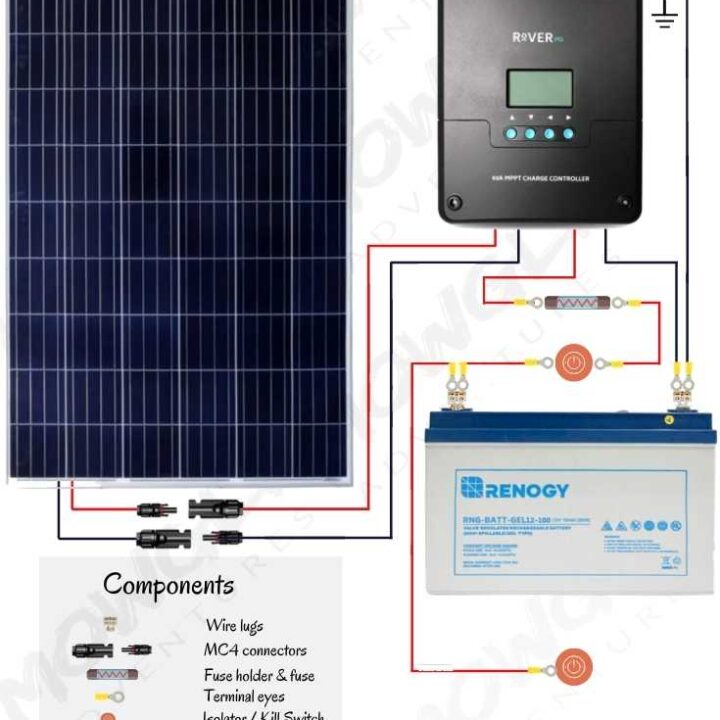
Components of a Camper Solar System | A Brief Glossary
Solar Panels
Solar panels harvest sunlight, converting it to electricity. There are different types of solar panels but we recommend using monocrystalline as they’re the most efficient.
Solar Charge Controllers
Solar charge controllers regulate the current from the panels to a safe level so it can charge the batteries. There’s 2 types of solar charge controller: PWM and MPPT.
- A PWM charge controller is a low cost, budget friendly option. Note if you have a PWM charger the solar panels must be wired in parallel.
- An MPPT charge controller has more complex electronics so costs much, much more than a PWM. However, it is far more effective at charging the batteries.
As with other aspects of camper solar set-ups, there’s no one size fits all answer to which is best.
Check out our complete guide on how to select the right solar charge controller for your setup.
If you need to know what size to get, use our interactive solar charge controller calculator.
Batteries
Batteries store the energy generated.
An RV battery bank is made up of at least one 12v deep cycle (or 2 6v batteries).
Deep cycle batteries are sized in amp hours or Ah. The higher the amp hours, the more energy is stored.
Different types of batteries perform in different ways so 100ah of one type of battery is not equal to 100ah of a different type.
There’s 4 types of deep cycle battery: lithium batteries, Gel batteries, AGM batteries and lead acid or FLA batteries.
Use our battery sizing calculators to get the right size and type for your needs:
You can read more detail about them in our post on campervan batteries and see why we recommend choosing Gel or Lithium-ion.
Solar Panel Mounting Brackets
Solar panel mounting brackets allow you to fit the solar panel to your van without needing to drill holes in the roof.
MC4 Connectors
MC4 connectors allow you to extend the solar cables.
There’s different types of connectors for joining multiple panels.
Solar Panel Cable
Solar panel cables (or solar wires)are rated to handle the current from the panels, connecting them to the charge controller.
By increasing using bigger cables, you can minimise voltage loss between the solar panel and the charge controller.
Choosing the correct campervan wiring sizes is critical for safety and efficient performance of a solar power system.
Solar Panel Gland
A solar panel gland seal is a weather proof seal to plug the hole needed to run the solar cables into the RV.
Fuse Holder
Fuse holder sits between the solar charge controller and the battery cut off switch, holding the fuse to protect the battery.
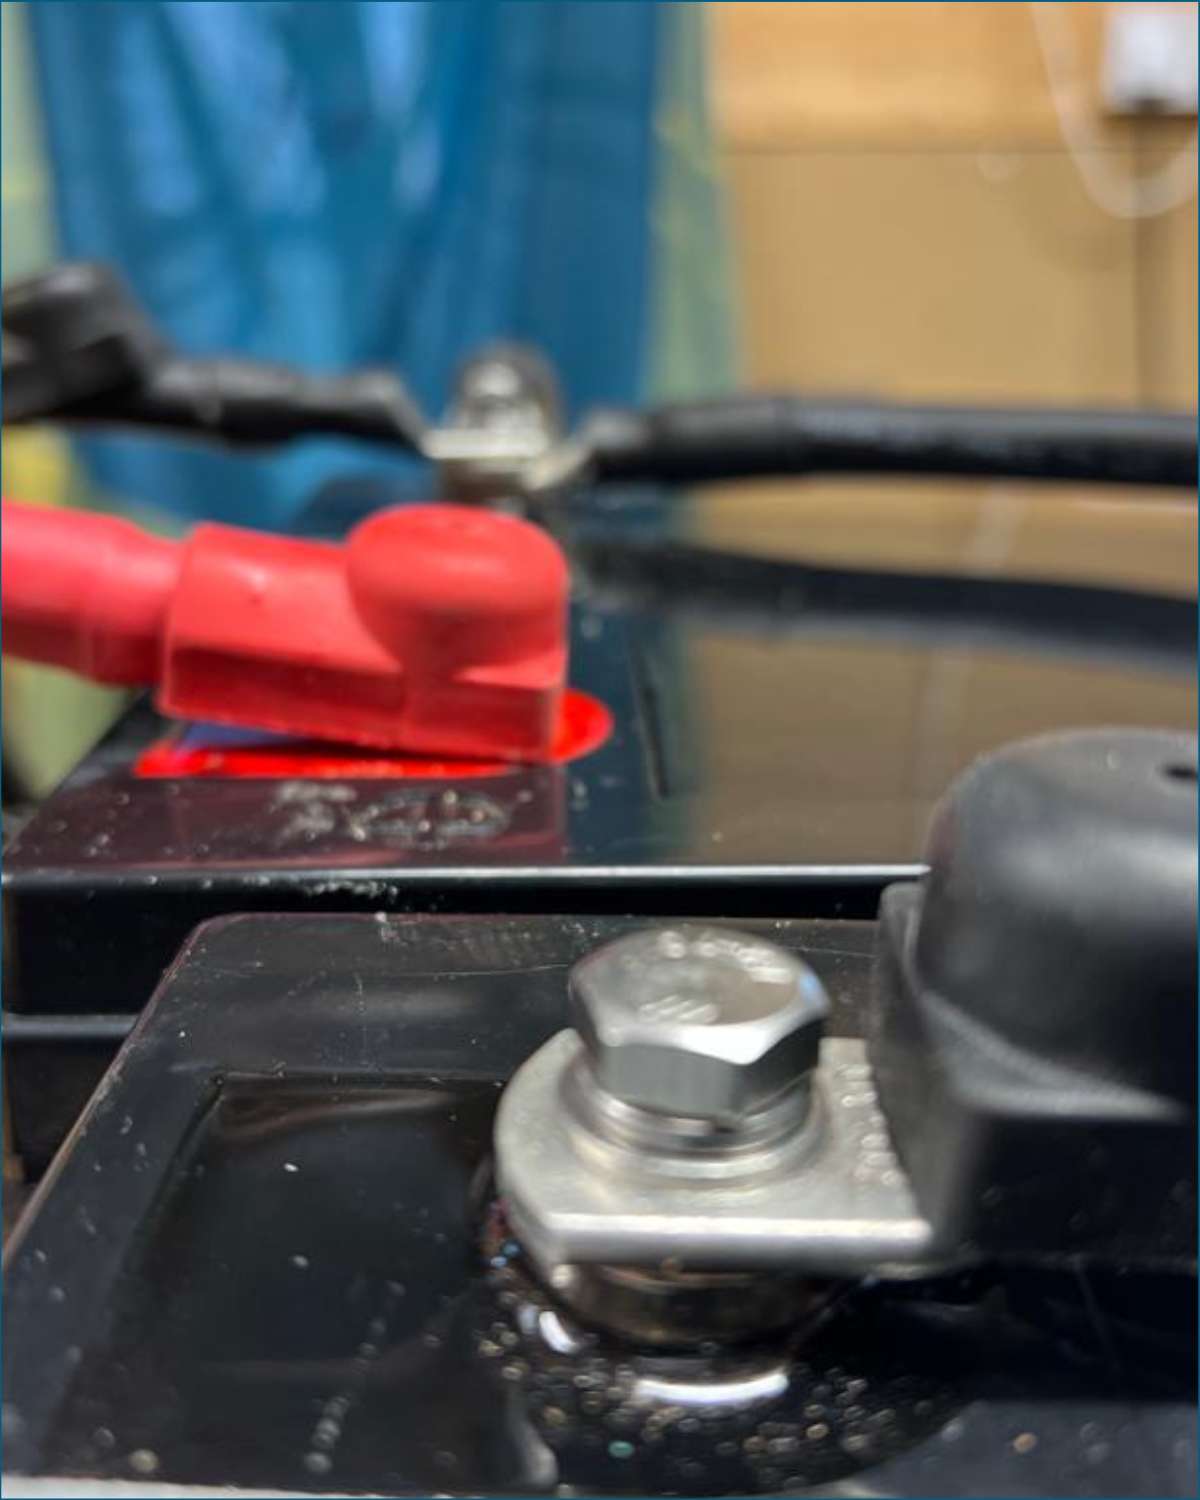
Battery Cut Off Switches
Isolators or battery cut off switches are safety mechanisms allowing the battery to be isolated.
Choose a cut off switch plenty big enough to cope with the entire amp hour capacity of the batteries with wriggle room for future expansion.
Battery Terminal Eyes
Wire Lugs or battery terminal eyes allow you to connect the solar panel cable to the battery.
Heat Shrink
Heat shrink seal electrical joints to cover the bare wires.
Solar Panel kits
Solar panel kits are pre-packaged configurations including most of the components need to install an RV solar panel system.
Each of our diagrams include an appropriately sized solar kit with the components list if you’d prefer to buy your solar panel system this way.
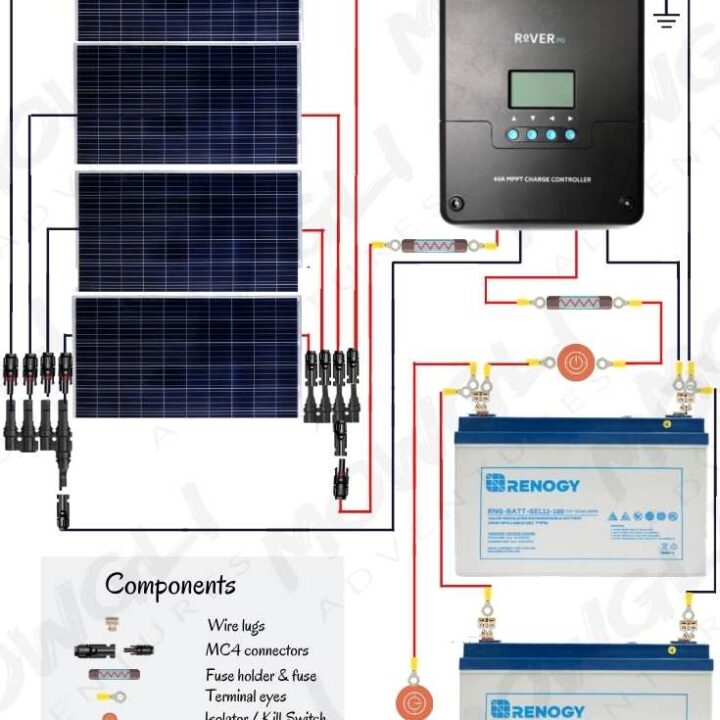
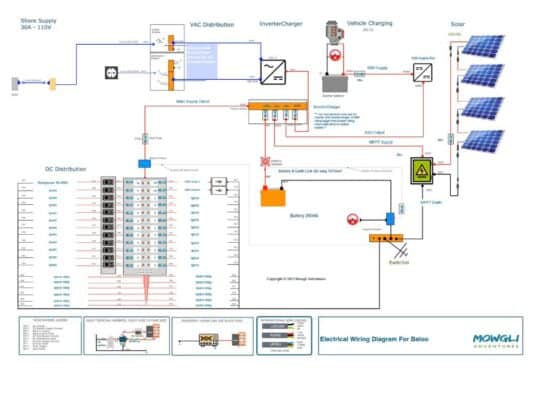
RV Solar Panel Wiring Diagrams
Here’s a list of each RV solar panel wiring diagram we have. Just click the link to go straight to the wiring diagram for the size closest to your chosen system.
Each wiring diagram provides:
- a detailed wiring diagram for the given size – both series and parallel,
- what you can reasonably expect to power with a system of that size,
- tips for future scaleability,
- a complete shopping list of parts needed for a DIY installation and
- where available, pre-configured solar panel kits.
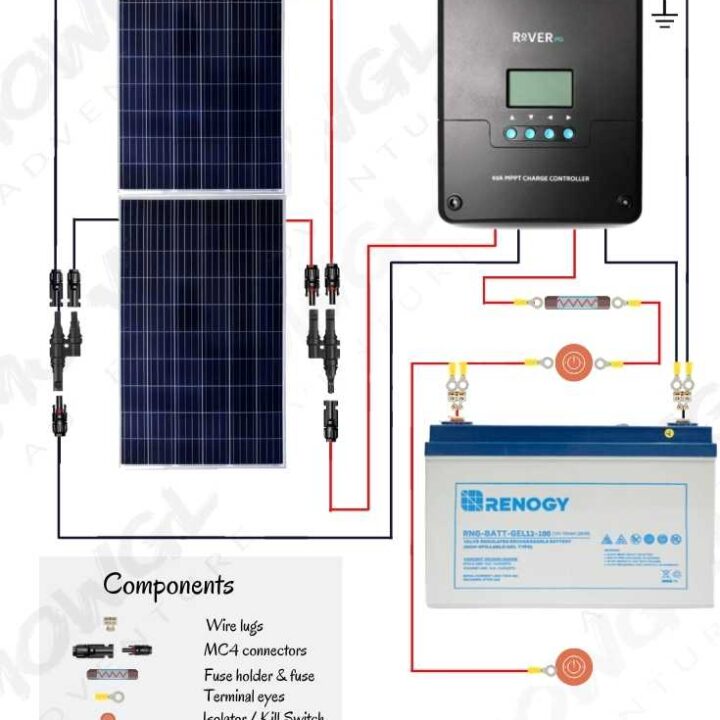
100 Watt Solar Panel Wiring Diagram & Kit List
A 100 watt solar set up is an ideal starter size or for small campers with little energy demand or roof space.
And with the right sized components, it will be cost effective to scale up in the future when your budget allows.
200 Watt Solar Panel Wiring Diagram & Kit List
A 200 watt solar set up gives a little more luxury in small campervans.
With careful use, 200w of solar is enough for living in a van full time in fair weather conditions, perfect for sun chasing van lifers.
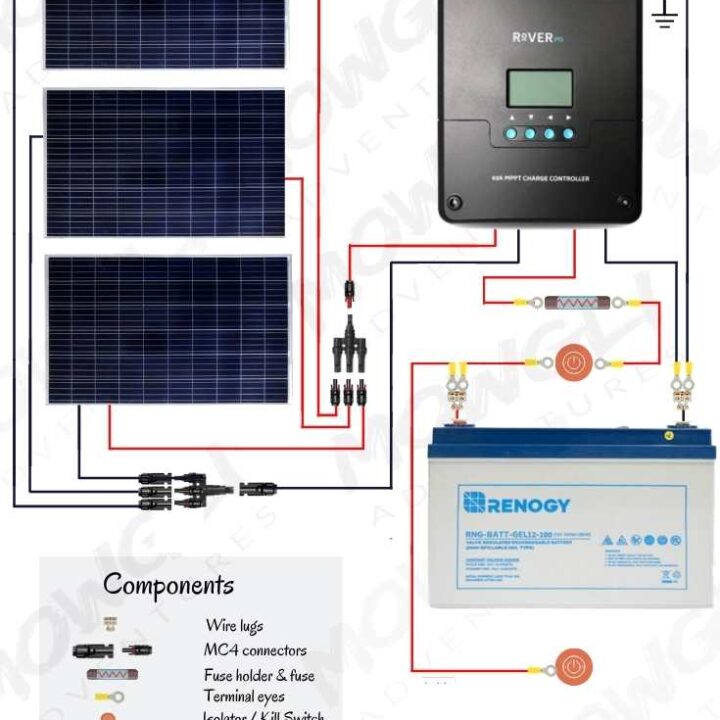
300 Watt Solar Panel Wiring Diagram & Kit List
At 300 watts, a solar system is capable of supporting a the energy demands of a couple or even a small family in a medium sized RV.
With careful use and monitoring, this is pretty close to year round living without the need for other energy sources like driving or hook up.
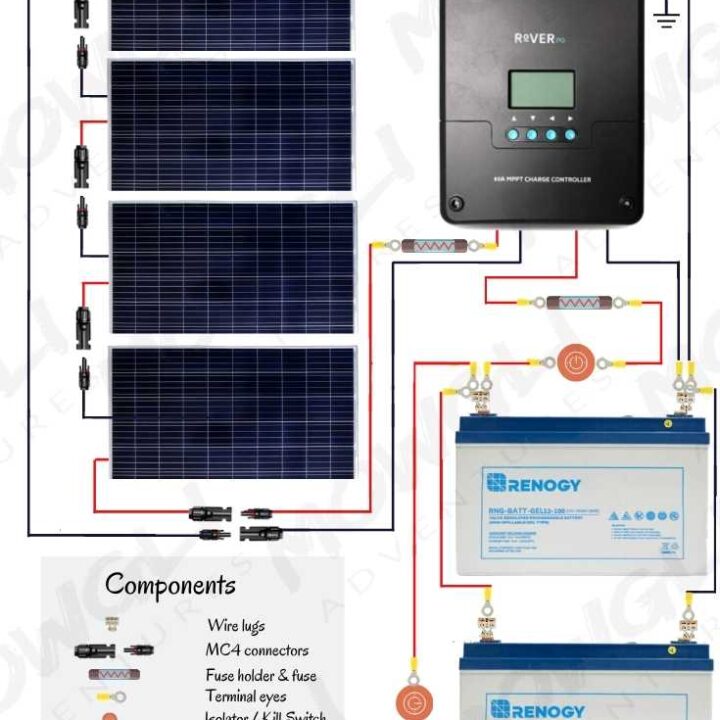
400 Watt Solar Panel Wiring Diagram & Kit List
With careful usage and monitoring, a 400 watt solar panel set up in a campervan should be enough for 100% off grid living.
This is goal zero!
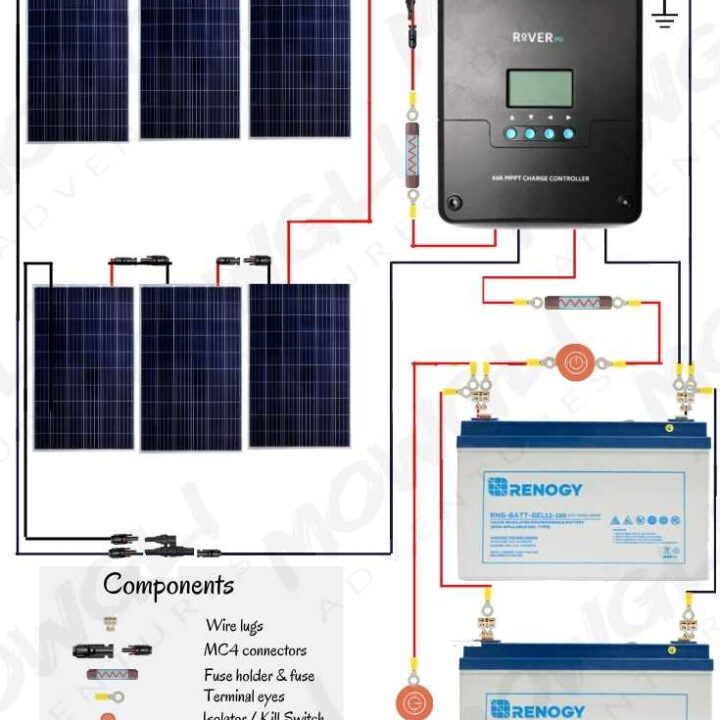
600 Watt Solar Panel Wiring Diagram & Kit List
In a medium sized campervan this is luxury and will support off grid living year round - if you have the roof space for the panels and storage space for the batteries.
800 Watt Solar Panel Wiring Diagram & Kit List
A whopping 800w of solar power should be enough for even the largest of RVs and campervans.
This is our idea of heaven!
Automatically Create Your Bespoke RV Wiring Diagram
Includes 110v & 240v, solar, B2B, batteries, inverters, 12v, 24v & 48v systems, wire gauges in AWG & mm² & much more!
How To Install A 12v Solar Panel System
For a complete step by step guide check out our detailed guide on how to install solar panels on RVs, campervan and motorhomes.
The guide details everything you need to install a campervan solar panel system.
We’ve written it to suit any size of system, the tools and components needed.
Some of the tools can be quite expensive. Unless you expect to get a lot of use out of them in the future, try to borrow them where possible.
The one thing we do encourage you to invest in is the multimeter. Keep it in your toolkit while you’re living in your van.
Check out our complete guide for how to use a digital multimeter in your camper.
It’s on our van life essentials list for good reason!
Graham Bogie

Graham is a seasoned marine electrical engineer with two decades of experience designing customized electrical systems for plant machinery and converting campers and overland vehicles. His expertise has led him to author the reputable Campervan Electrics Handbook and become the chief designer of the RV Wiring Design Tool. As a knowledgeable figure in the field, his YouTube channel, blog, Facebook group, and newsletter, offering electrical advice and product reviews, reach more than a million users each year.
Looking for a complete wiring diagram for the complete RV system for starter battery to caravan/trailer duel lithium batteries. Including all breakers, Anderson plugs, MMPT and dcdc chargers and isolator if needed.
Basically I have an Isuzu tray with canopy towing a trailer with 240 watts solar on the roof, and 2 x 120AH lithium batteries.
EXELLENT , EASY TO FOLLOW AND WELL EXPLAINED
None now. Winterizing now. Planning for off the grid camping next spring.